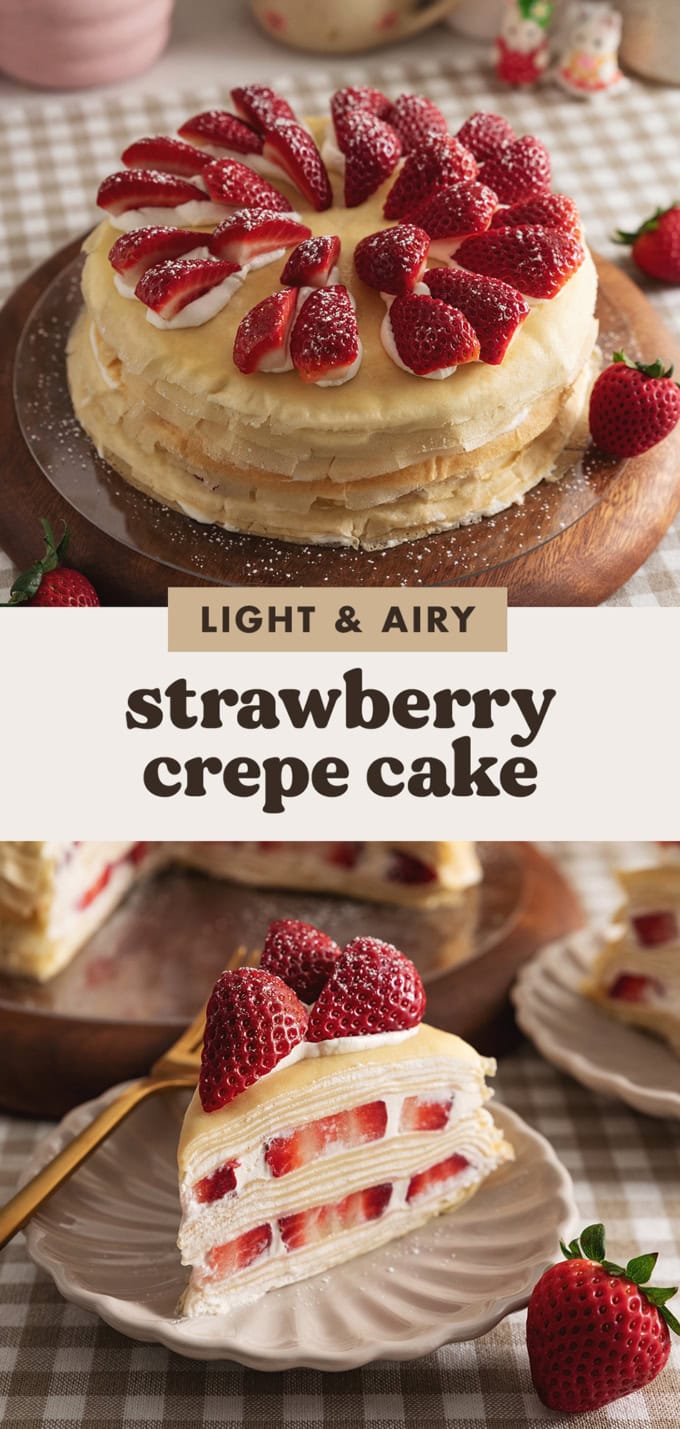
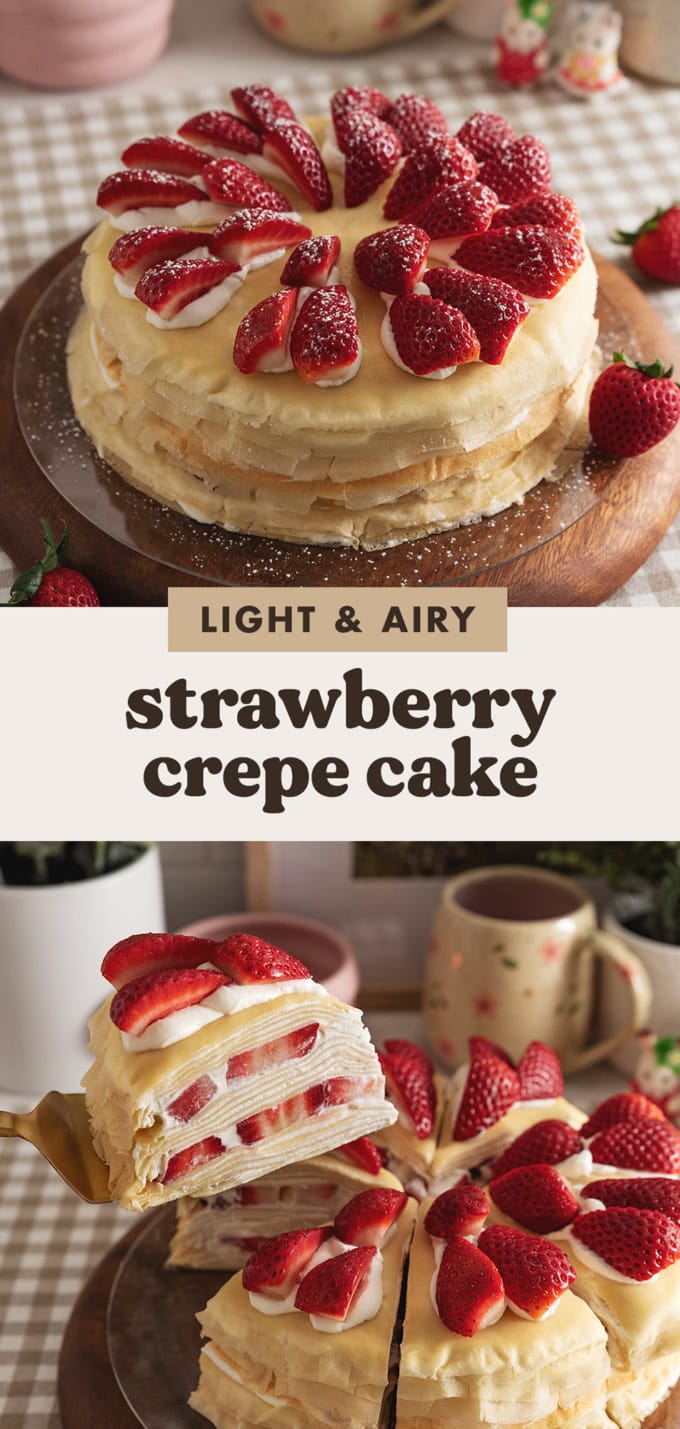
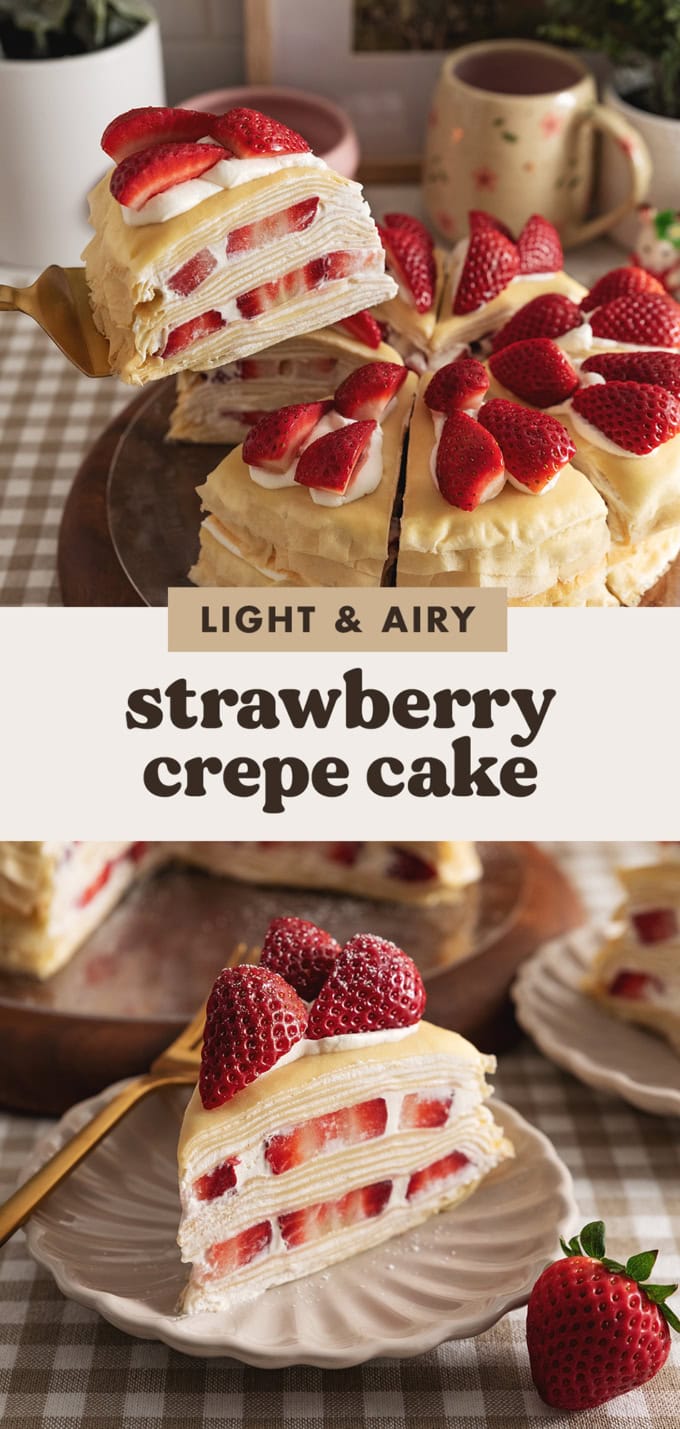
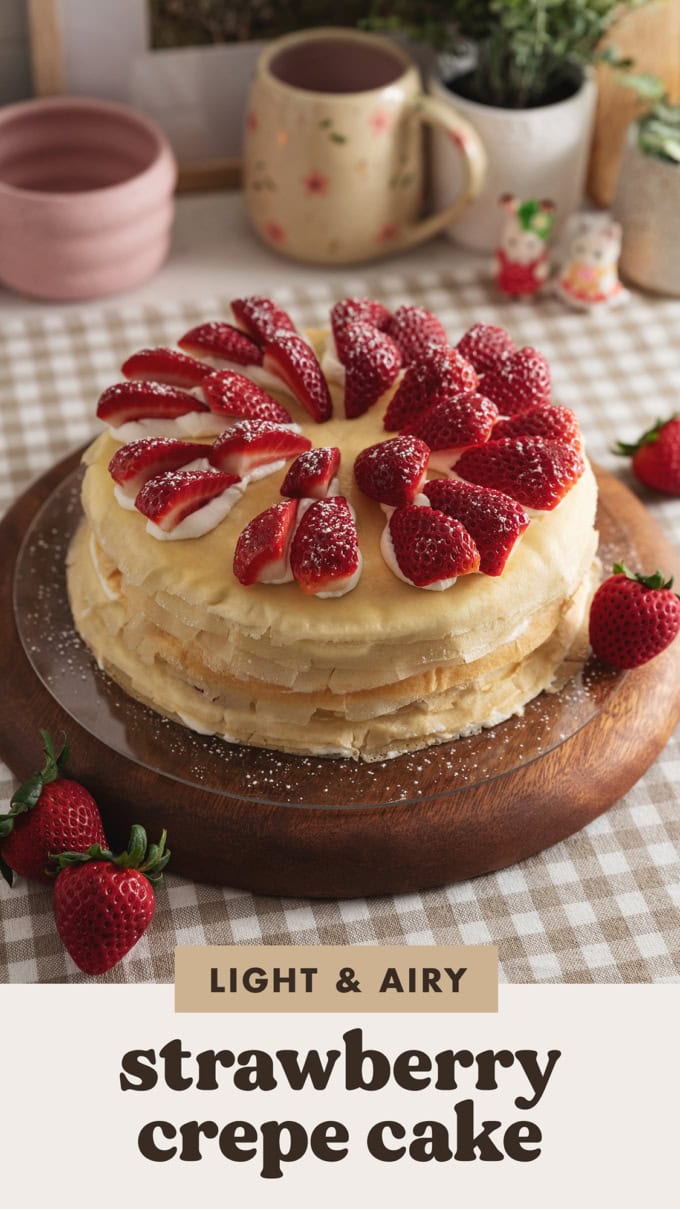
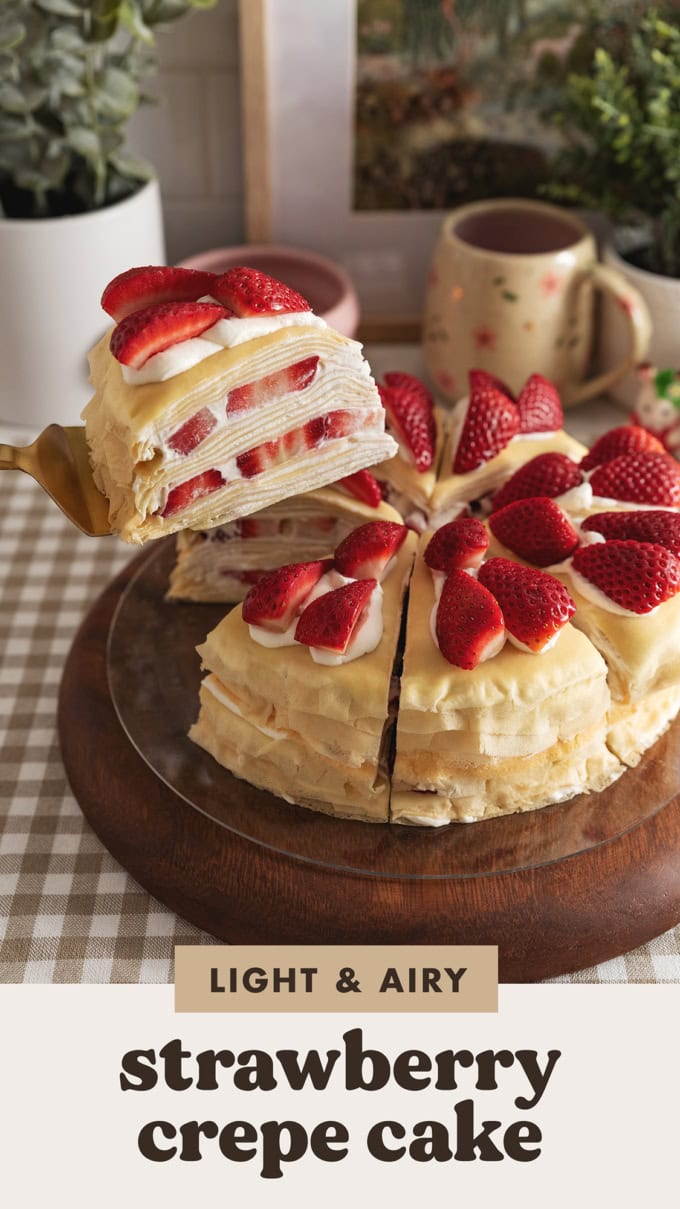
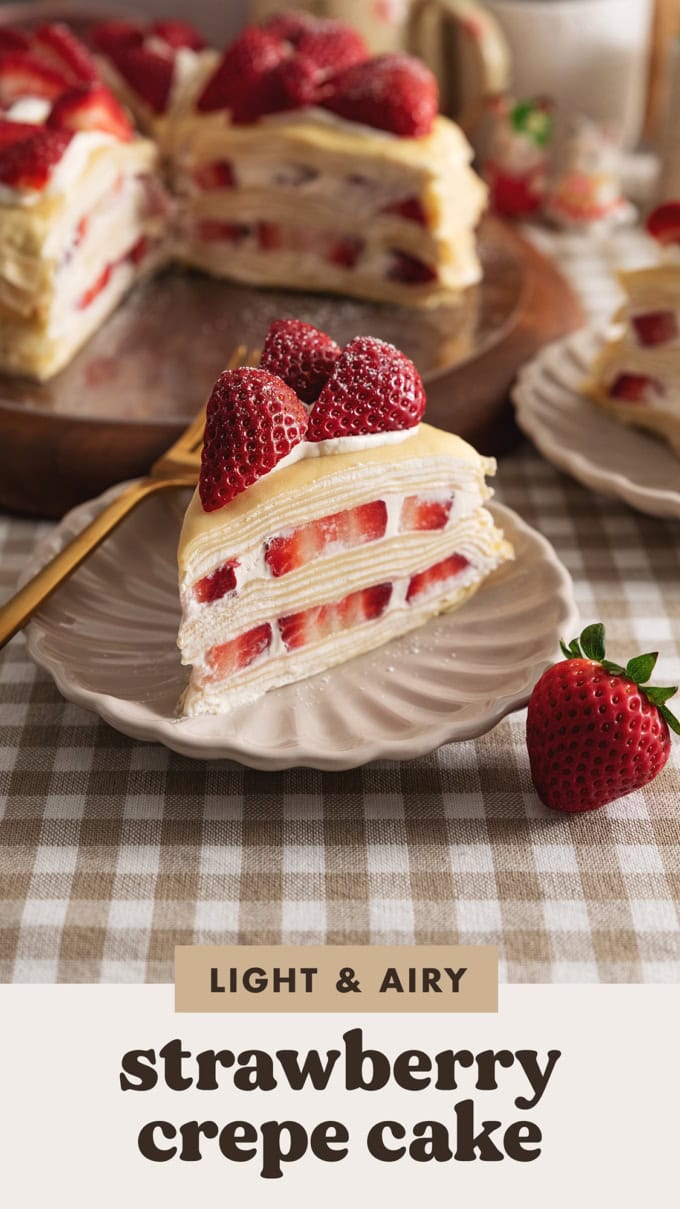
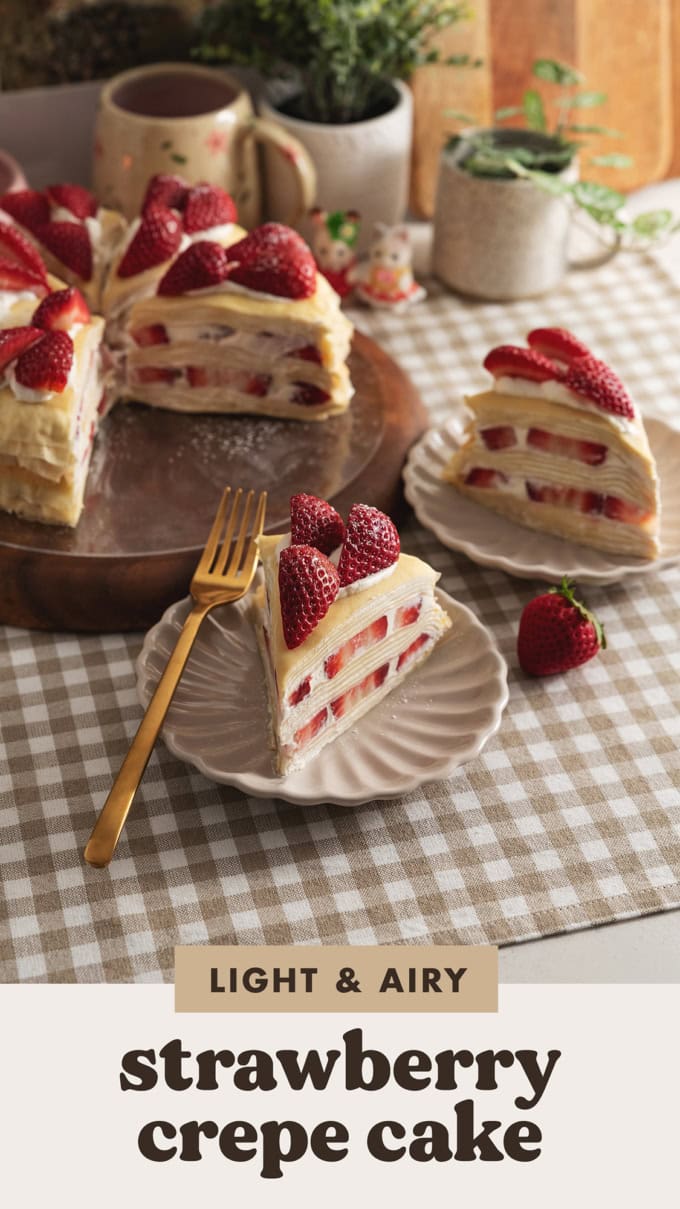
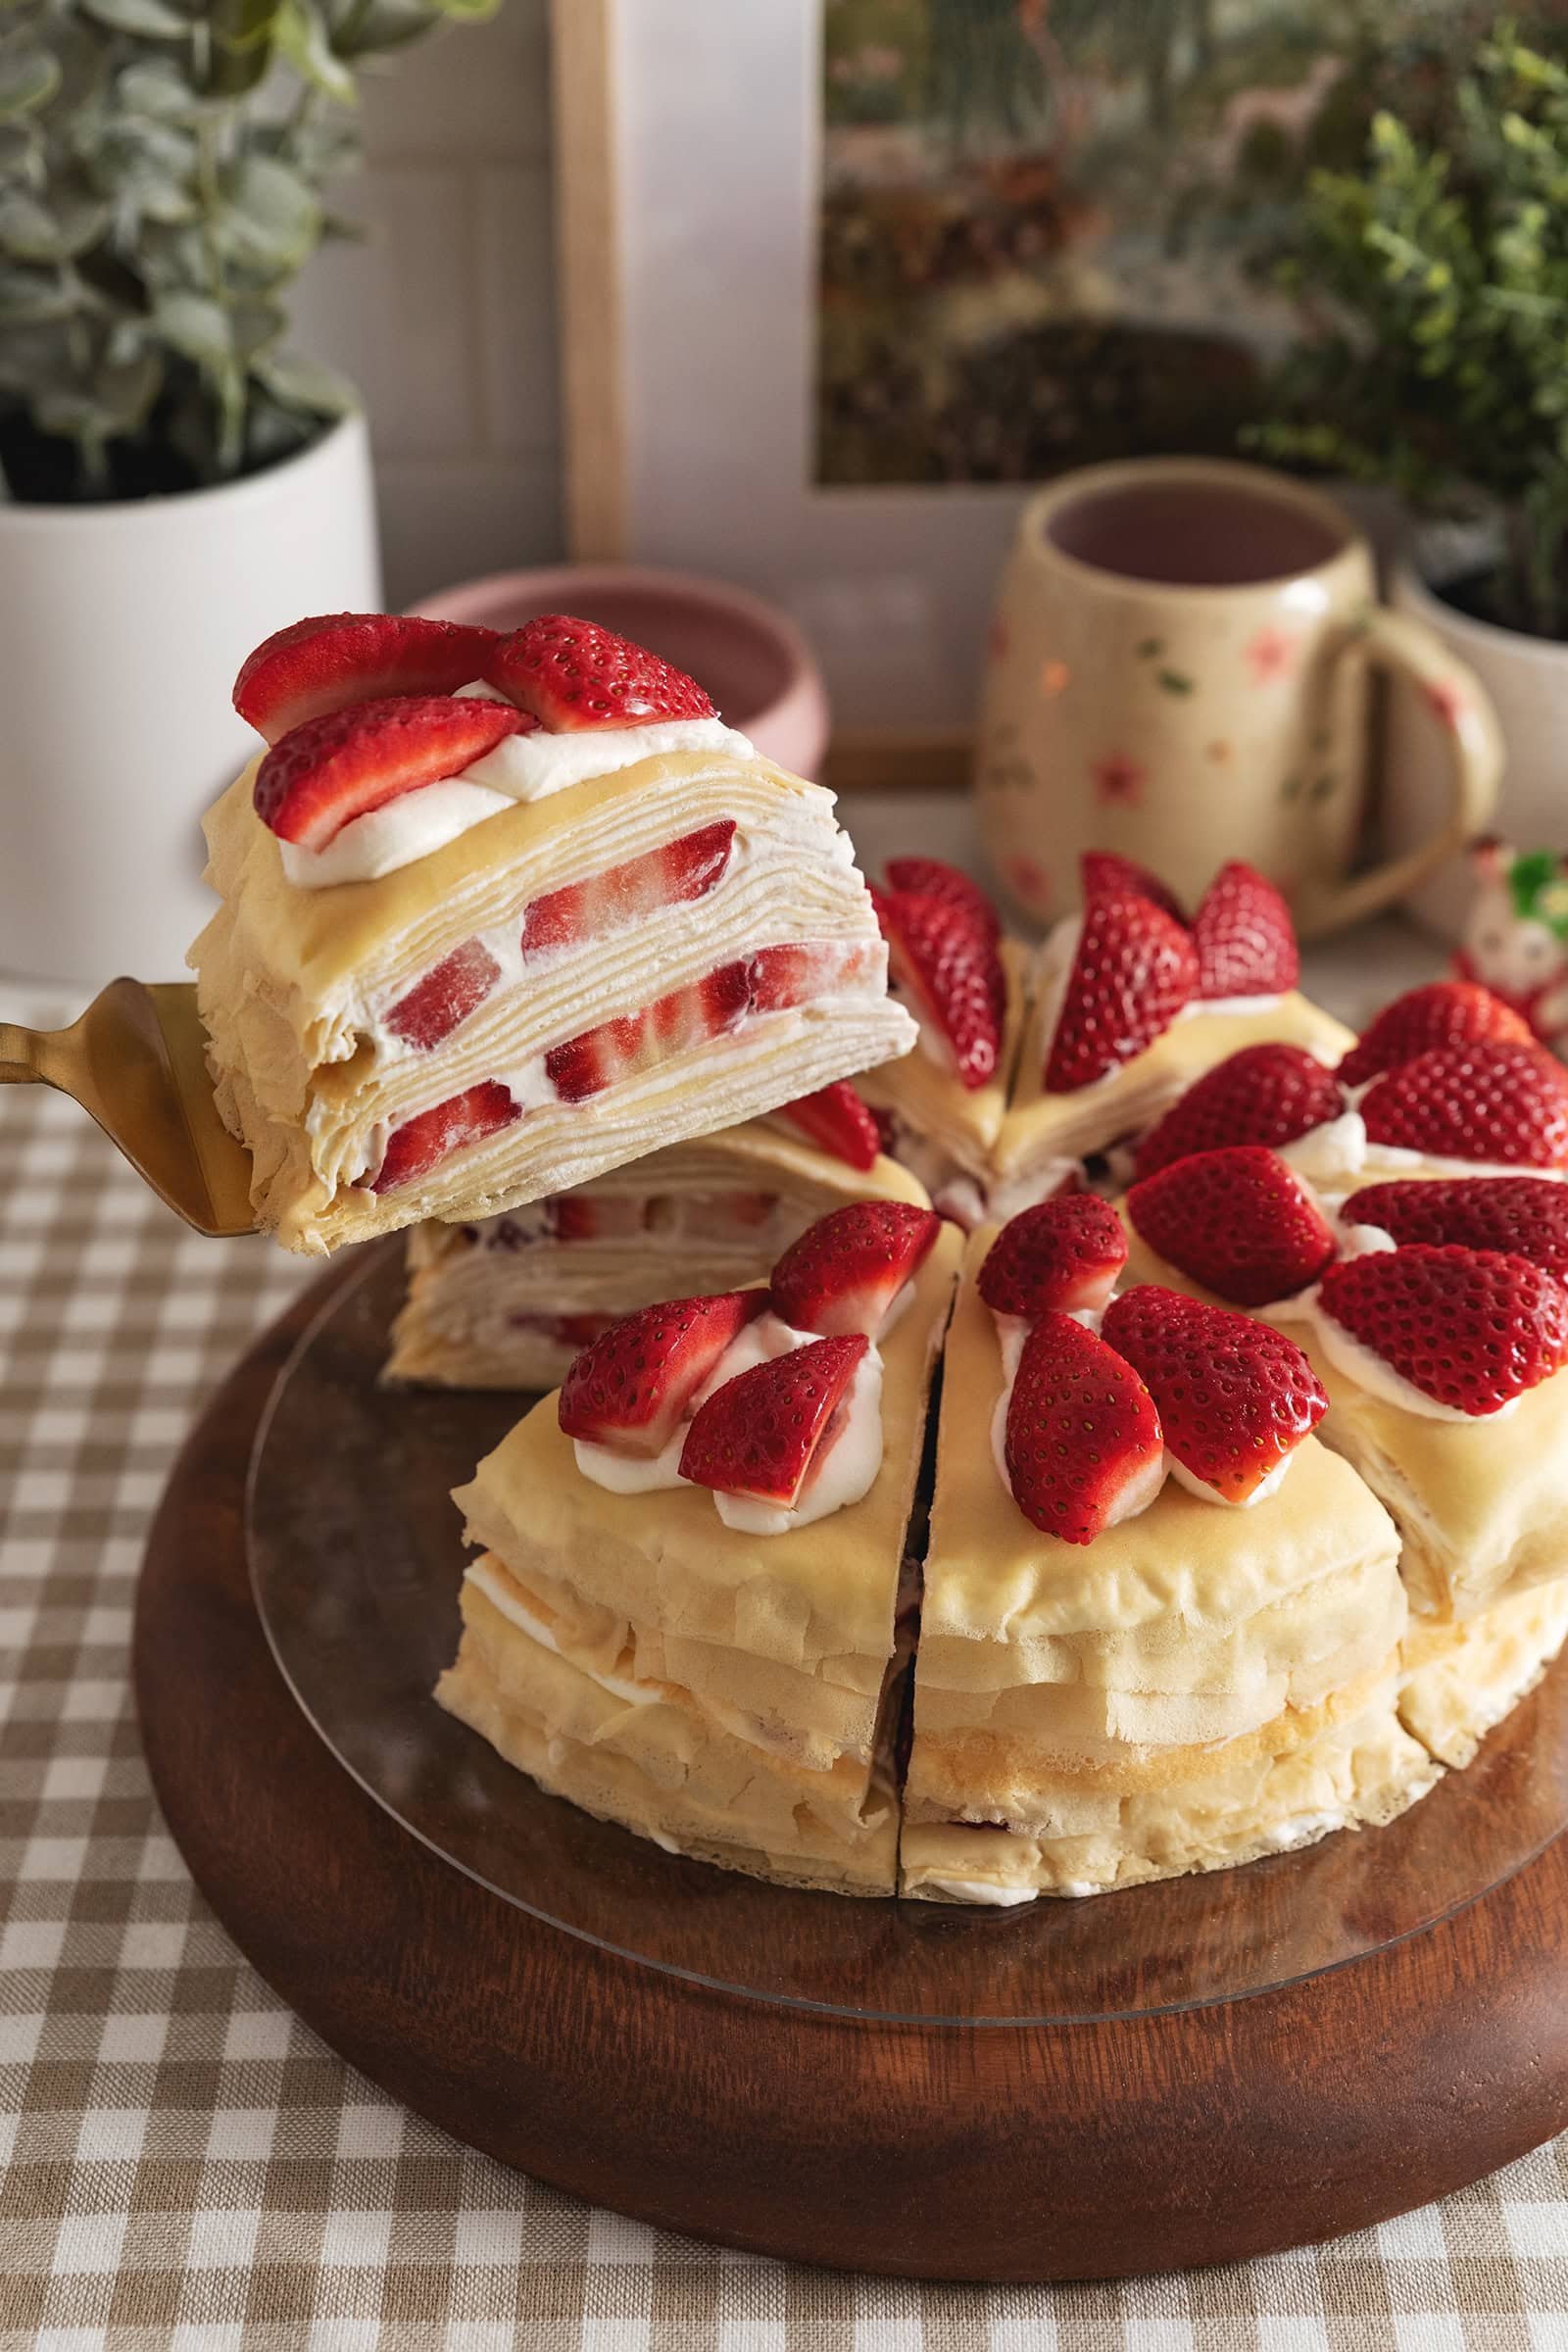
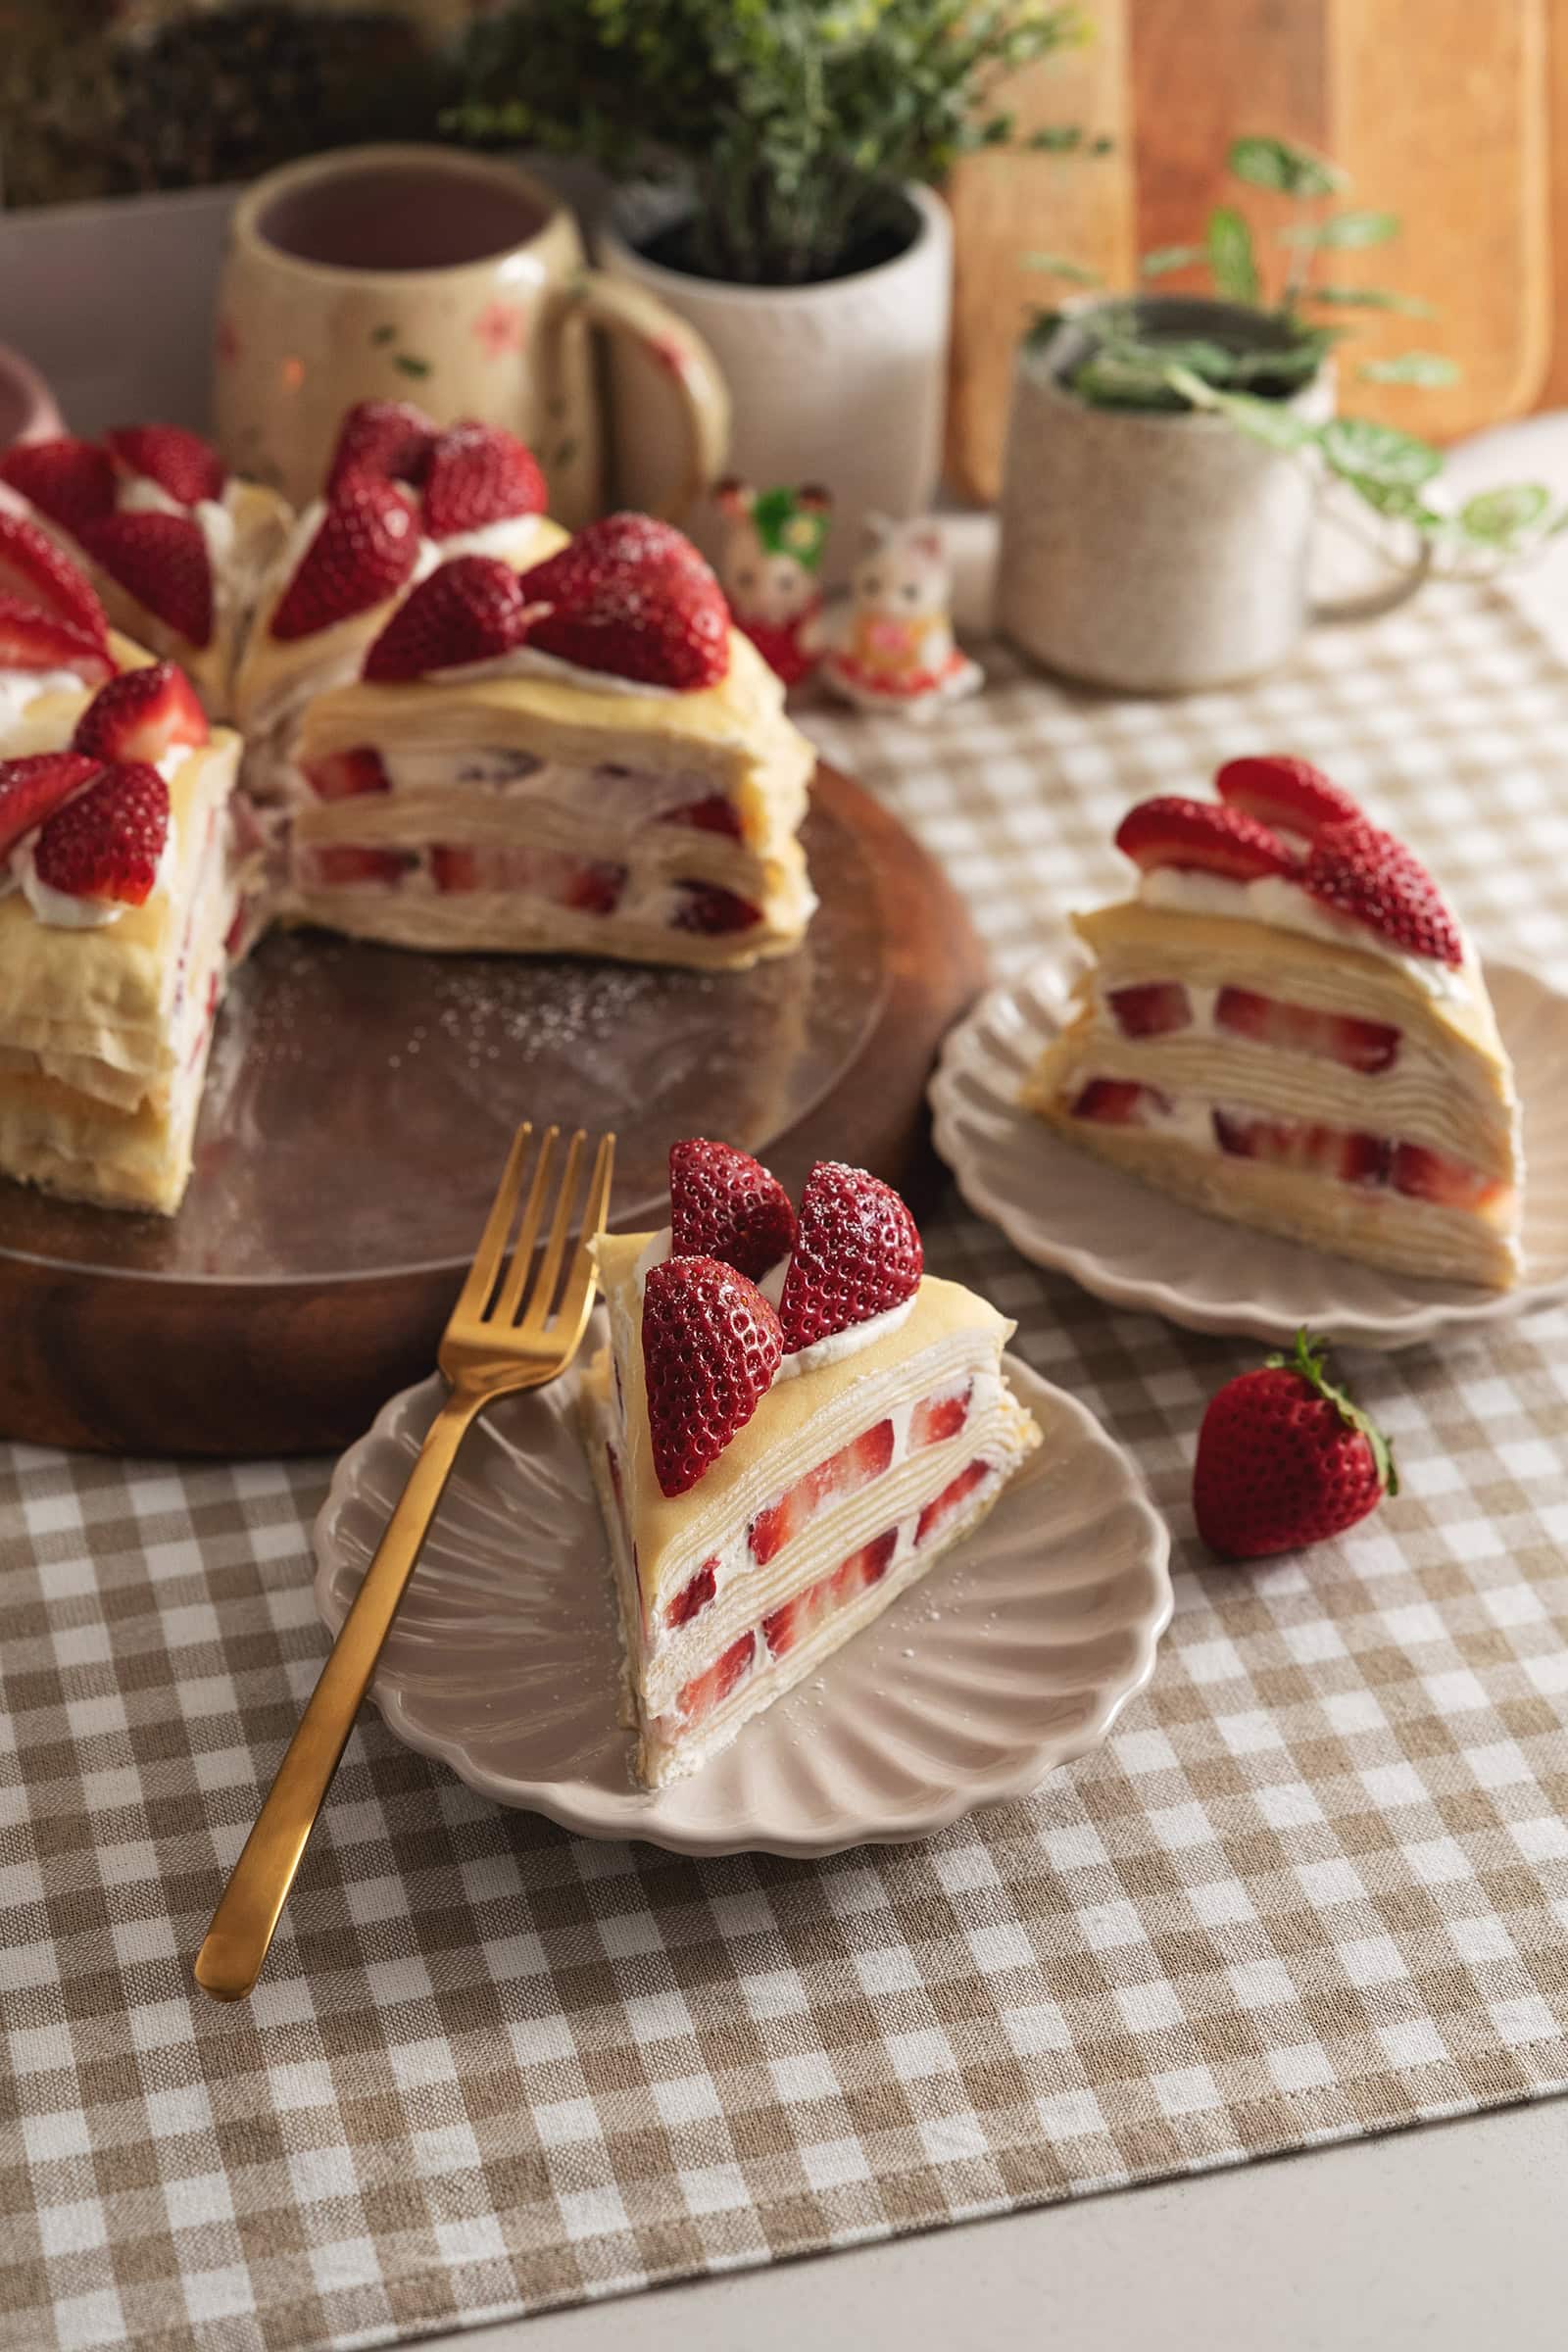
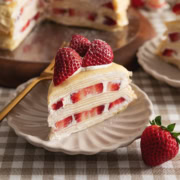
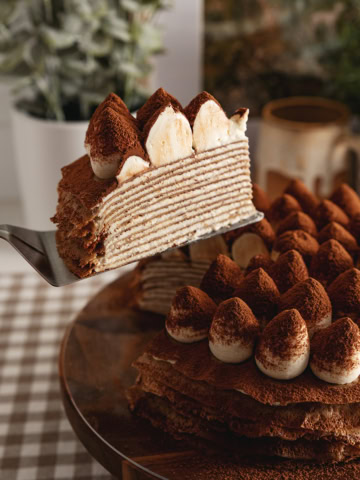
This light and airy strawberry crepe cake is made with 15 layers of thin crepes sandwiching fresh strawberries and whipped cream. It's an easy and elegant cake that takes just a bit of patience!

Jump to:
Notes from the baker
I've made a few crepe cakes in the past but I think I've finally gotten the crepe recipe closest to how I want them to be - a thin and watery batter that is easy to spread in a pan with any special crepe-making tools but thick and pliable enough to not rip.
This strawberry crepe cake is the most classic variation of a crepe cake. Simple, elegant, and beautiful with the pops of colour and fruity flavour. It's a combination that I would make again and again and it's also perfect for Valentine's Day, Galentine's Day, Mother's Day, birthdays, or for anyone who will appreciate the time and effort it takes to make a slightly laborious crepe cake (it's worth it!).
Why you'll love this recipe
- Super thin and buttery crepes. No special crepe-making tools needed.
- Light and airy whipped cream. Keeps the cake moist and creamy without being too sweet!
- Fresh strawberries. A fruity contrast to the rich flavours.
- No-bake recipe. This cake is made on a stovetop only. No oven needed.

Tools
- Whisk - The crepe batter can be made with only a manual whisk. You can choose to use a hand mixer but it's not necessary.
- Fine mesh sieve - This is used to remove any clumps of flour or egg in the crepe batter to make it very smooth and silky (and prevent lumpy crepes!).
- Electric hand mixer - I prefer using a hand mixer to make whipped cream because my arm gets tired when using a whisk. You can use whichever you prefer!
- 10" frying pan - A 10" frying pan or skillet will make crepes that are about 8-9" in diameter. You can use a smaller pan for smaller crepes. Try to only allow the batter to cover the flat bottom of the pan, not up the curved sides.
- Cake turntable (optional) - A turntable is not required but it makes spreading the cream on the crepes easier since you can rotate the cake.
- Offset spatula - An offset spatula has the perfect angle for spreading whipped cream on top of the crepes.
- Piping bag - This is for piping the whipped cream on top of the cake or any other designs you want to make as decoration.
Ingredient notes
As always, the full recipe card with ingredient amounts and instructions is at the bottom of this post! Keep reading for more details on each ingredient or skip ahead to the recipe.
- Eggs - These should be at room temperature before using them.
- Granulated sugar
- Cake flour - Cake flour contains less gluten than all-purpose flour and creates softer crepes.
- Unsalted butter - This should be melted and cooled.
- Milk - This should be at room temperature to prevent the butter from solidifying upon contact with the cold milk. I like to warm up the milk at the same time as I'm melting the butter.
- Vanilla extract
- Whipping cream - You can use whipping cream for a lighter texture or heavy cream for a richer and thicker texture.
- Powdered sugar
- Strawberries - Use fresh and ripe strawberries for the best colour and flavour. The strawberries on the inside of the cake should be cut into coins while the strawberries on top of the cake should be cut into quarters. You can change this up if you like! Finely chopped strawberries on the inside also works very well. You can decorate the top of the cake however you like.
Tips for making the best strawberry crepe cake
- Use room temperature ingredients. This is very important for the crepe batter to come together! You don't want the melted butter to solidify into chunks when it comes into contact with any cold ingredients.
- Chill the batter before using. Chilling the batter allows the melted butter to firm up and thicken the batter slightly. If the batter isn't chilled, the crepes are more likely to rip when cooked.
- Make the crepes as thin as possible. Thinner crepes create a better cake texture when you layer many of them together without being gummy or doughy. To achieve even thinner crepes, you can add slightly more batter to your pan, quickly swirl, and pour the excess batter out of the pan. Keep in mind that thinner crepes are more delicate and harder to work with so it's a fine balance!
- Adjust the heat, cooking time, and amount of batter accordingly. The heat setting that works best for your crepes varies between stovetops. For my stove, I found that exactly medium heat or slightly lower than medium was perfect. If your batter is cooking too fast to be able to swirl it around, lower the heat. If the crepes are taking too long to cook, increase the heat. In terms of batter amount, I found that slightly less than a ¼ cup of batter worked well for 8-9" crepes. Use less batter for a smaller pan or thinner crepes.
- Don't overwhip the whipped cream. Whip the cream to soft or medium peaks and stop. When the whipped cream is whipped to stiff or firm peaks, it ends up becoming a bit dry in between the crepe layers. You'll end up with small pockets where there doesn't seem to be any cream at all since the crepes will soak up a bit of the moisture from the cream.
- Chill the cake before slicing. This is also important! With so many layers of whipped cream, the crepes will likely slide around and the cake ill fall apart if you try to cut it without allowing the whipped cream to set. Chill for at least a few hours or preferably overnight.
Storage
This strawberry crepe cake can be stored covered or in an airtight container in the fridge for up to 3 days.
Leftovers can be frozen in an airtight container for up to 1 month. Thaw in the fridge overnight or at room temperature for about an hour before eating.
Frequently asked questions
Baking by weight is much more accurate than volume. When using US standard cups, ingredients like flour and sugar can easily be overpacked into the cup causing you to add too much of certain ingredients. Recipes with weight measurements are also easier to scale to smaller or bigger batches without dealing with weird fractions. To measure by weight, you simply need a kitchen scale which you can usually pick up for less than $20.
Small measurements are given in tablespoons and teaspoons because most kitchen scales are not accurate under about 10g. Tiny amounts like a ¼ teaspoon may not register accurately unless you have a drug scale. Mixing these measurements is a common practice among other recipe sites and commercial kitchens.
More crepe cake recipes to try
Recipe
Strawberry Crepe Cake
Equipment
- 1 whisk
- 1 cake turntable, optional
Ingredients
Crepes
- 2 large eggs, room temperature
- 50 g granulated sugar
- 80 g cake flour
- 40 g unsalted butter, melted and cooled
- 400 g milk, room temperature or warmed with the butter
- 1 teaspoon vanilla extract
Whipped Cream
- 400 g whipping cream
- 40 g powdered sugar
- 1 teaspoon vanilla extract
Filling & Toppings
- 500 g strawberries, sliced into ⅛" coins
- 6 strawberries, sliced into quarters, for topping
Instructions
Crepes
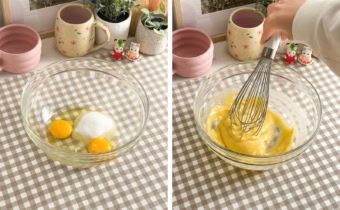
- Whisk: In a medium mixing bowl, whisk together the eggs and sugar until loosened and well-combined. Add the flour and whisk until combined.

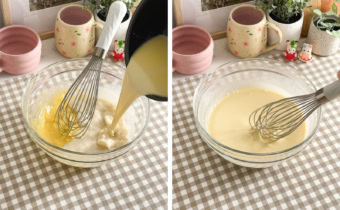
- Liquid ingredients: Add the melted butter, milk, and vanilla extract. Whisk until combined into a thin and watery batter.
- Sieve: Pour the batter through a fine mesh sieve into another bowl to get rid of any clumps of flour or egg. Cover and chill the batter in the fridge for 1 hour.
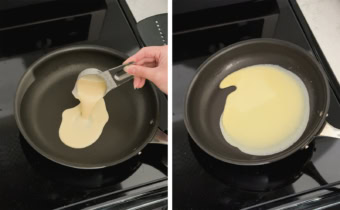
- Swirl pan: Heat a 10" frying pan on medium heat. Use a ladle or a ¼ cup measuring cup to scoop and pour the crepe batter into the middle of the pan. Immediately swirl the pan around to spread the batter. Keep swirling until the batter stops running.
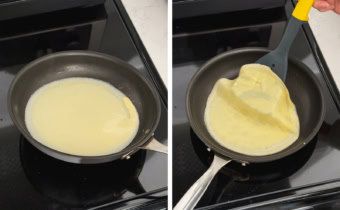
- Cook crepes: Cook each crepe for about 2-2.5 minutes, depending on the thickness, or until the edges of the crepe just barely begin to brown. Run a spatula under the edges of the crepe until you can slide the spatula underneath. Transfer the crepe to a sheet of parchment paper to cool. Repeat with the rest of the batter until you have about 15 crepes. Divide the crepes into three equal piles - in my case, I made 15 crepes so I could make 3 piles with 5 crepes each.

Whipped Cream
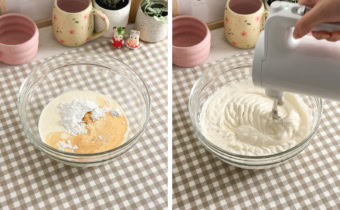
- Whip: In a large mixing bowl, add the whipping cream, powdered sugar, and vanilla extract. Use an electric hand mixer to whip the mixture until it becomes soft peaks.
Assemble the crepe cake
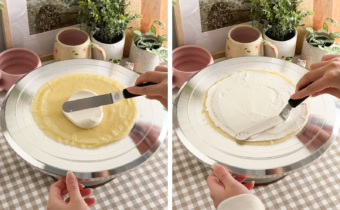
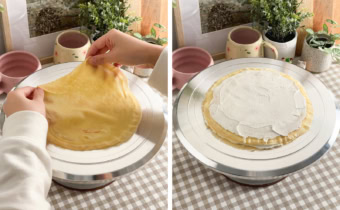
- Spread cream: On a cake turntable, lay down a cake board. Lay down the first crepe. Use a 4-tablespoon to add a scoop of whipped cream on top of the crepe. Use an offset spatula to spread the whipped cream into an even layer, leaving a small edge of the crepe empty for a neater look.
- Alternate crepes and whipped cream: Place another crepe on top and repeat until you have a stack of 5 crepes.
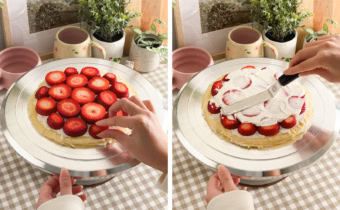
- Strawberry layer: Spread whipped cream on the 5th crepe again. Arrange a layer of sliced strawberries on top of the whipped cream without going all the way to the edges. Add another dollop of whipped cream on top and smooth it over the strawberries and into any gaps.
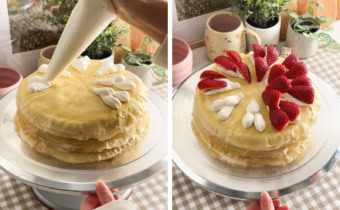
- Repeat: Repeat arranging a stack of 5 crepe and whipped cream layers and create another strawberry layer on top of the 10th crepe. In the end, the layout looks like this: 5 crepes-strawberry layer-5 crepes-strawberry layer-5 crepes.
- Topping decorations: Transfer any remaining whipped cream to a piping bag and snip the tip off. Pipe a few dollops of whipped cream on top of the cake and arrange your quartered strawberries on top.
- Chill: Cover (an upside down mixing bowl is good for this) and chill the crepe cake in the fridge for at least 4 hours or overnight to allow the whipped cream to set before slicing into it with a sharp knife.

Gorgina says
Absolutely amazing and delicious – no complaints at all. Everyone loved it!
1. The recipe is written in a way that’s super easy to follow — simple, clear and made with love.
2. The crêpes, the cream and the seasonal strawberries make an absolutely perfect combination. It doesn’t just look beautiful — it tastes incredibly light and delicious. Not too sweet, just perfectly balanced.
3. It does take some time and patience to prepare, but it’s 100% worth it in the end.
I’d definitely make this recipe again. 10/10!
Emma says
This cake looks beautiful and delicious! I will make this cake soon for sure!
Mel says
This recipe is soooo good tysm
Asma Almulla says
It’s soo delicious and fluffy I looovvvveee how informative the photos are it really made the whole process ssooooo easy ♥️♥️
Thaaank youuu
Mimi says
Your recipes are so easy to follow that even as a non baker I feel like I would enjoy every single part of it! Thank you for your very well detailed explanations and the pictures ! It helps a lot ! Keep doing it! ✨