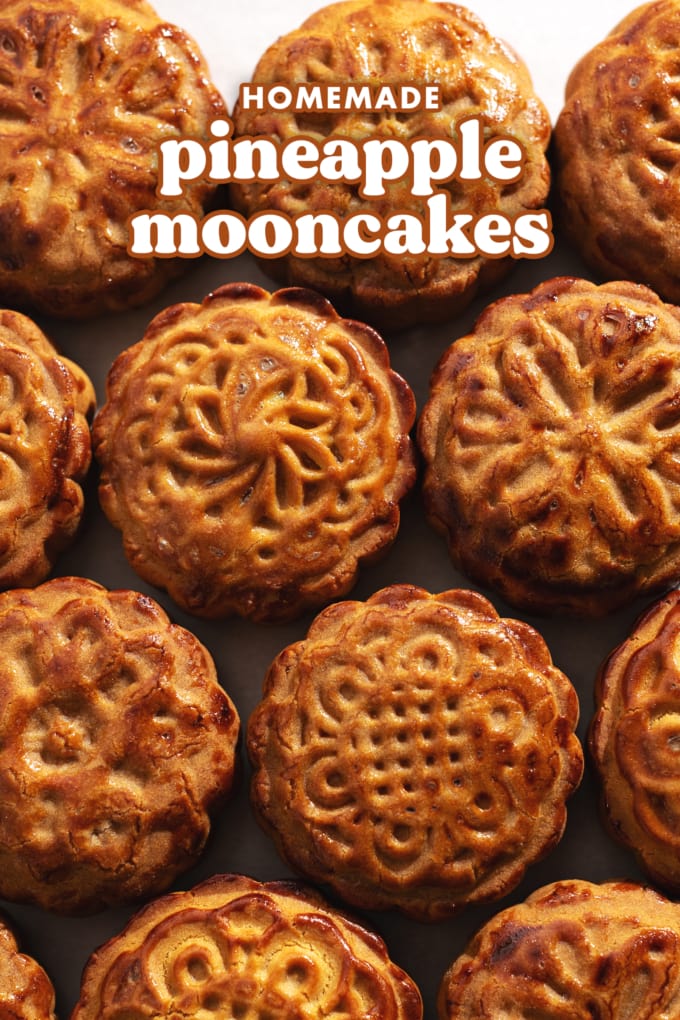
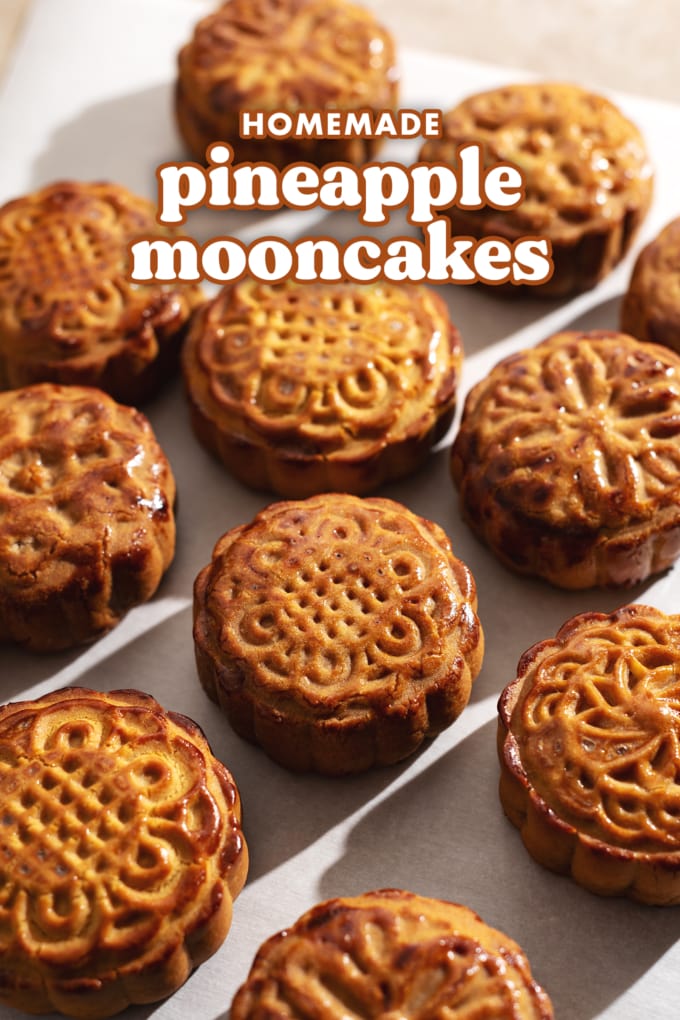
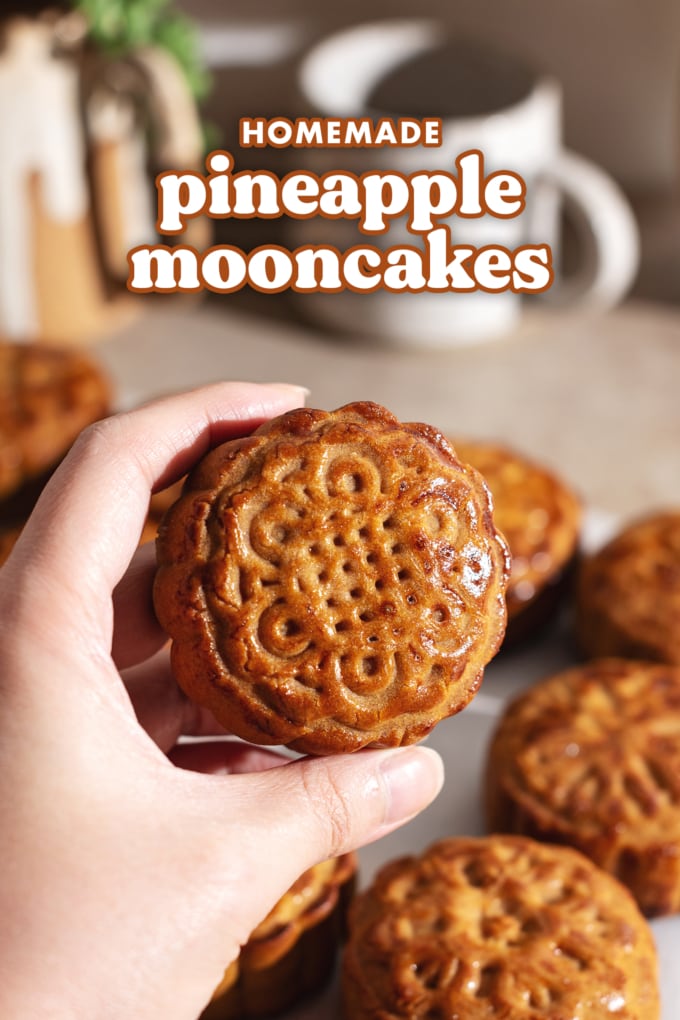
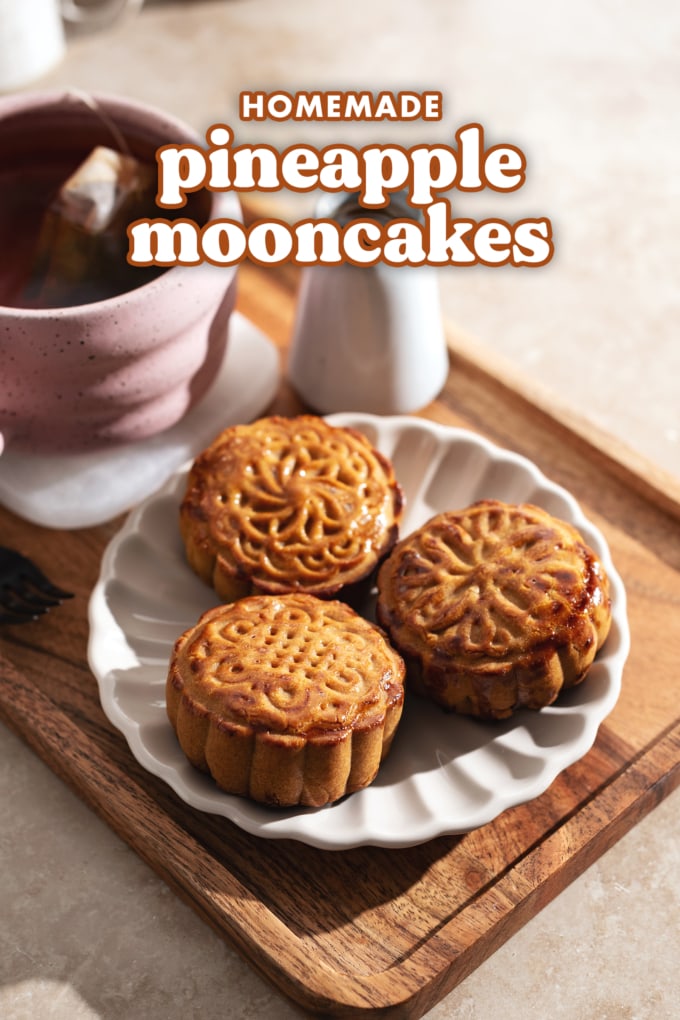
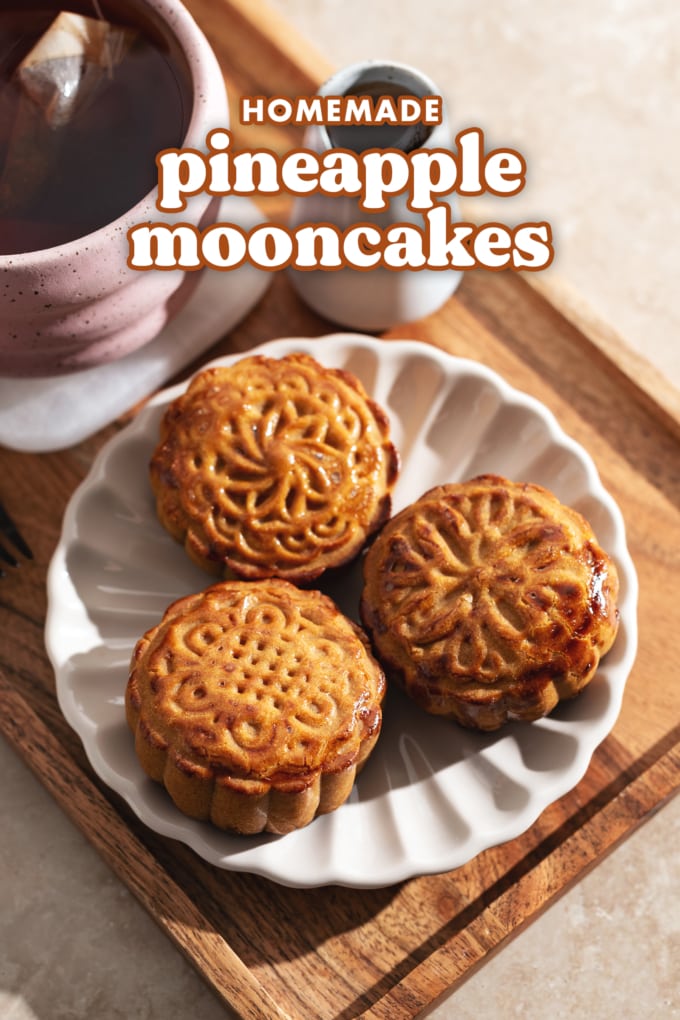
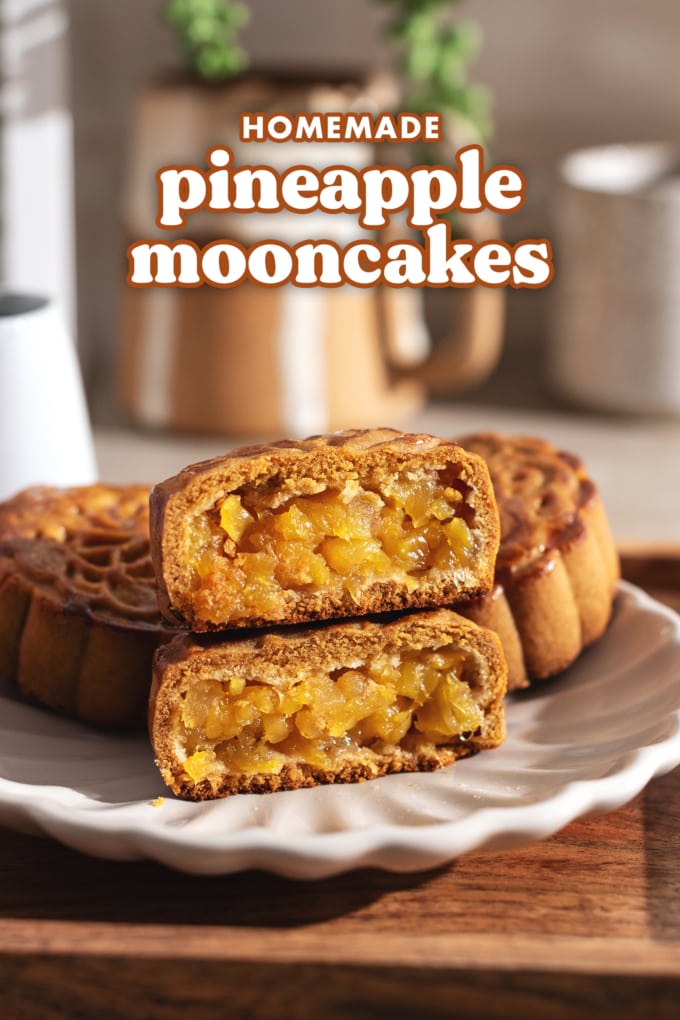
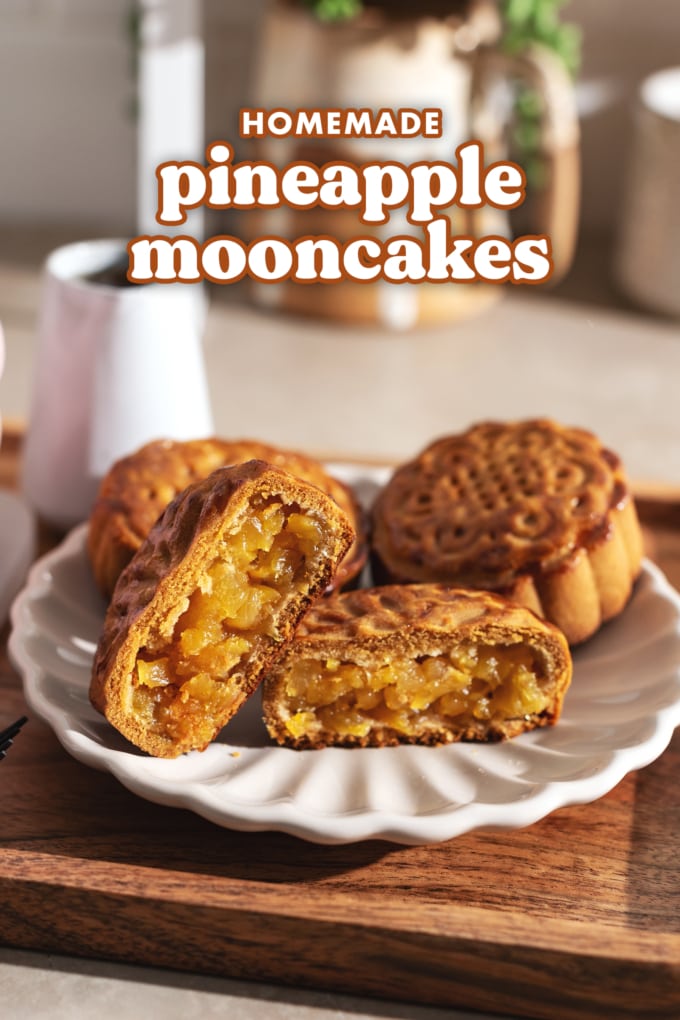
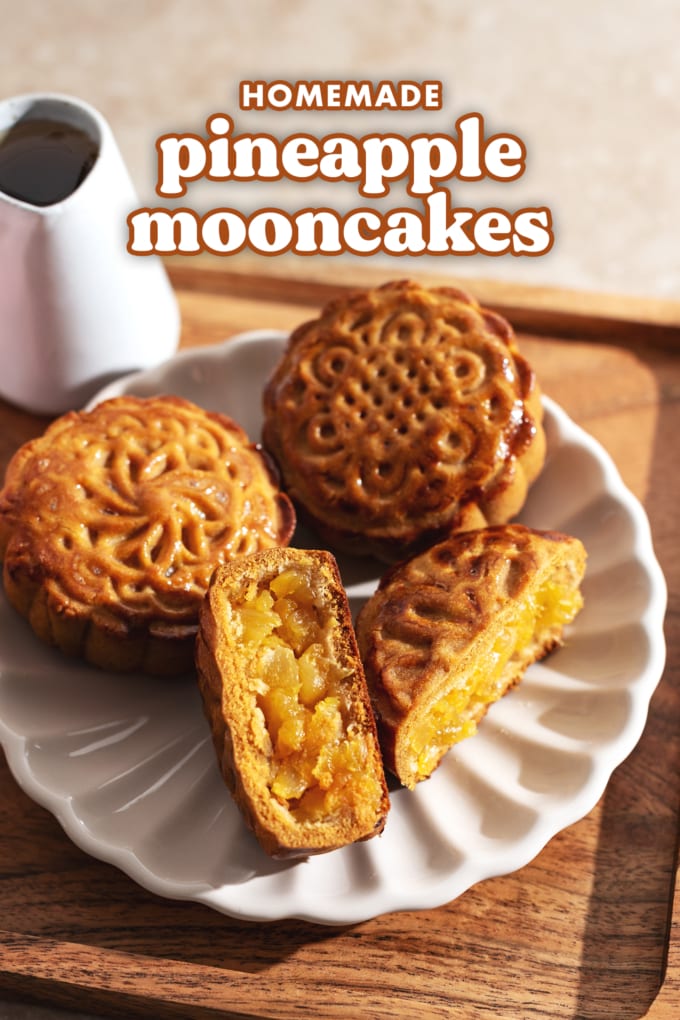
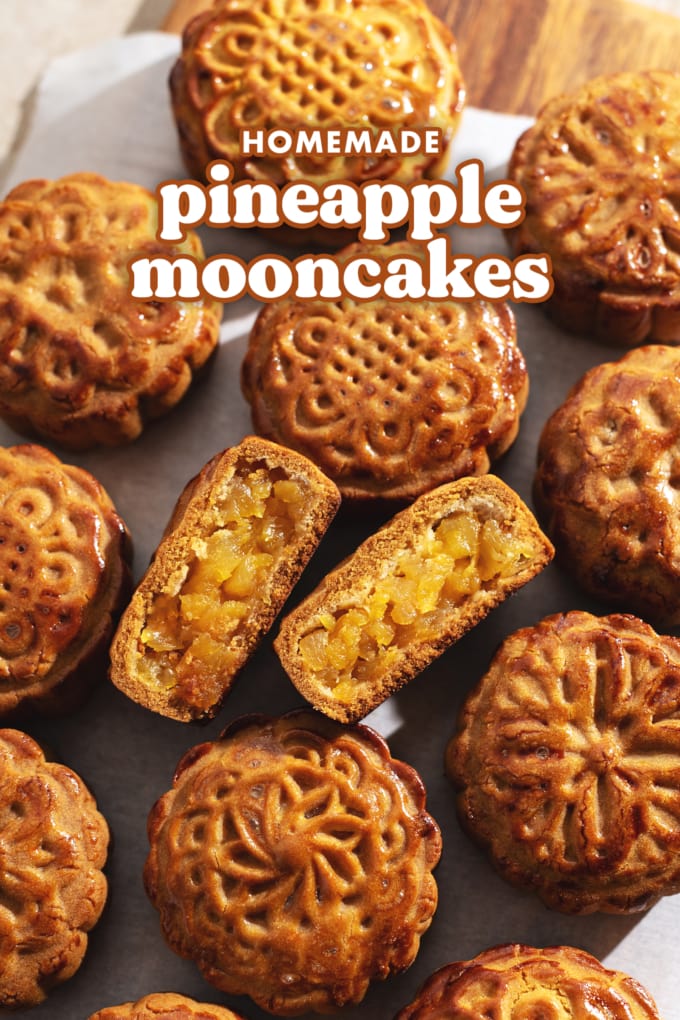
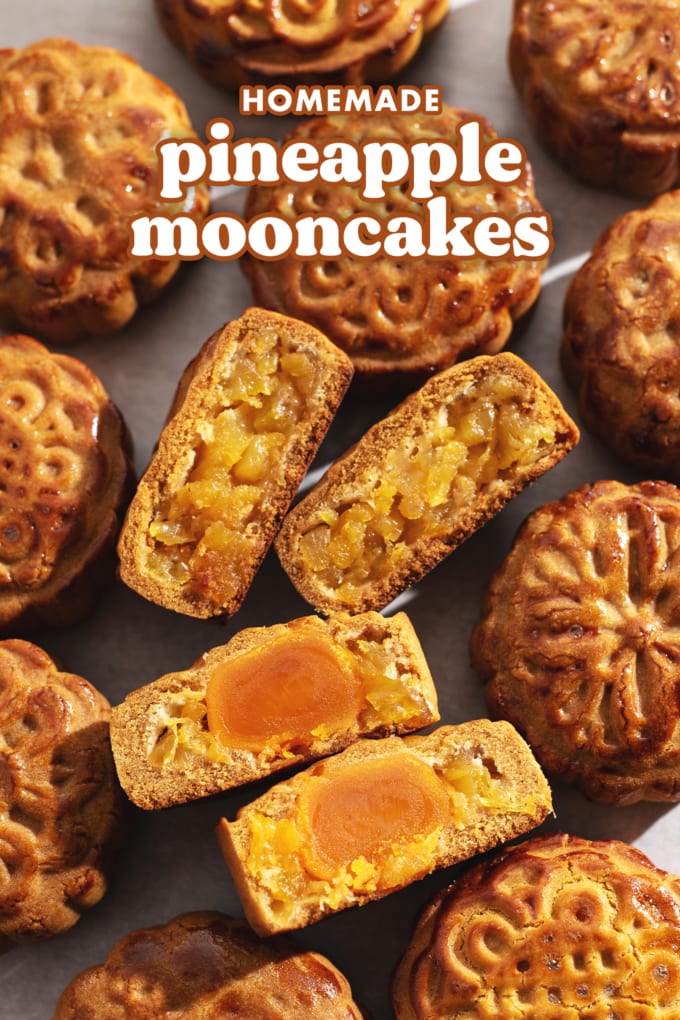
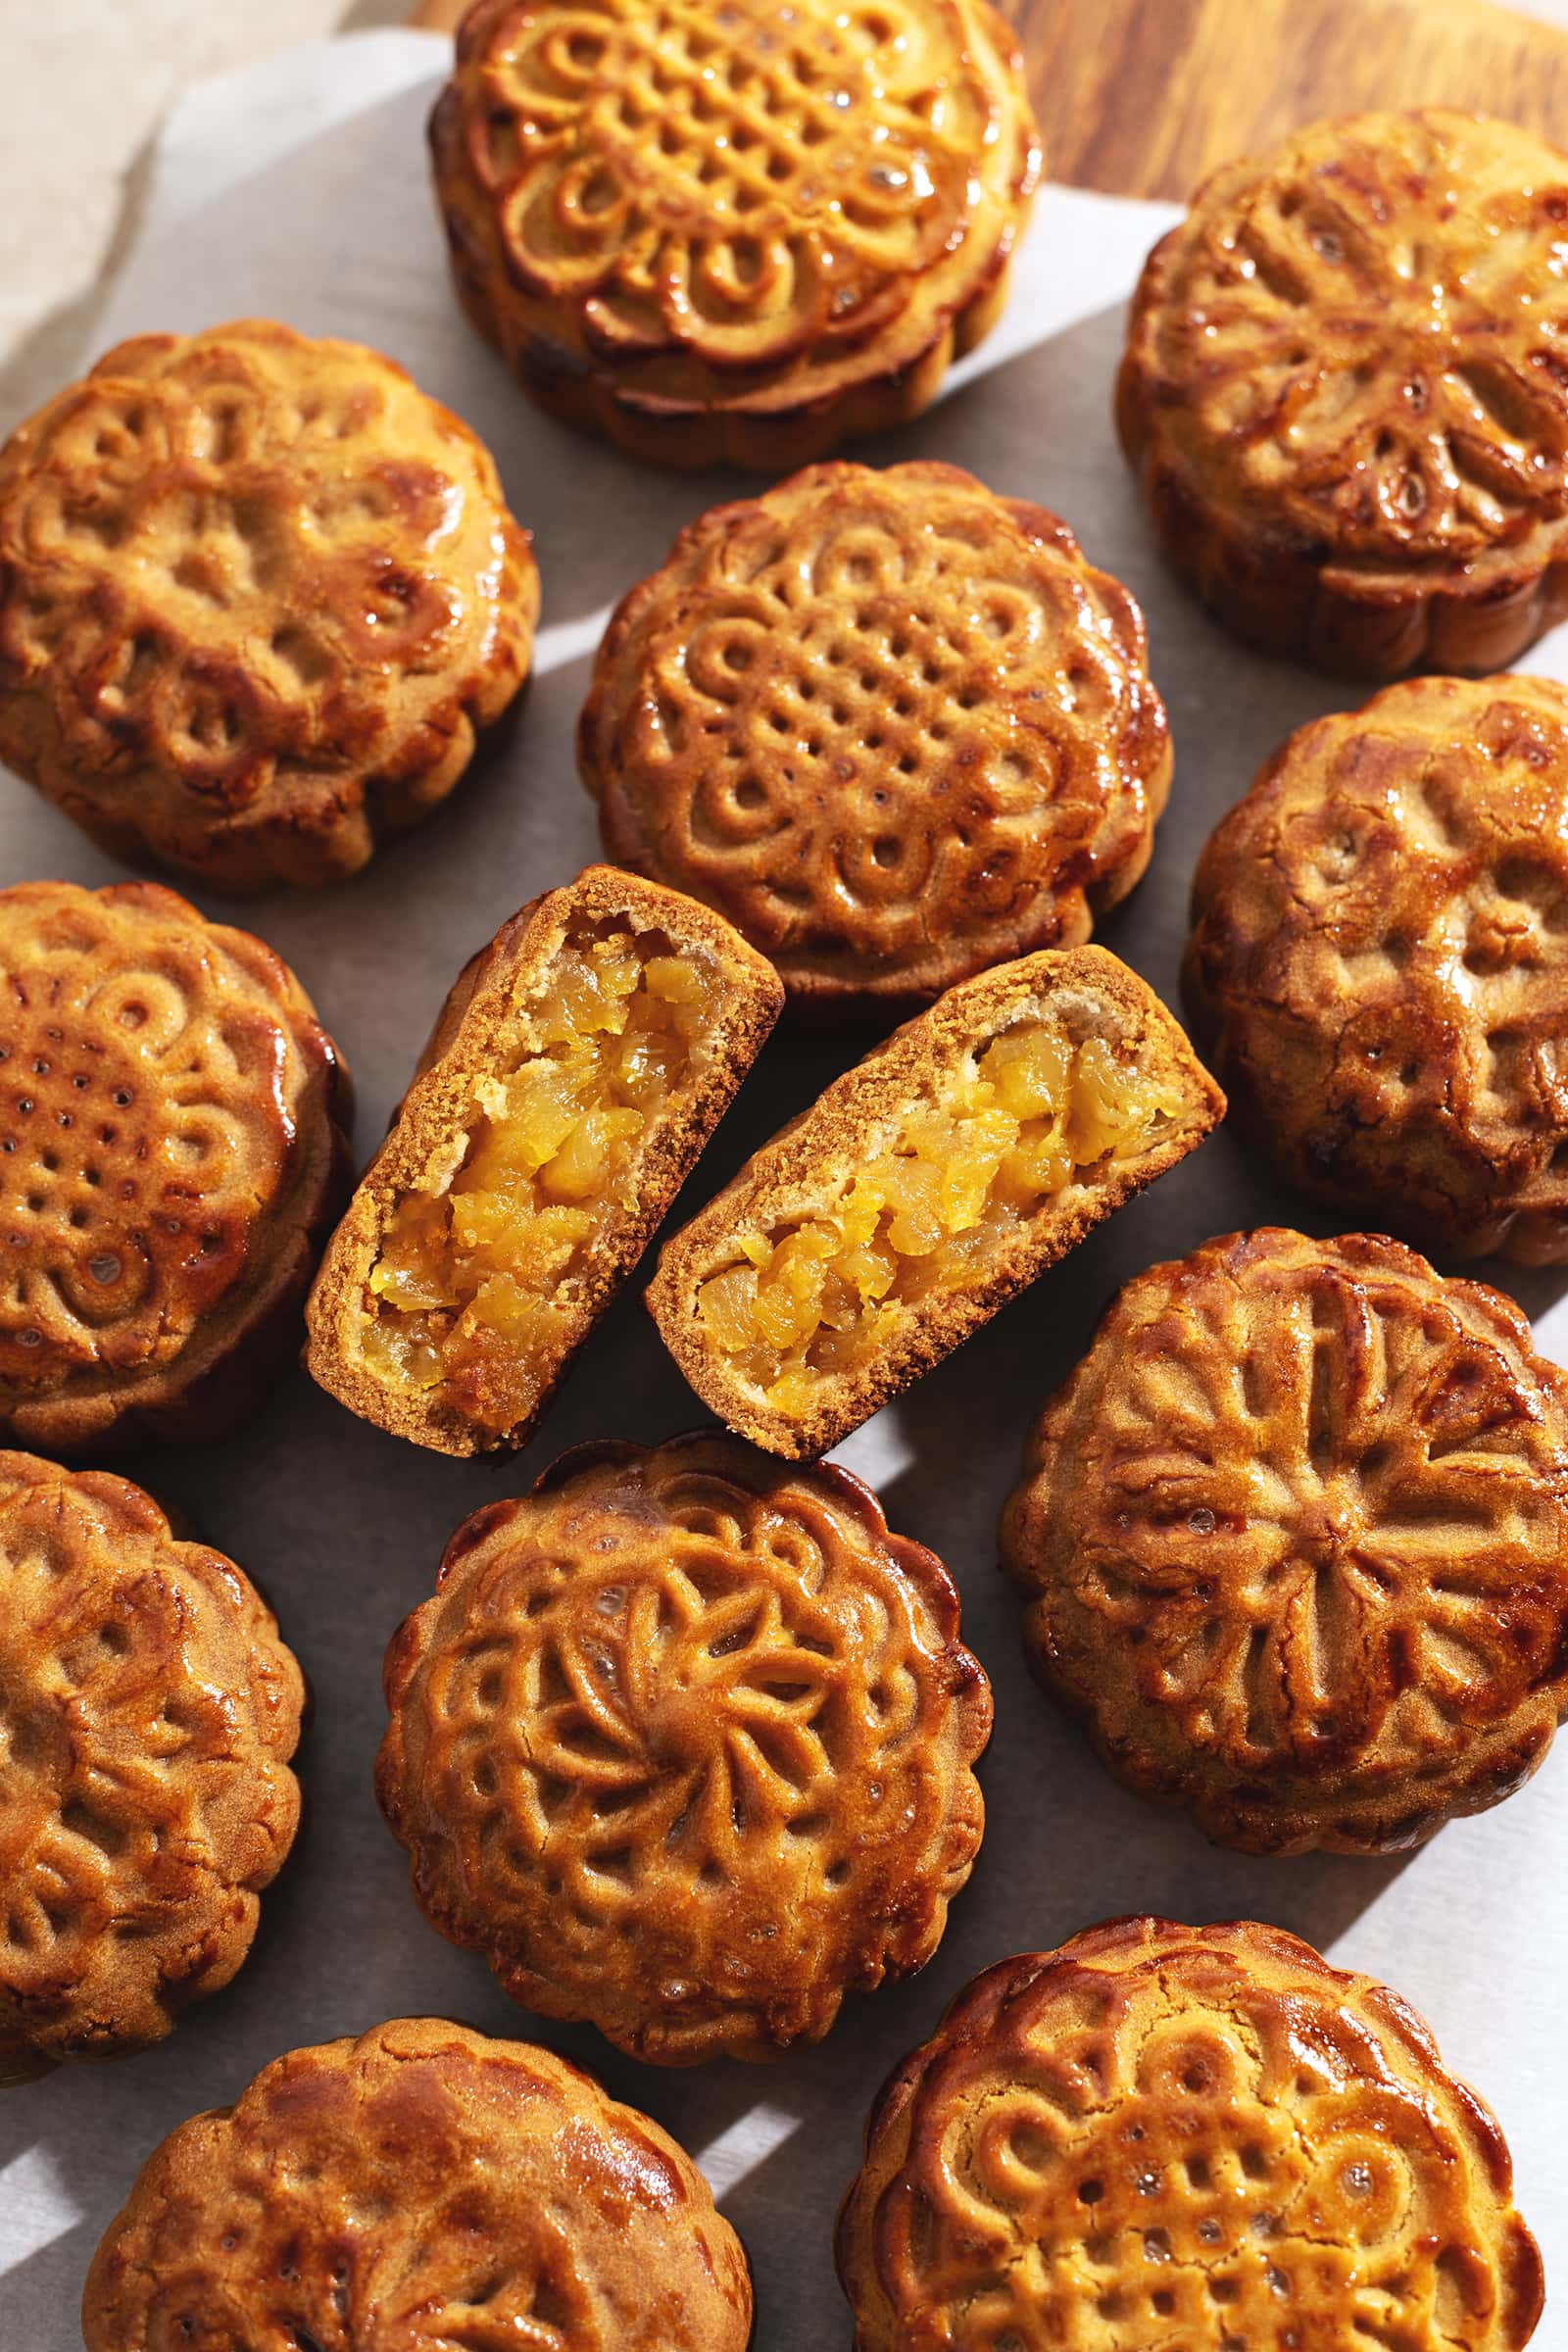
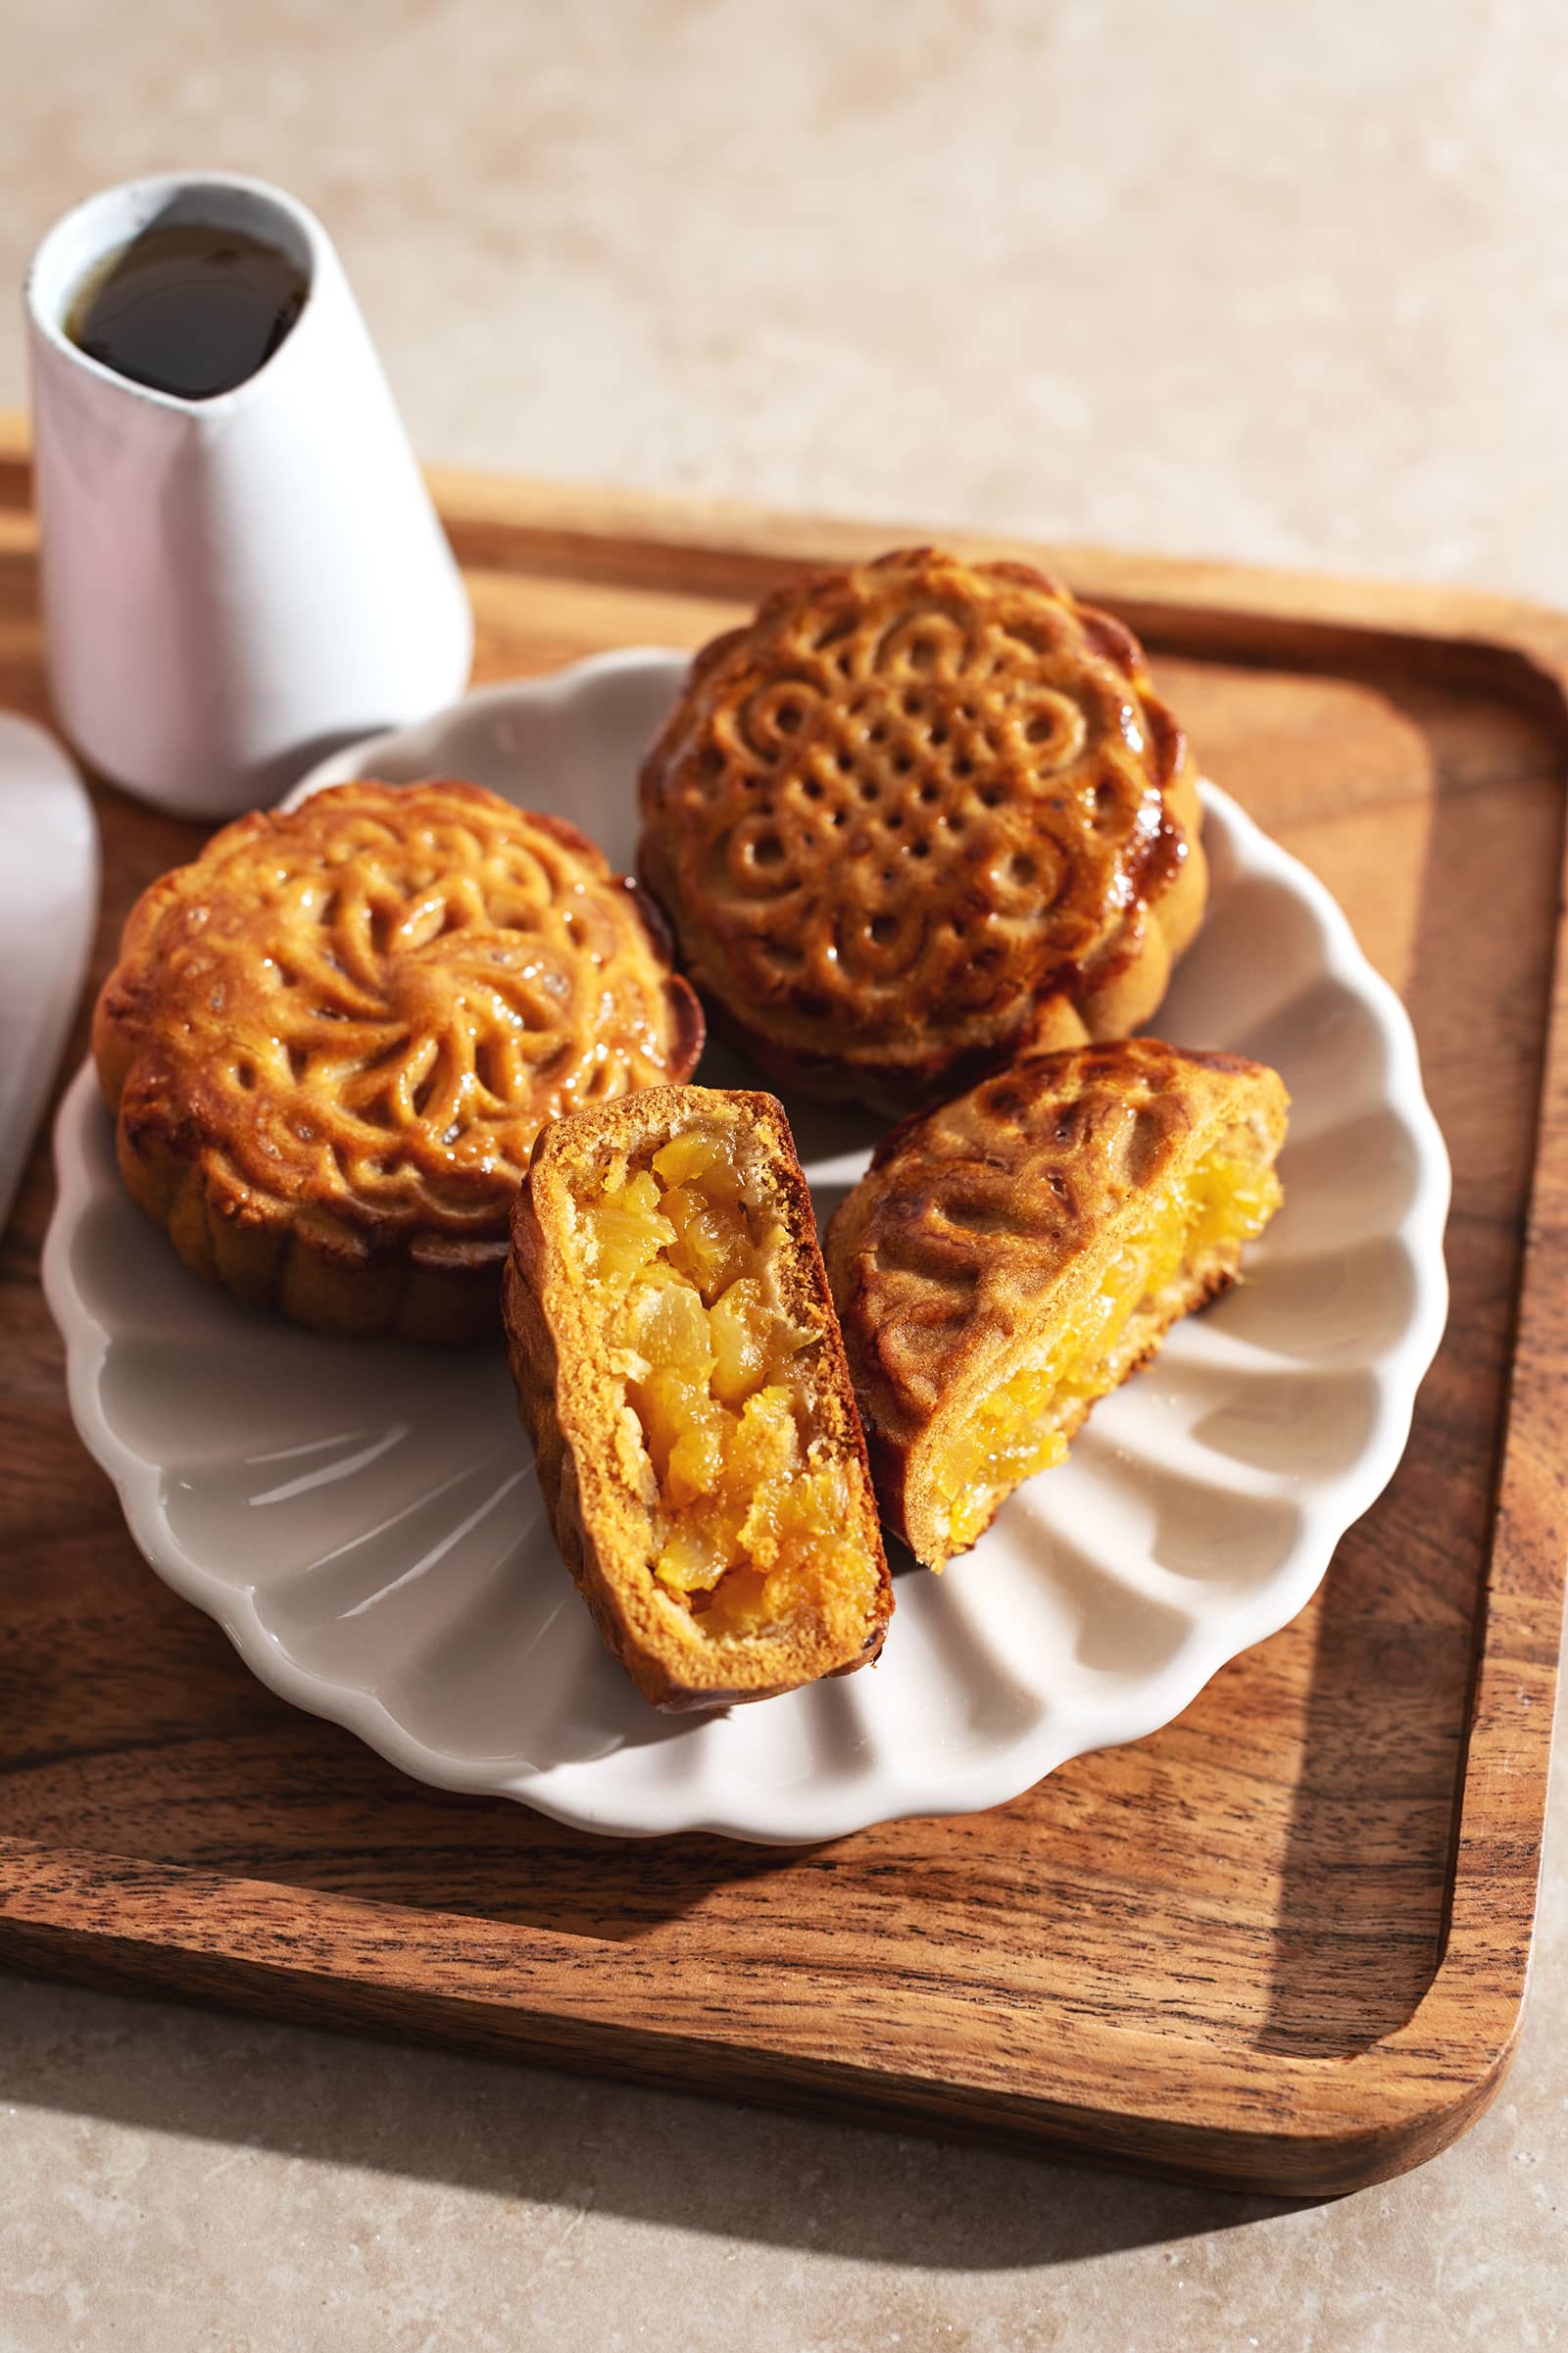
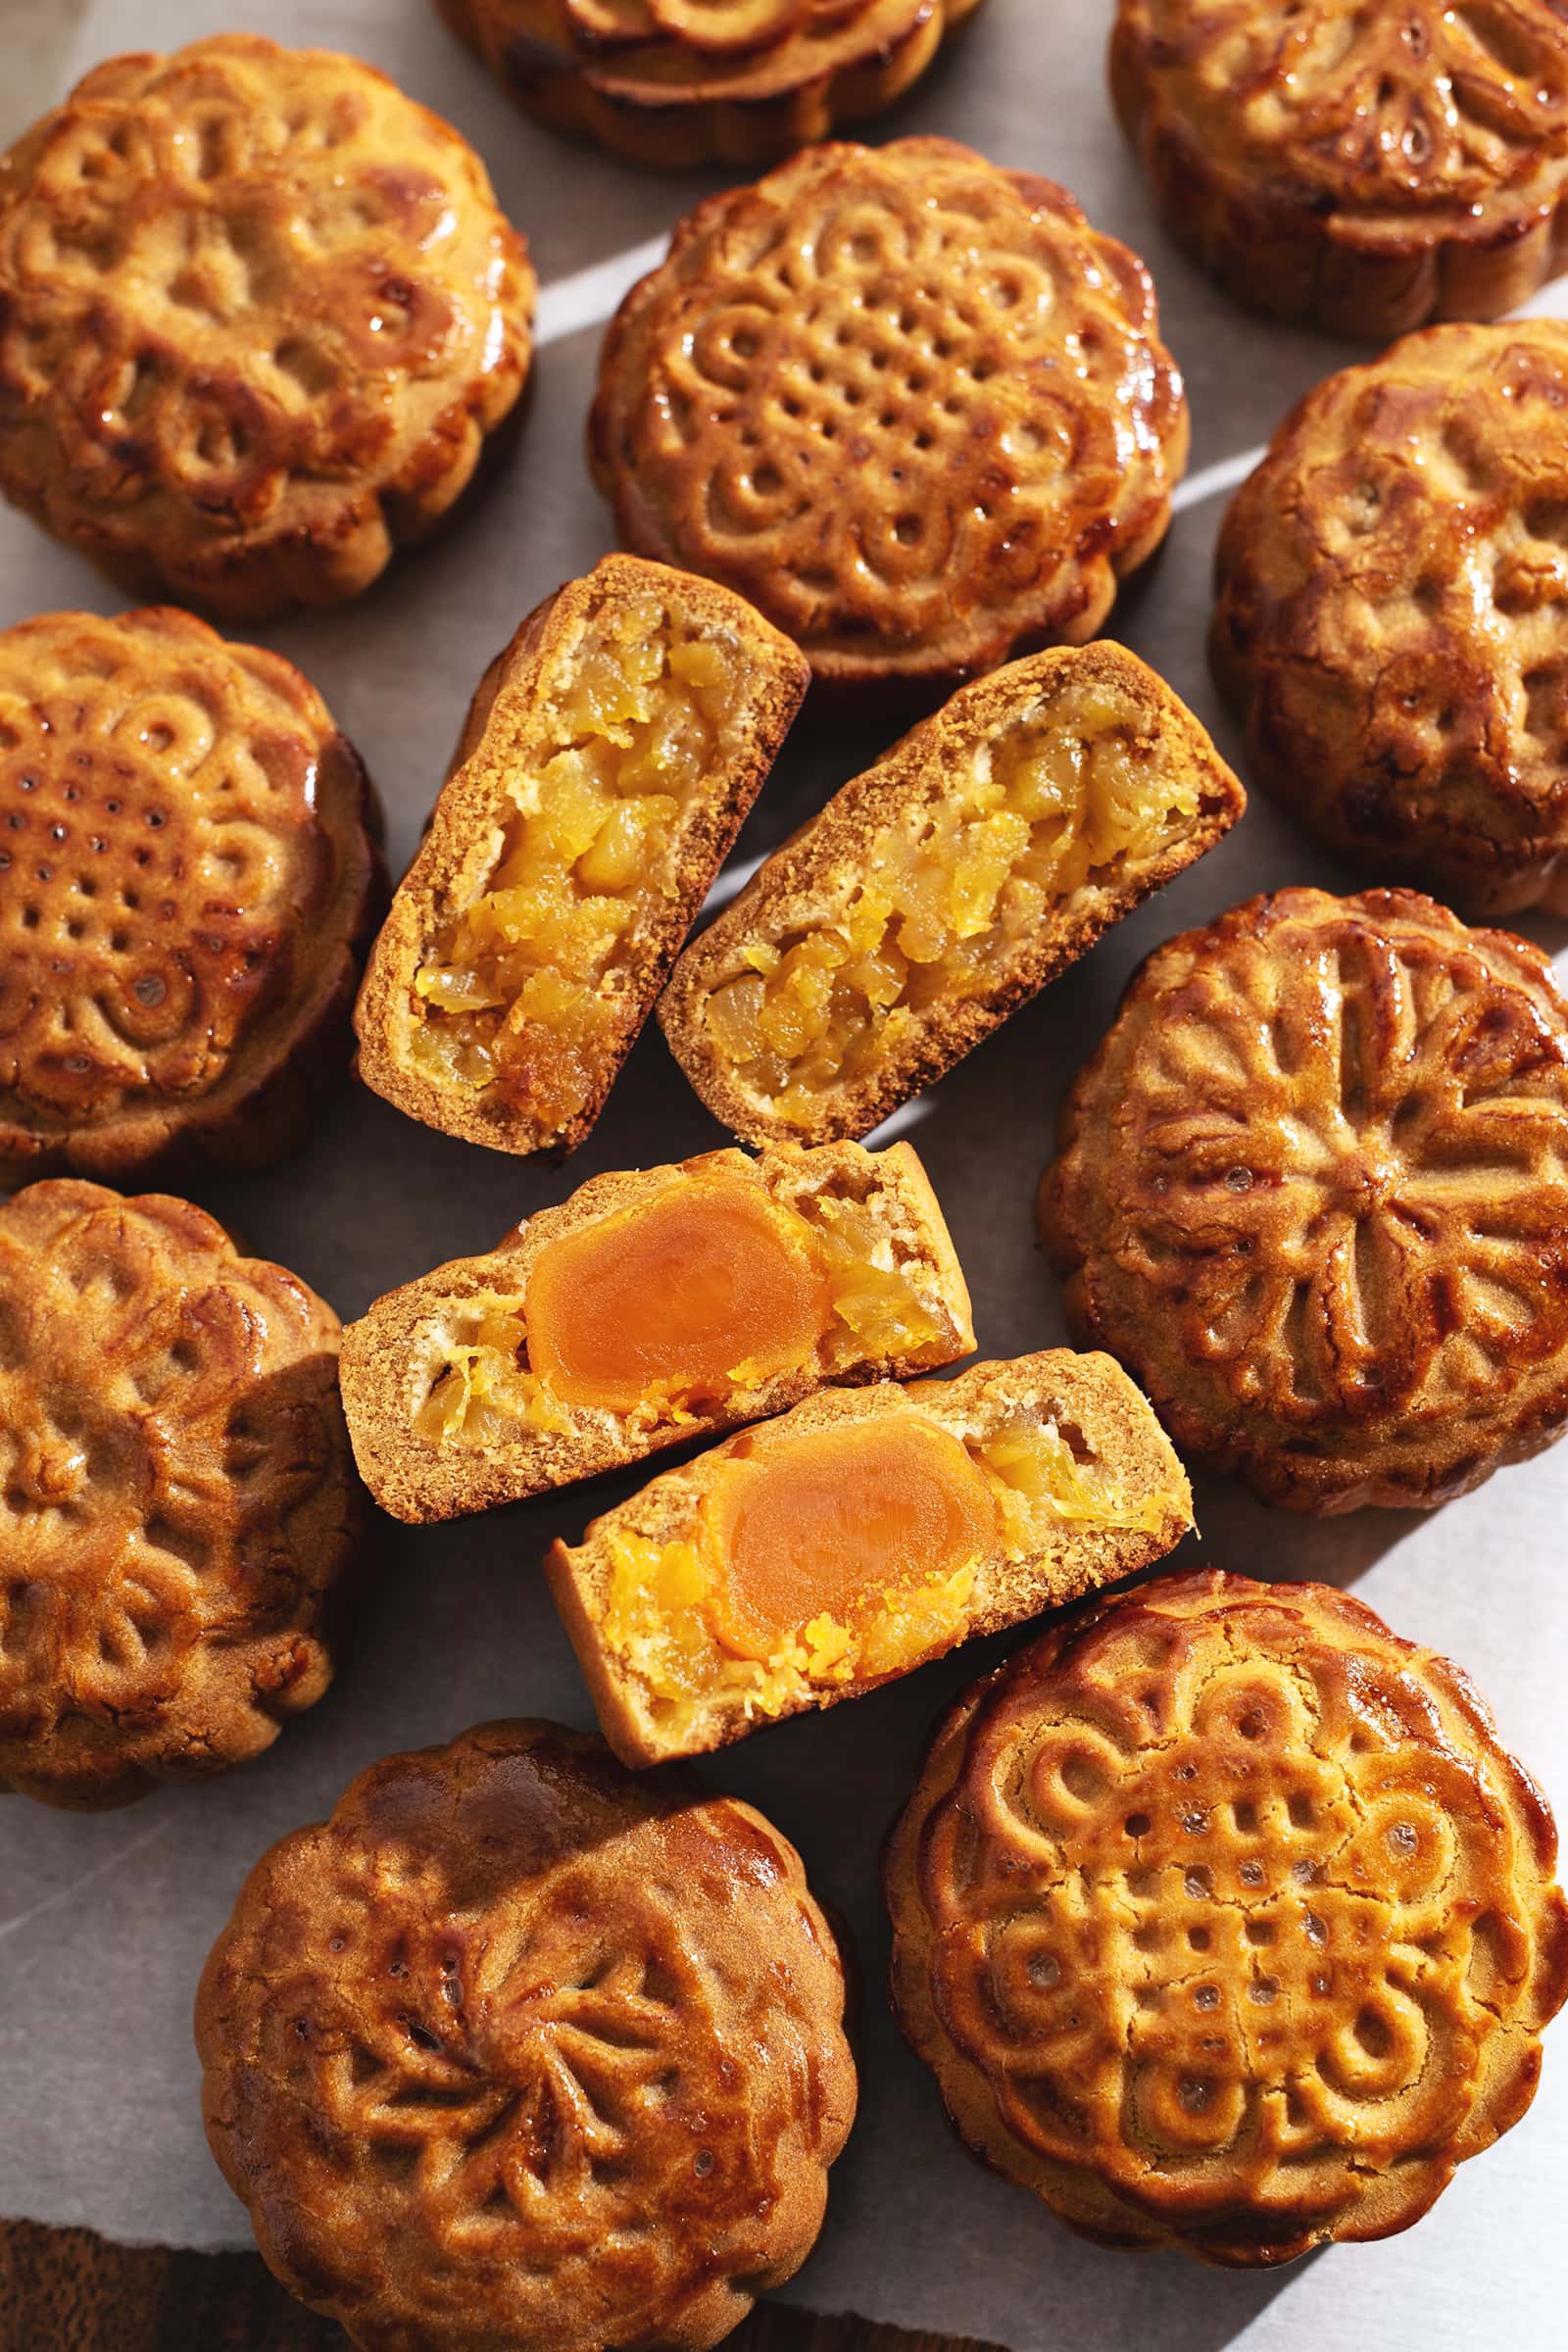
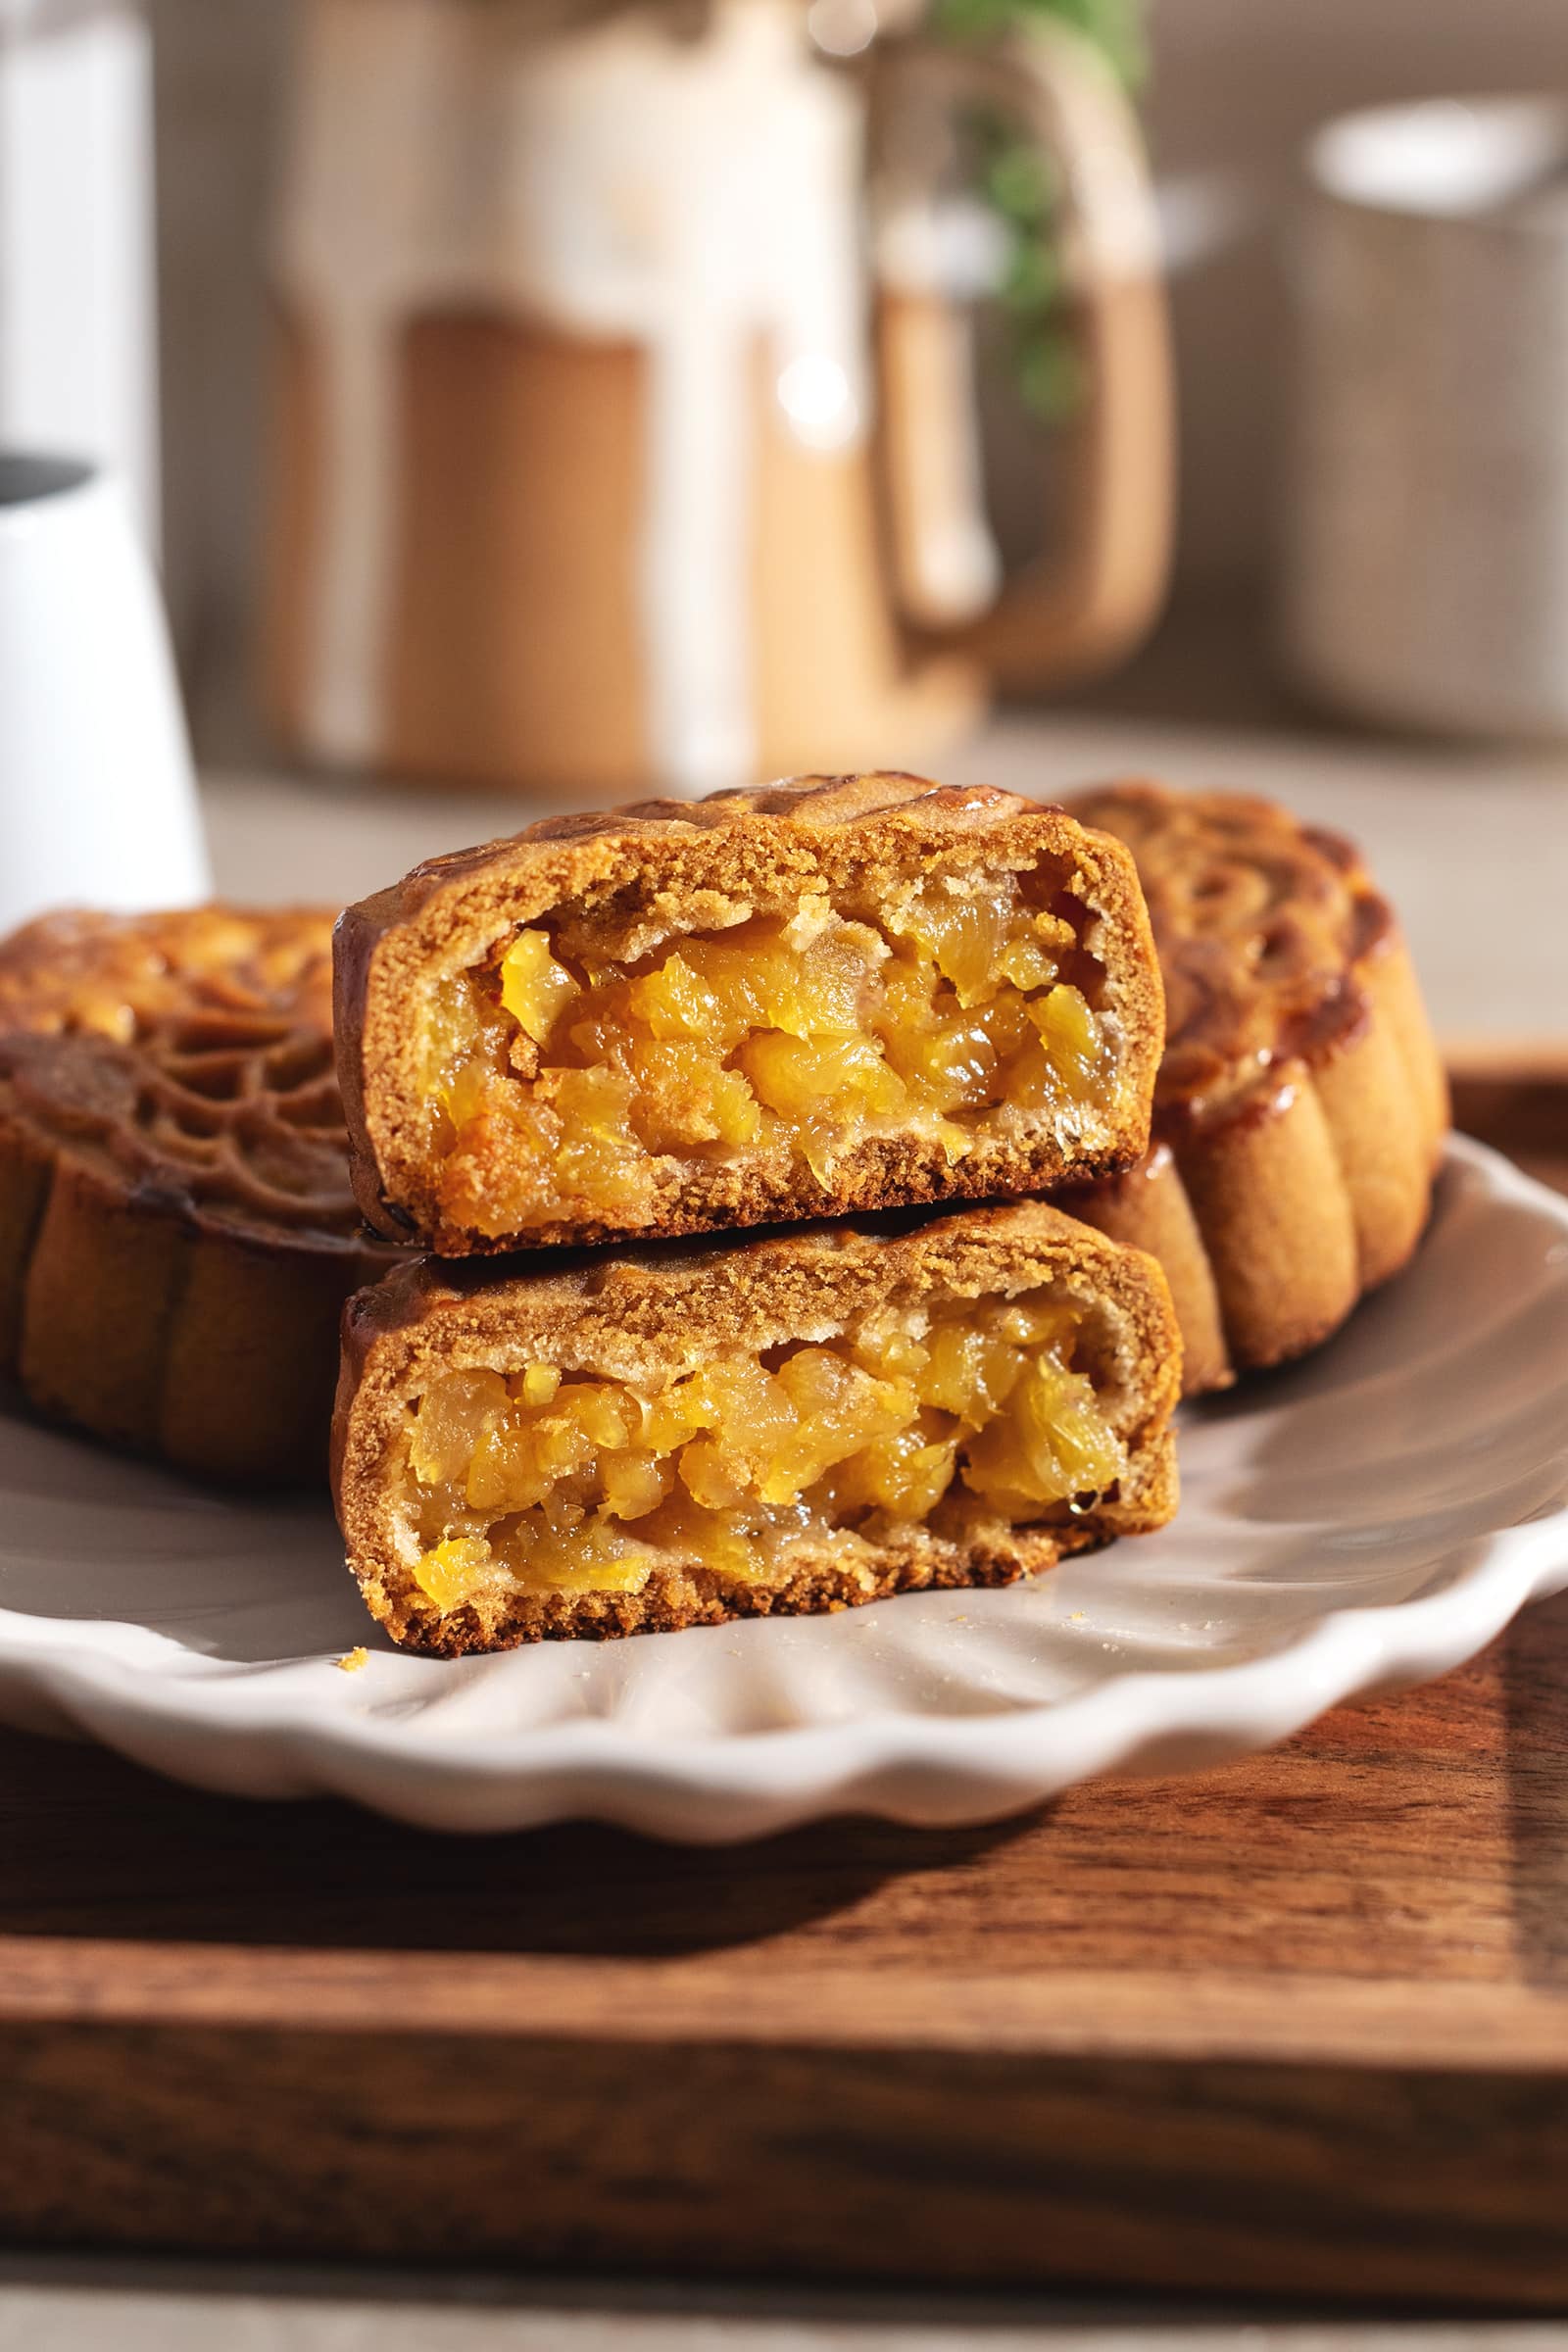
These pineapple mooncakes are made with a baked mooncake crust and filled with jammy pineapple filling and salted egg yolks. They're a fruity twist on a traditional mooncake that's perfect for Mid-Autumn Festival or Moon Festival!
Jump to:
What are mooncakes?
Mooncakes are a traditional Cantonese dessert usually served around Mid-Autumn Festival, also known as Moon Festival or Mooncake Festival.
There are two main kinds: baked mooncakes and snow skin mooncakes. Baked mooncakes have a golden brown, shiny pastry and are usually filled with lotus seed paste, red bean paste, or seeds and nuts.
Snow skin mooncakes are made with a soft and chewy mochi-like wrapper and are typically filled with custard, taro paste, red bean paste, or ice cream.
Both types of mooncakes can contain salted egg yolks in the middle to symbolize the full moon. The mooncake itself symbolizes unity and family reunion. They're usually enjoyed in small wedges with the whole family.
Why you'll love this recipe
- These pineapple mooncakes are light and not too sweet.
- The pineapple filling is a contemporary and fun variation of traditional mooncakes. It's a great alternative to rich and heavy paste fillings.
- The pastry is soft and crumbly and gets better over time.
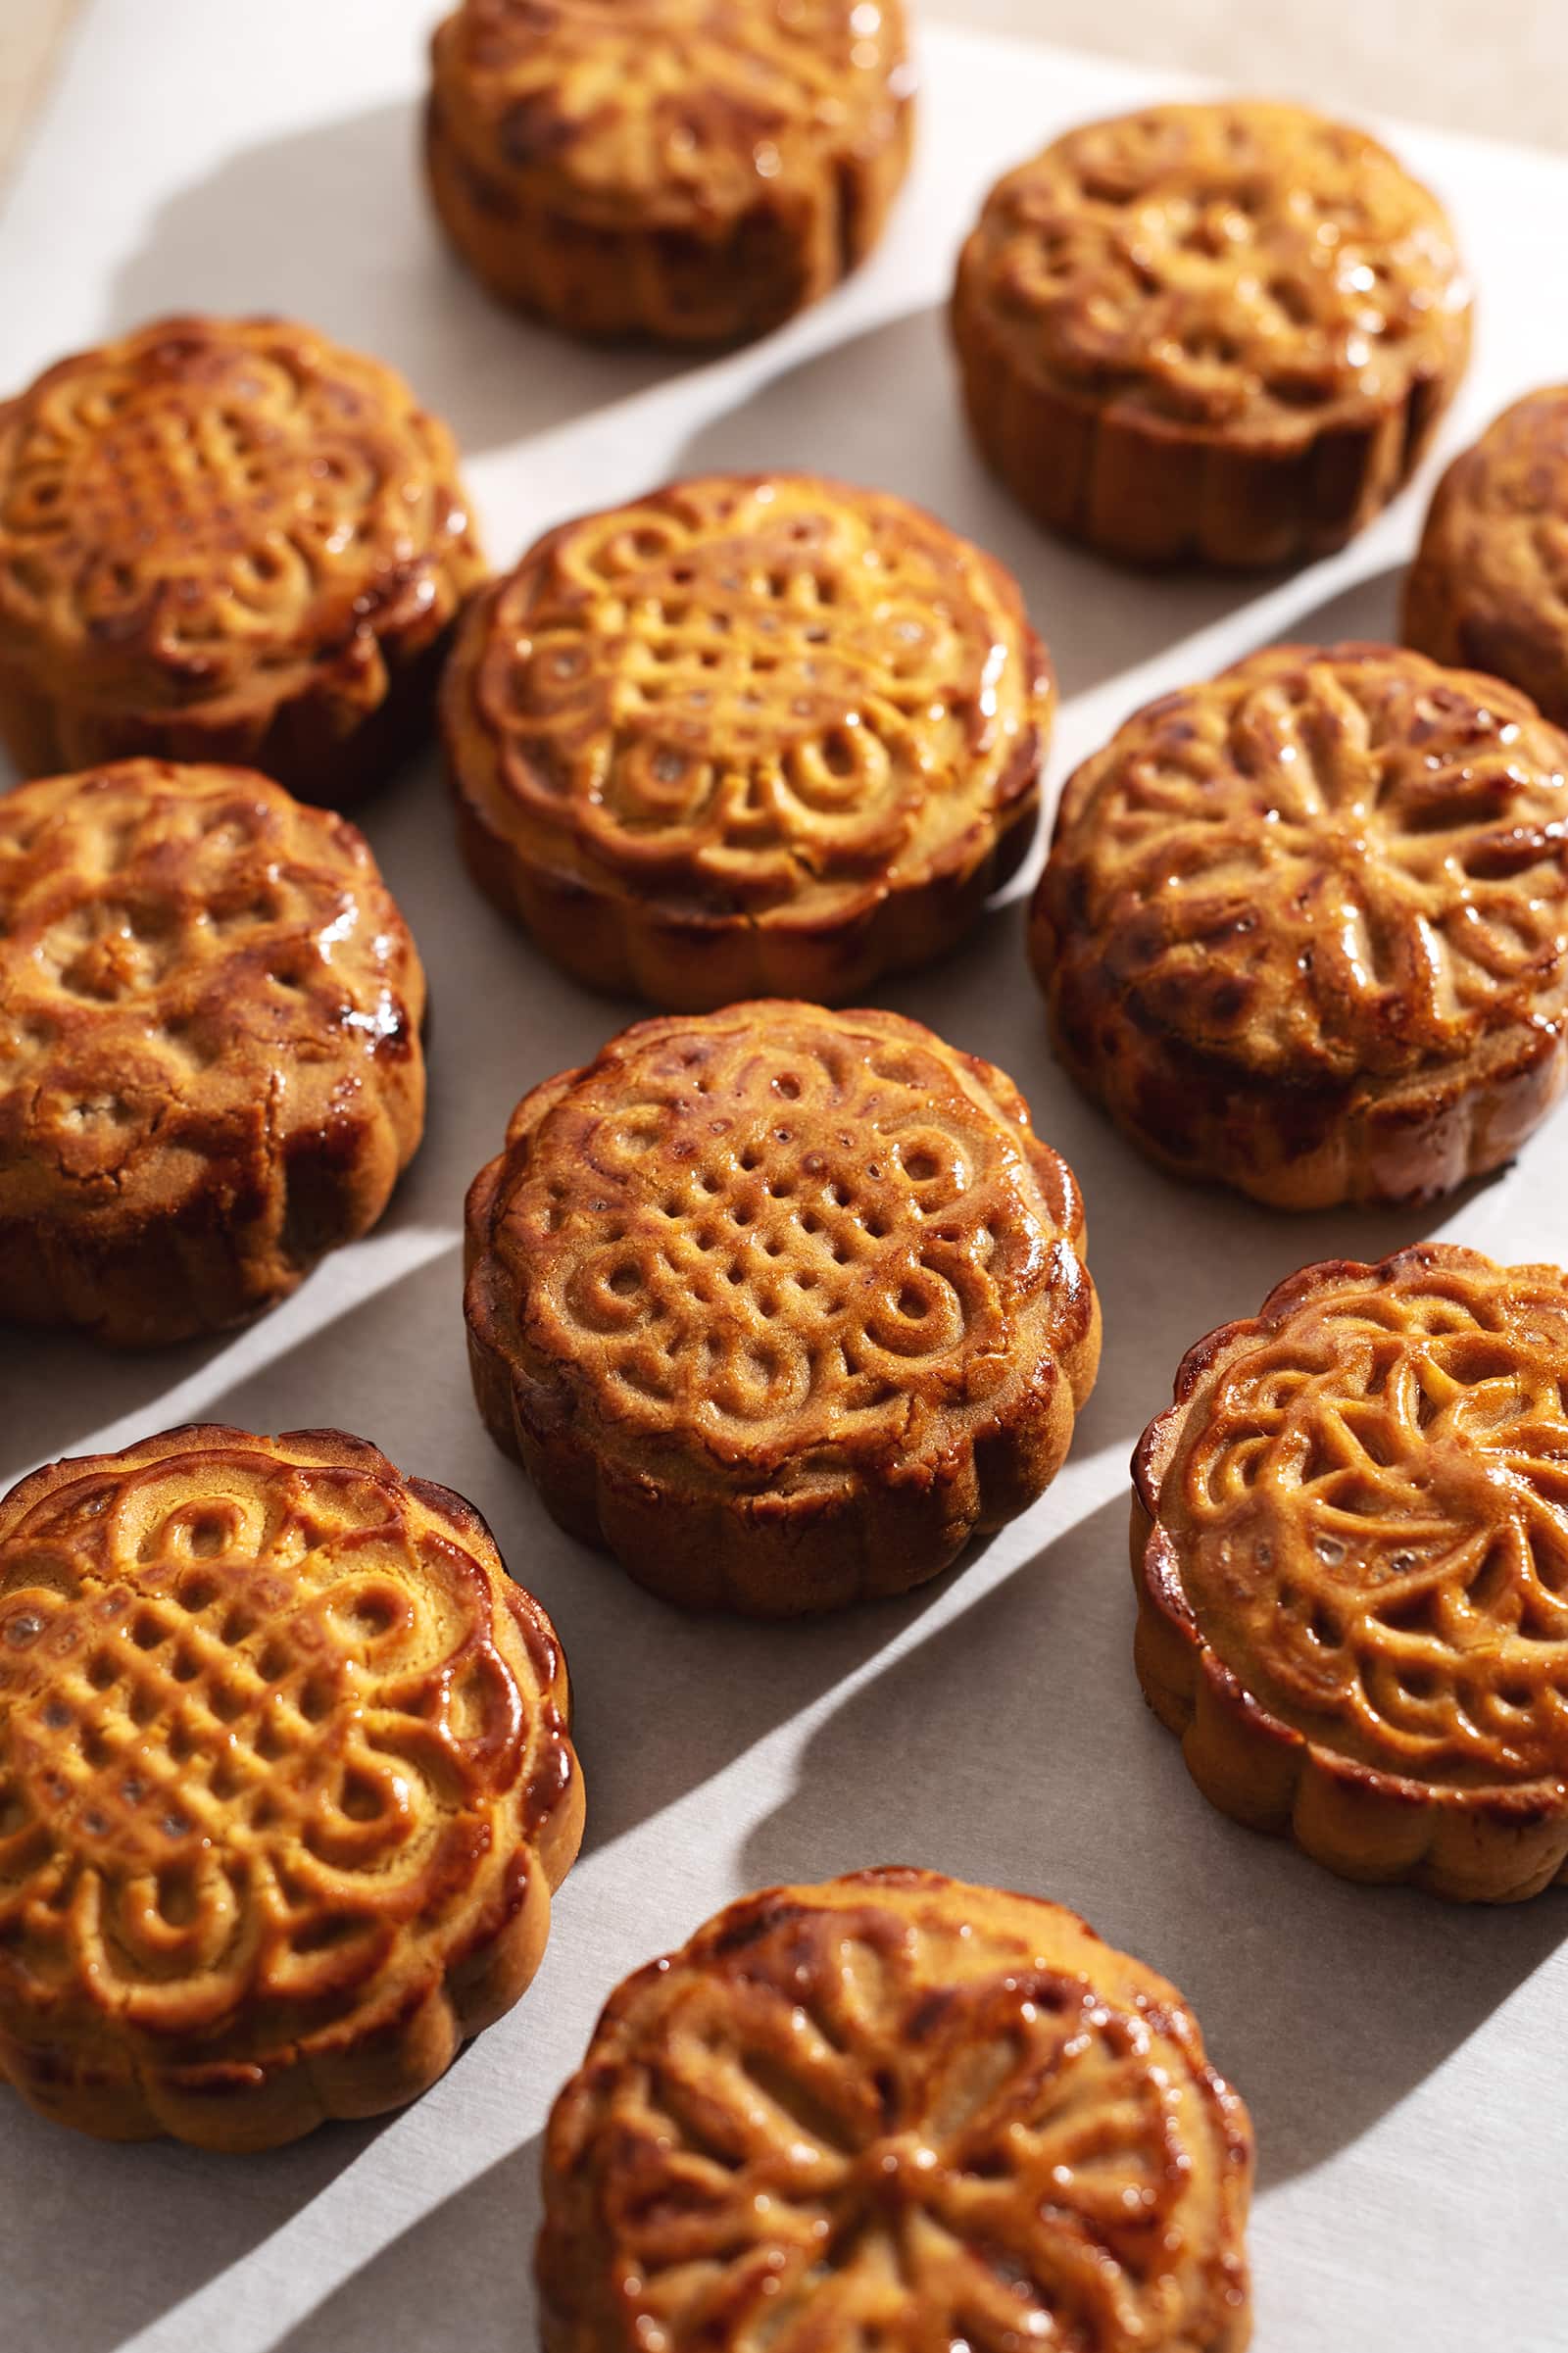
- The possibilities are endless with mooncake mold shapes and designs. It's so fun to get a new set every year and experiment with the designs!
Tools
- Mooncake mold - There are many kinds of mooncake molds you can get. The easiest ones to work with are the ones that look like a plunger and come with several stamp plates with different designs. I used a 75g mold in this recipe but you can also get 50g and 125g molds.
Ingredients
As always, the full recipe card with ingredient amounts and instructions is at the bottom of this post! Keep reading for more details on each ingredient or skip ahead to the recipe.
- All-purpose flour
- Golden syrup - Also known as light treacle, this is an inverted sugar syrup made from sugar cane. It's a thick amber-coloured syrup with a buttery, light caramel flavour that doesn't crystallize over time like honey. The most commonly found one is Lyle's Golden Syrup which you can purchase from Amazon if you can't find it locally.
- Oil - Use any light-tasting neutral oil like canola oil.
- Lye water - Also known as kansui (枧水), lye water is an alkaline water solution used in very small amounts for a distinct taste and colour. It's commonly used when making pretzels. It neutralizes the acidity of golden syrup and gives mooncakes their golden brown colour.
- Crushed pineapple - You can use fresh or canned pineapple. Either pick up crushed pineapple or crush it yourself.
- Granulated sugar
- Salt
- Salted duck egg yolks - Optional. Salted egg yolks are a common filling for mooncakes. They're made by curing duck eggs in salt. You can find them as whole eggs or in a package with just the yolks at most Asian grocery stores. You can omit them or add them to some of your mooncakes for a sweet and salty flavour.
- Egg yolk - This is for the egg wash to make the mooncakes shiny and golden brown.
- Water - This thins out the egg yolk for the egg wash.

How to make pineapple mooncakes
For the mooncake dough
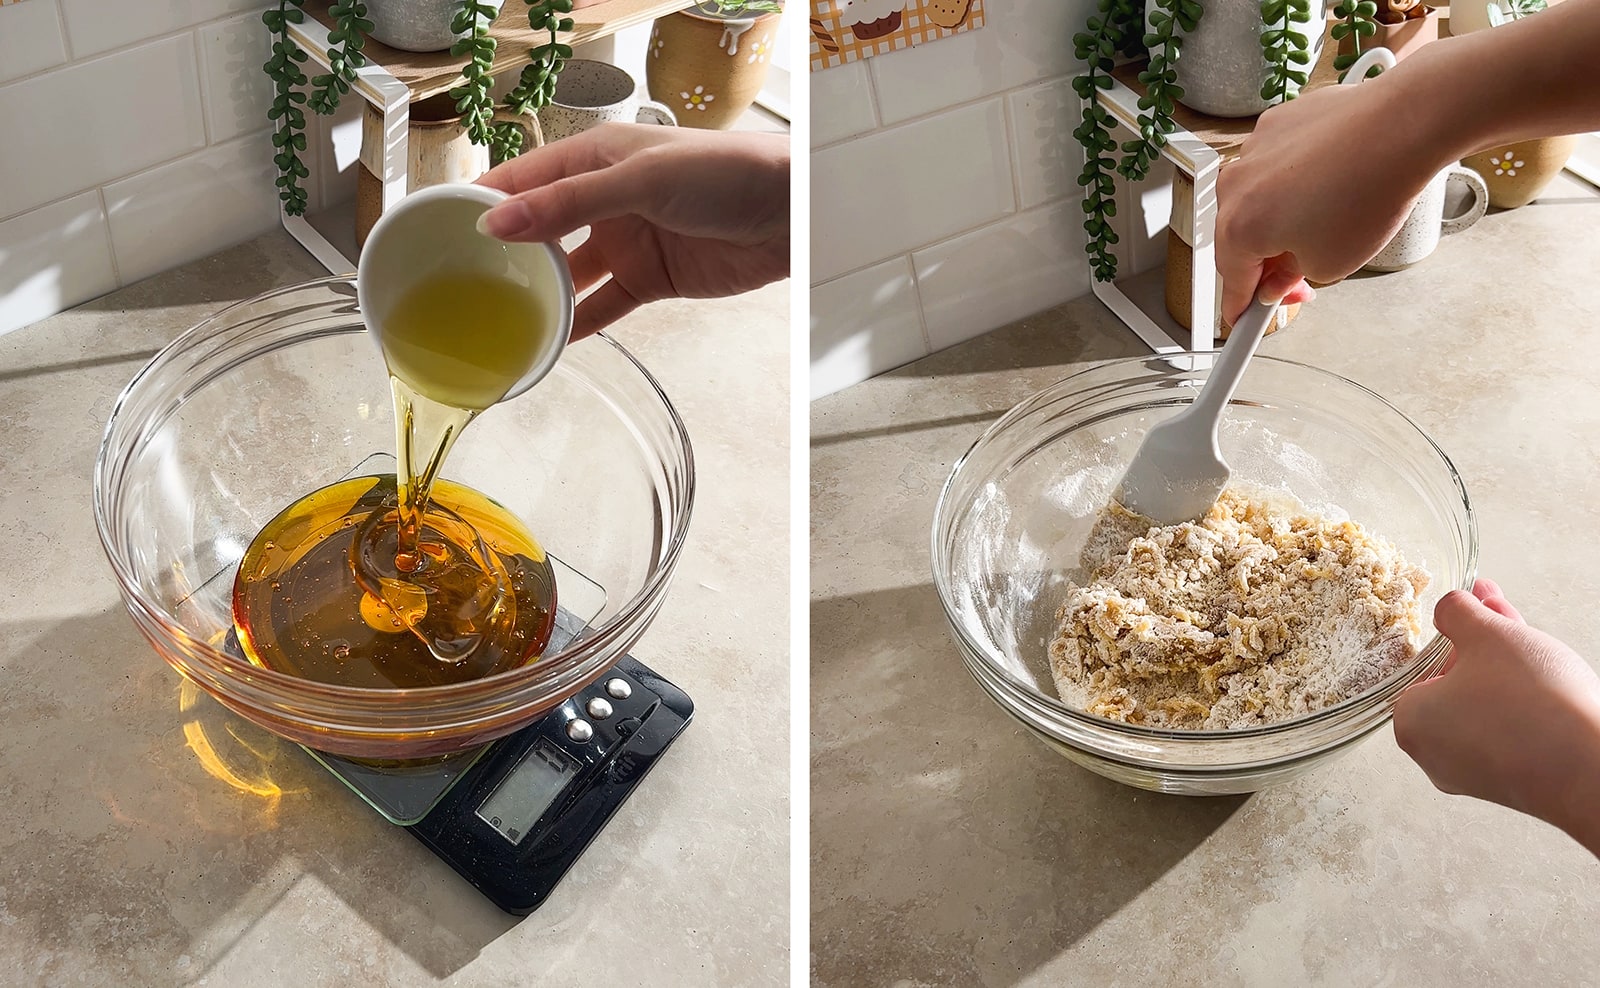
Make dough - In a mixing bowl, stir together golden syrup, oil, and lye water. Add flour and fold together until mostly combined. Use your hand to knead the dough a few times until it forms a soft dough.
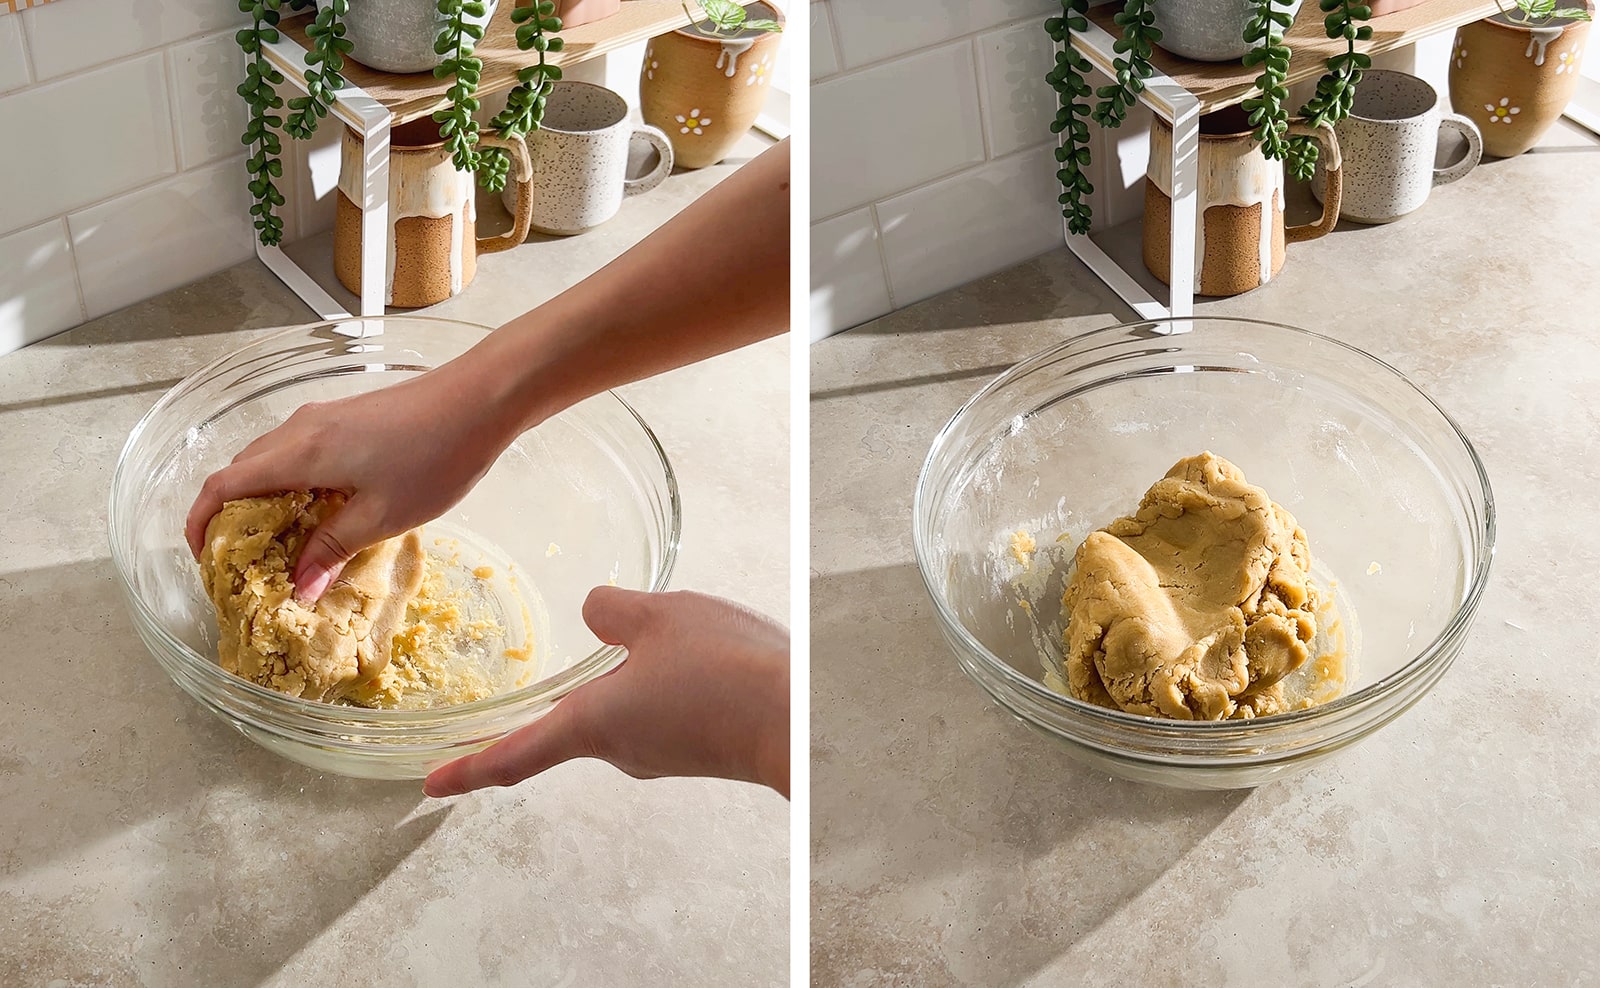
Let rest - Cover the bowl with plastic wrap and let it chill in the fridge for about 1 hour while you make the filling.
For the pineapple filling
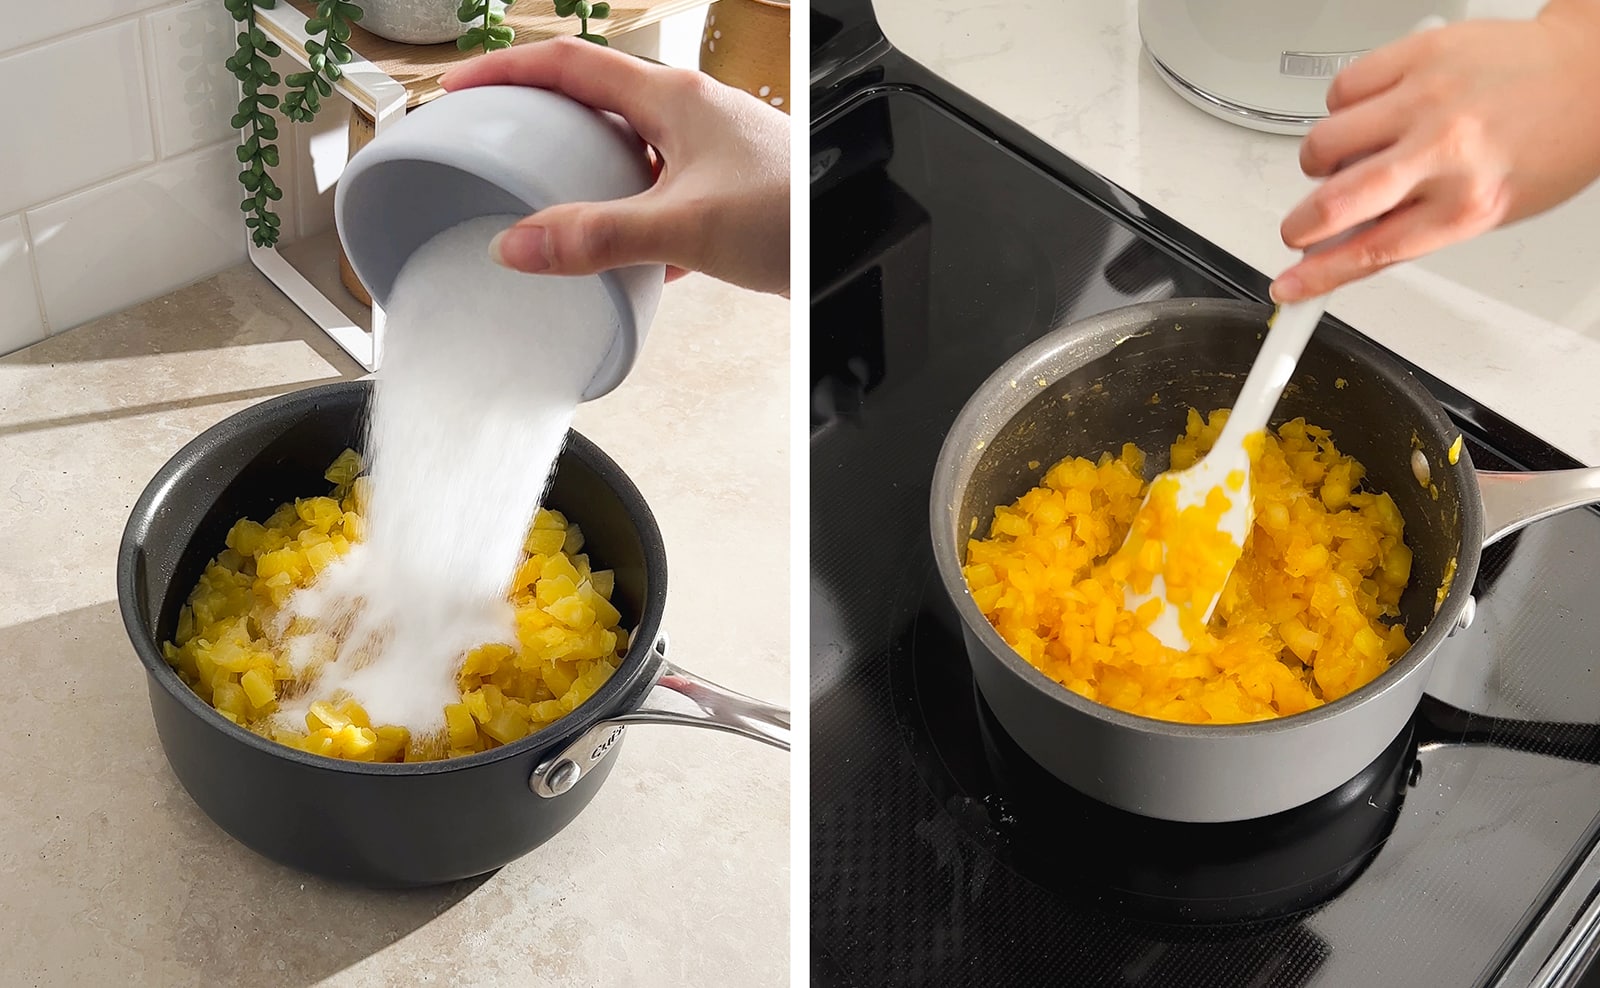
Caramelize filling - In a small pot, stir together crushed pineapple, sugar, and salt. Cook on medium-high heat, stirring often, until most of the liquid has boiled off and the mixture has caramelized and thickened, about 30 minutes.
Cool - Remove from heat and transfer to a bowl or spread it out on a plate to cool completely before using.
Assemble the mooncakes
Prep - Preheat oven to 375°F. Line a baking sheet with parchment paper. Set aside.
Determine mold size - Figure out the capacity of your mooncake mold. If you don't know what it is, wrap the mold in plastic wrap to prevent leaks and fill the mold with water. Pour the water into a cup that has been tared on a scale.
Determine ratio - From there, you can decide on the ratio of dough to filling that you want to use. For baked mooncakes, I would recommend a ratio of 1:2 or 2:3 if you want a bit more dough. For a 75g mold, a 1:2 ratio would be 25g dough and 50g filling. A 2:3 ratio (what I used for mine) would be 30g dough and 45g filling.
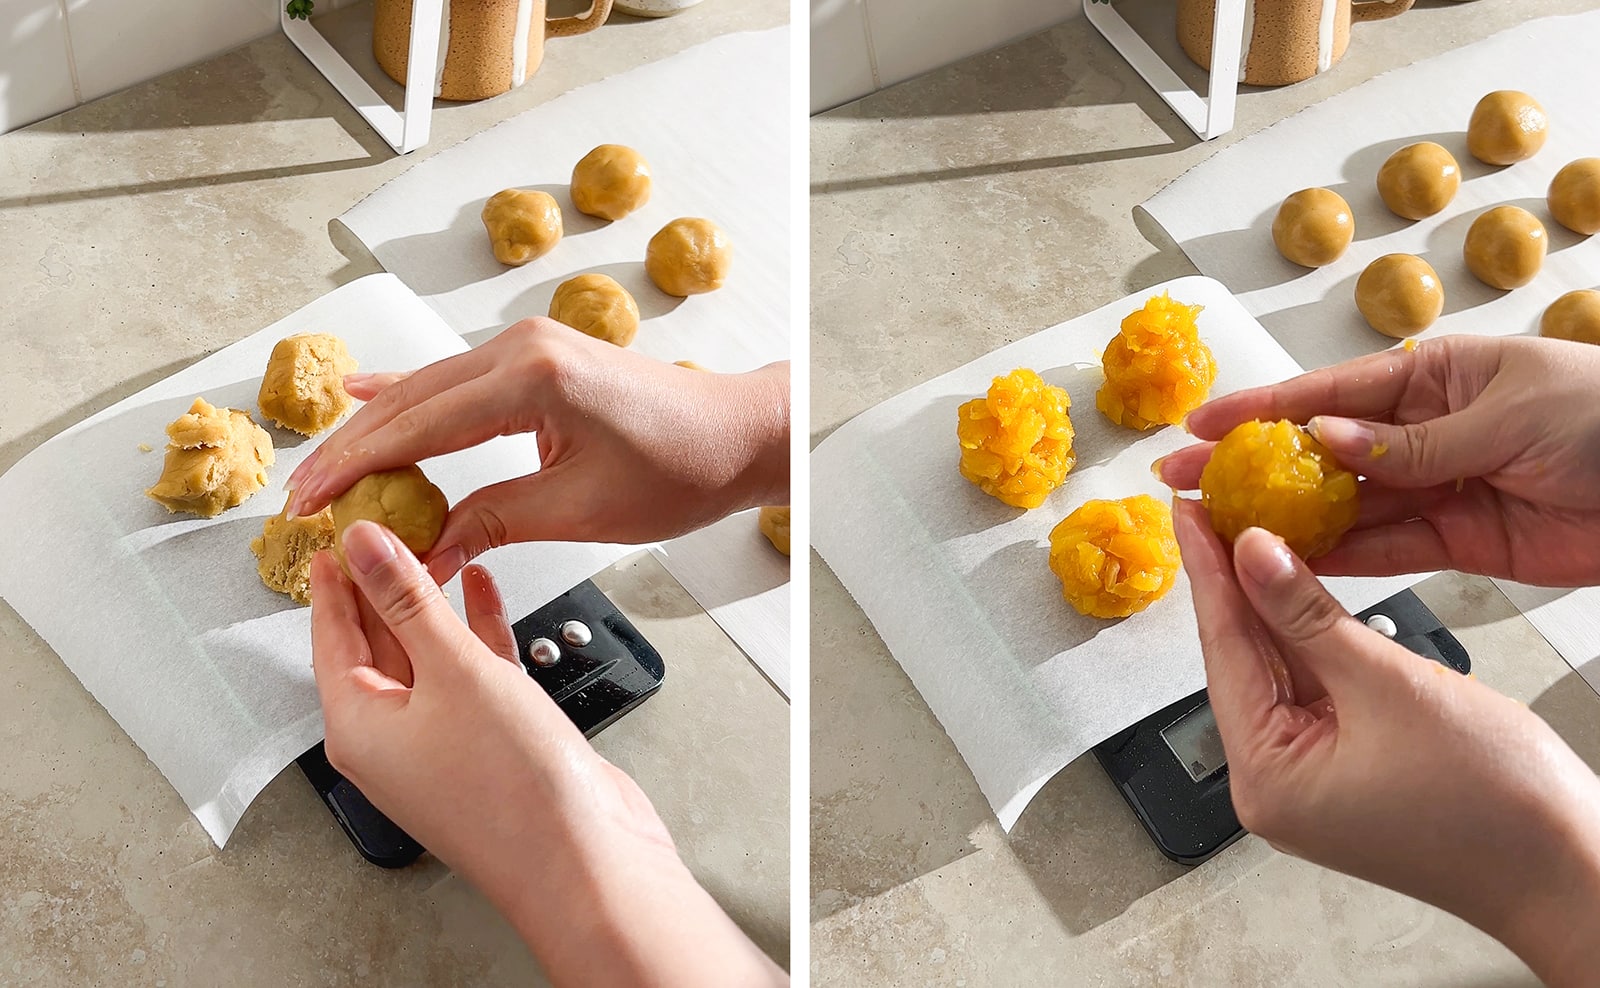
Portion out dough - Weigh out the dough into 30g portions. Roll them in your hands to form balls. Weigh out the pineapple filling into 45g portions. Squeeze and roll them in your hands to form balls. If using salted egg yolks, weigh the egg yolks first and then add pineapple filling to make the total weight 45g. Pack the pineapple filling around the egg yolk. Place all the balls on a piece of parchment paper.
Flatten dough - Dust your hands with a bit of flour to prevent sticking. Press a ball of dough between your hands to flatten it. Place the dough on the flat palm of one hand and press it out with your other fingers until it's quite thin, about 1/16".
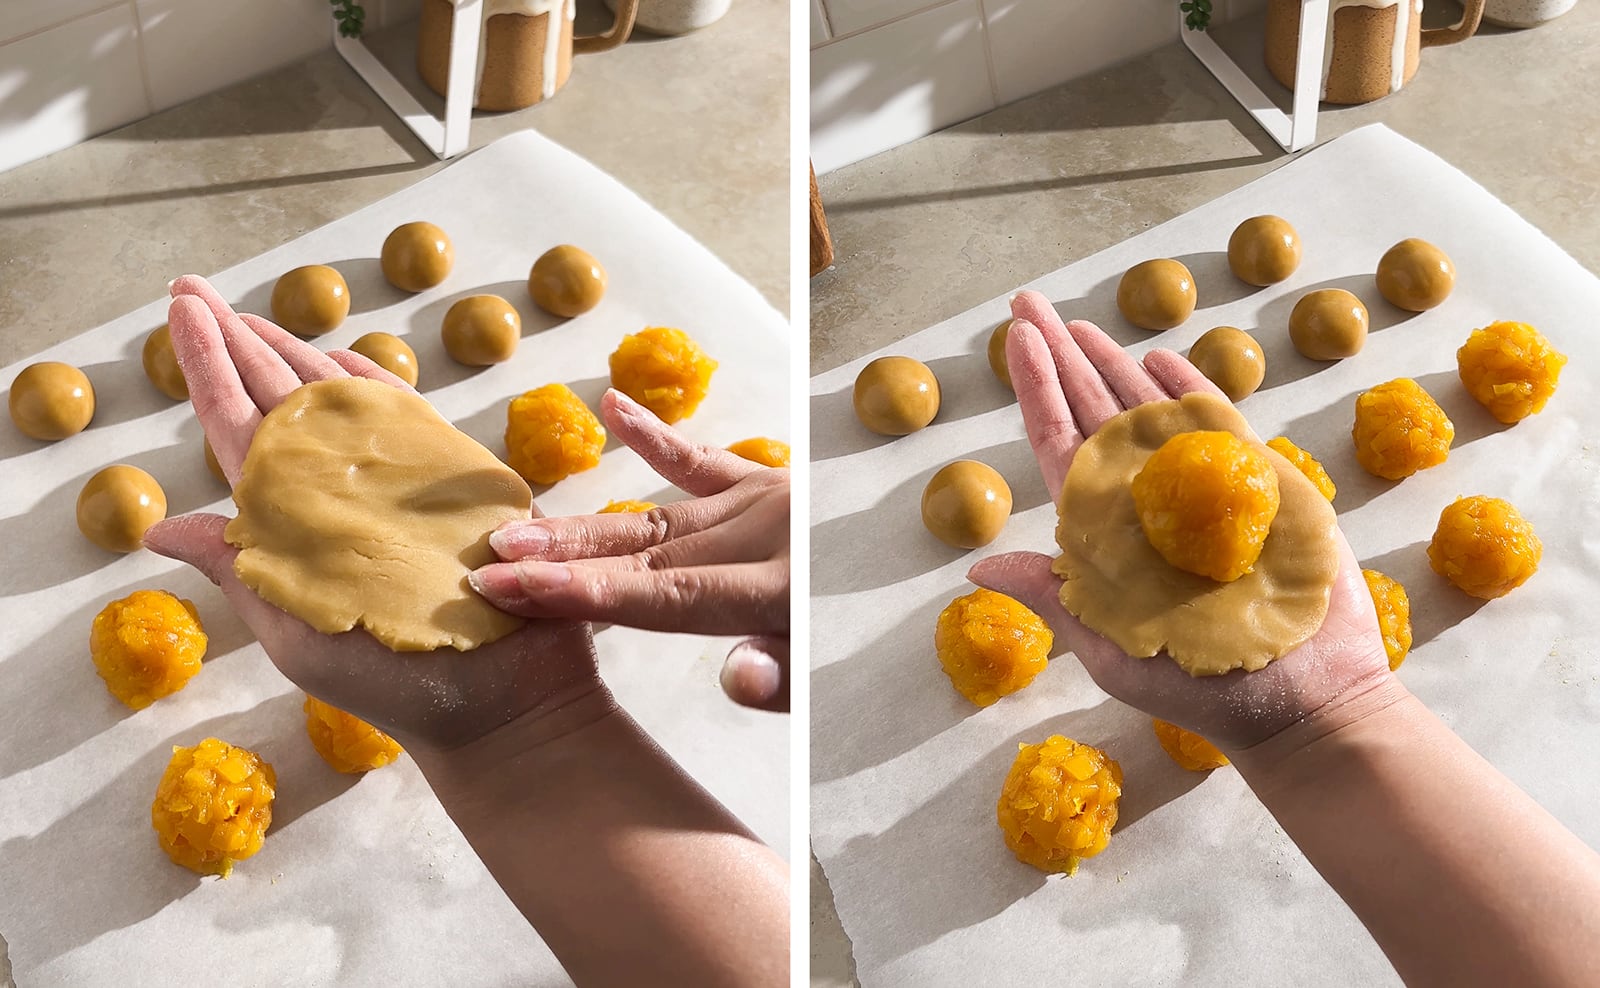
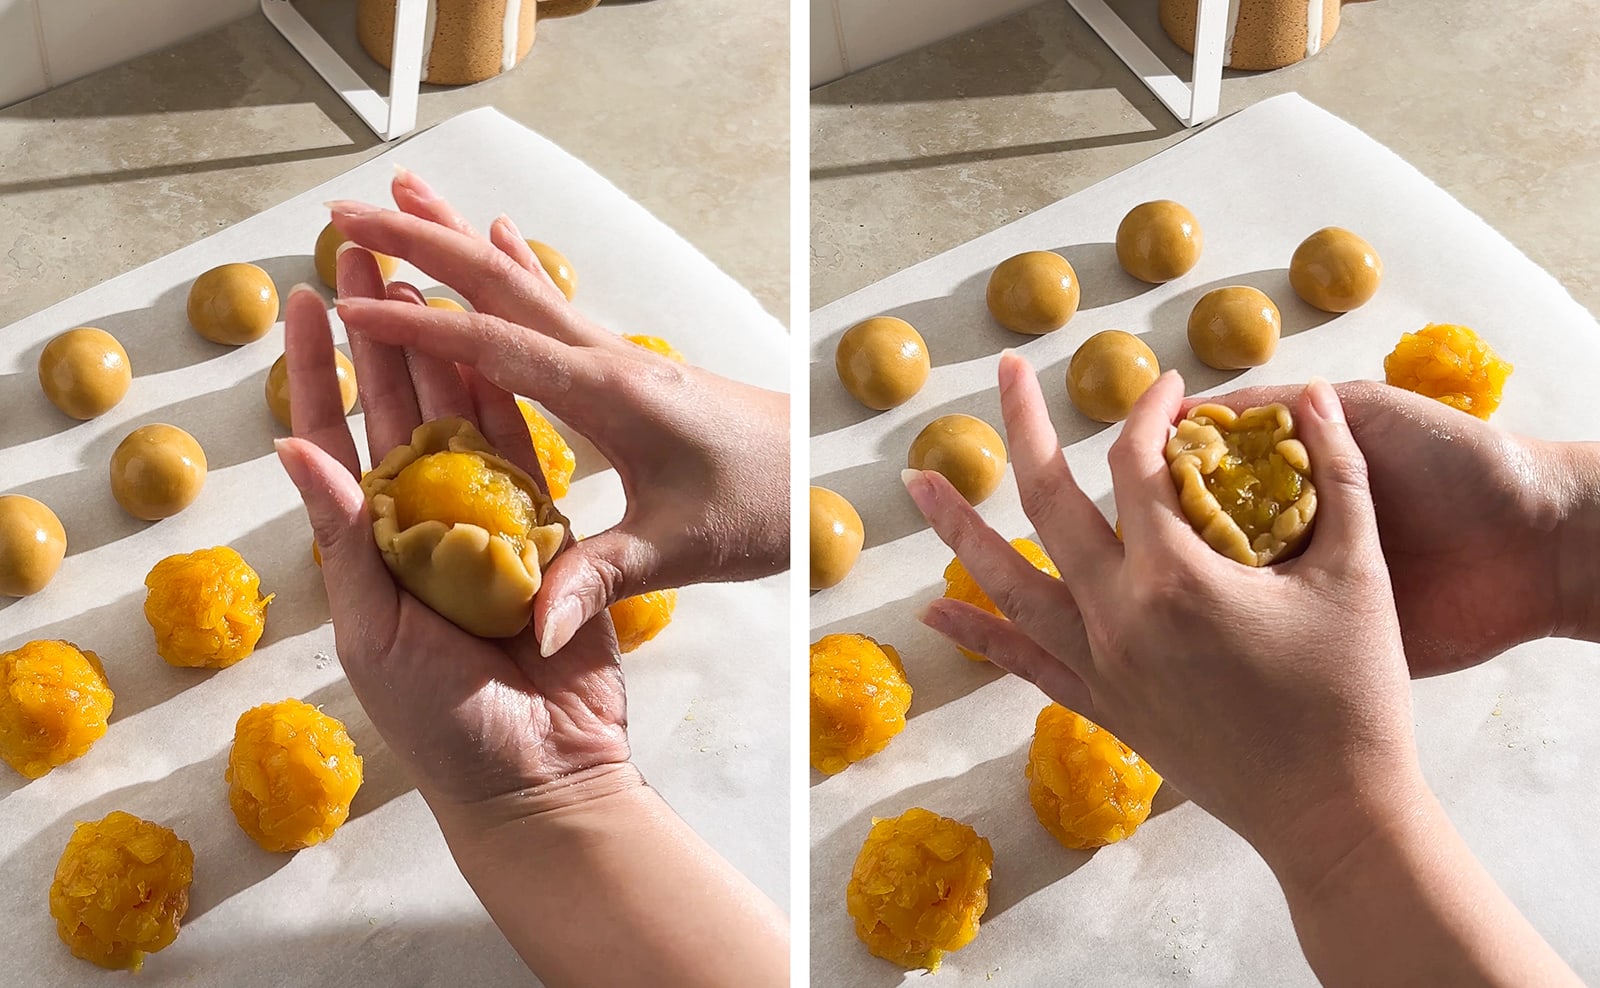
Wrap filling - Place a ball of pineapple filling in the middle and wrap it with the dough. Push the filling down, if needed, and push the dough towards the opening to close. Re-form into a ball. Use a bit of excess dough to patch any holes or tears. Place the ball with the seal side down on your baking sheet. Repeat with the rest of the dough and filling.
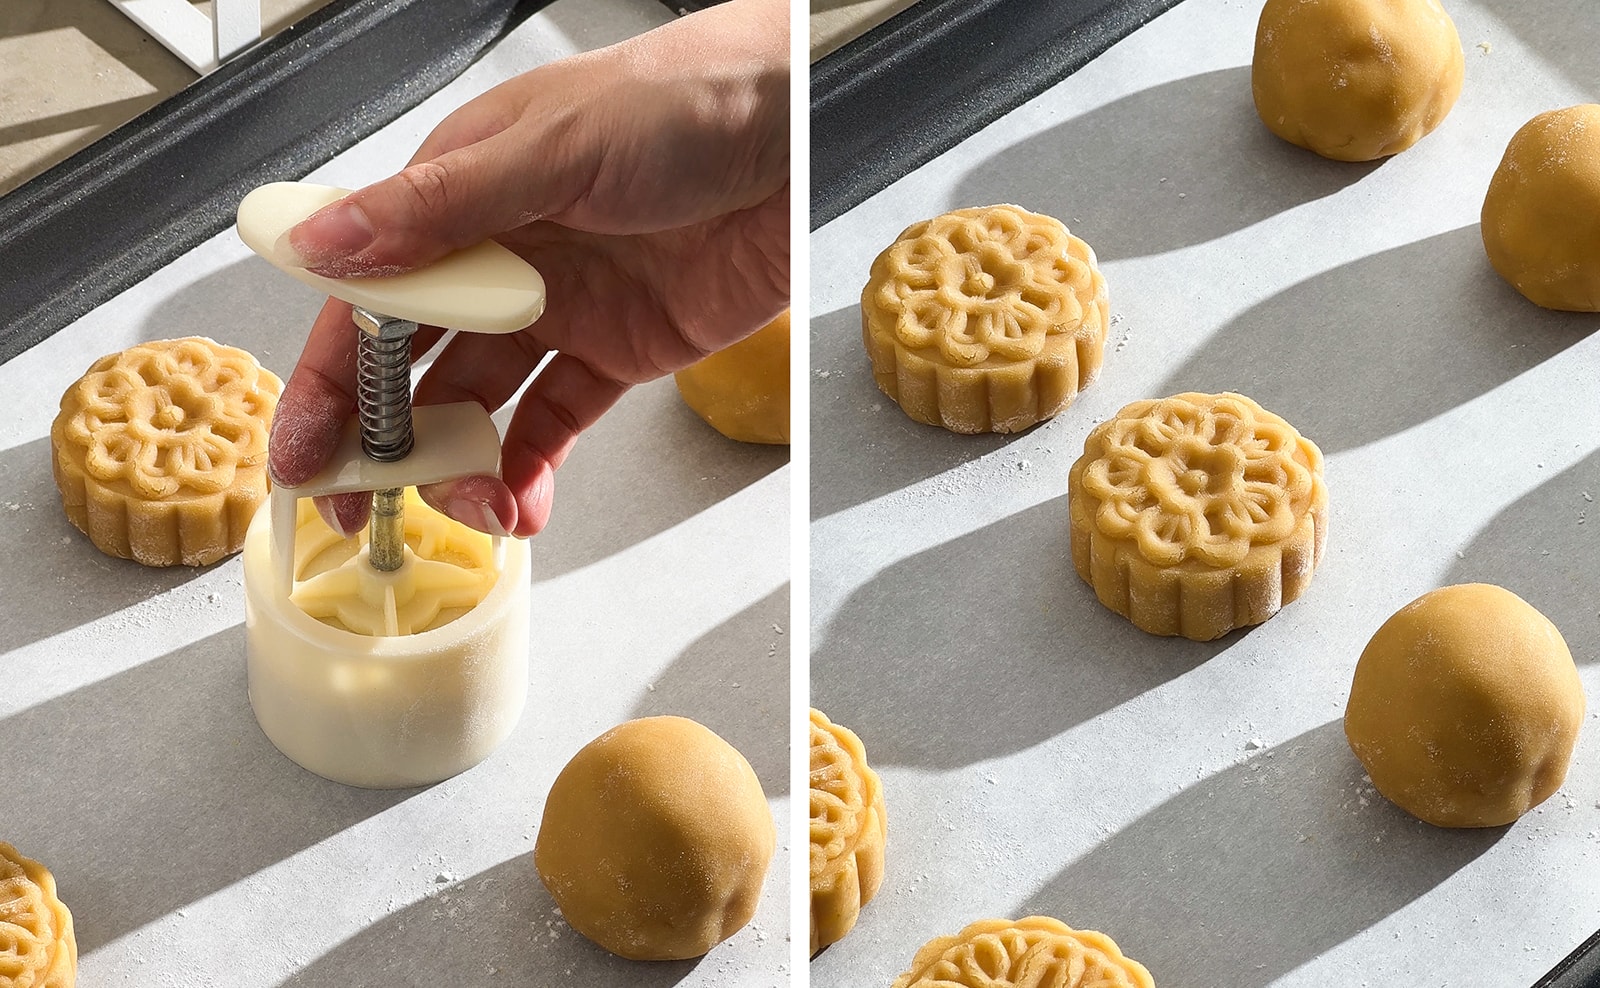
Stamp design - Insert your desired stamping plate into your mooncake mold plunger. Lightly dust each mooncake ball and the plunger with flour, tapping any excess out. Carefully lower the plunger onto a ball of dough and firmly press the plunger down 5-10 times for a clear design. Repeat with the rest of the mooncakes.
Bake the mooncakes
Bake - Bake the pineapple mooncakes for 10 minutes. Remove them from the oven and let the tray cool on a wire rack for 15 minutes for the design to set before applying egg wash.
Egg wash - Meanwhile, whisk an egg yolk with water for the egg wash. Use a pastry brush to very gently brush a very thin layer of egg wash across the top of each mooncake.
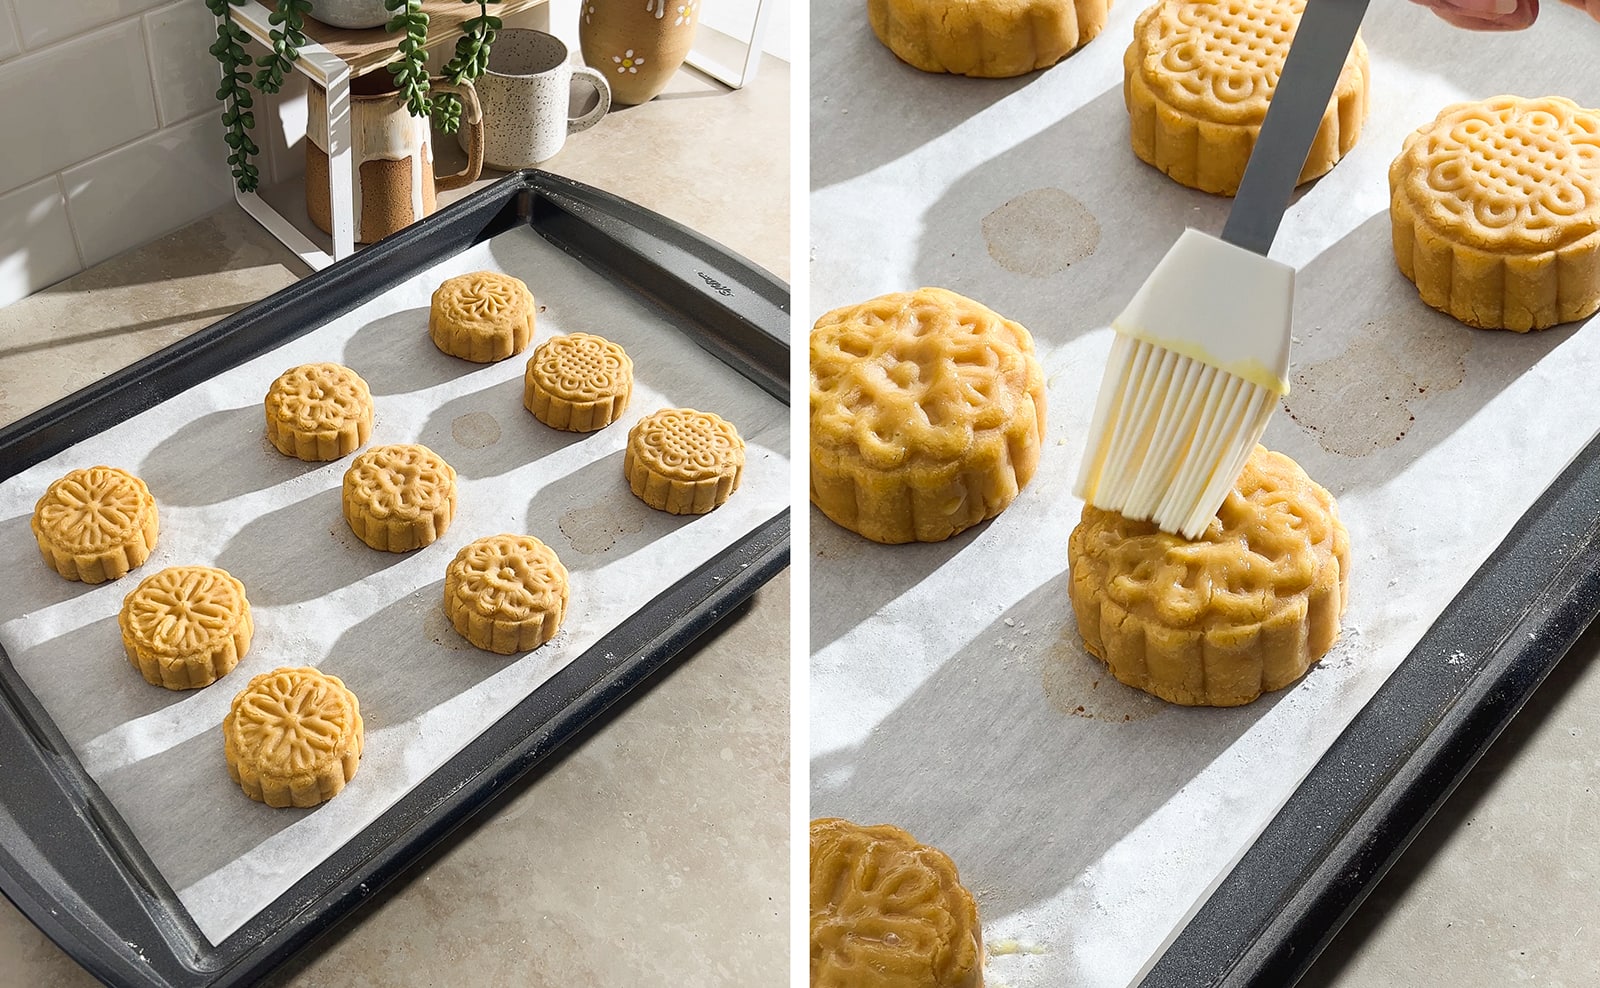
Bake again - Return the tray to the oven to bake for another 10 minutes.
Let mooncakes rest - Let the pineapple mooncakes cool completely at room temperature. They will be hard and crumbly when freshly baked. Transfer them to an airtight container and store them in the fridge for at least 24 hours. They will soften and gain an oily sheen like proper mooncakes. Let them come back to room temperature before serving.
Storage
These pineapple mooncakes should be stored in an airtight container in the fridge for up to 5 days. They will get softer and taste better after the first 1-2 days after baking.
Freezing
You can freeze mooncakes in an airtight container for up to 1 month. Thaw in the fridge overnight or at room temperature for several hours.
Tips for success
- Crush and chop the pineapples thoroughly. Leave some larger pieces if you want some variation in texture. The important part is to chop up any harder pieces and any long stringy pieces to prevent the filling from being stringy.
- Flatten the dough very thin. Try to make it as thin as possible without tearing. Thick crusts tend to be hard and doughy even after allowing to soften for a few days. You can also try rolling the dough out in between two small pieces of parchment paper and wrapping it around the filling instead of pressing it in your hands.
- Use excess dough to patch up holes and cracks. The mooncake dough is very pliable and forgiving. Don't worry if you have any bald spots or tears after wrapping the filling. You won't be able to see these patched-up areas after shaping and pressing them in the mold.
- Don't press down too hard with the mooncake mold. If you press too hard, the filling can leak out of the bottom. Instead, apply firm pressure several times (without shifting the plunger).
- Let the mooncakes cool so that the design sets before applying egg wash. You'll detail in the design if you apply egg wash before the dough is set. Wipe off most of the egg wash on the side of the bowl and only apply a thin layer to the mooncakes. Use a paper towel or a smaller brush to remove any big puddles of egg wash.
Frequently asked questions
You can replace golden syrup with honey and omit the lye water. However, the mooncakes won't be as golden in colour and the flavour will be slightly different. You can also make golden syrup and lye water at home if you aren't able to find them in-store. There are recipes online!
Mooncakes are a great dessert to make in advance since they already need time to soften and reach optimal texture. You can make mooncakes 1-3 days ahead of time before you plan on serving them. Always store them in an airtight container in the fridge.
For baked mooncakes, I would recommend using a 1:2 or 2:3 ratio if you want a bit more dough. These two ratios use just the right amount of dough without being too thick and doughy. For snow skin mooncakes, I would recommend a 1:1 ratio.
More Mid-Autumn Festival recipes to try
- Baked Tapioca Pudding
- Tangerine Tanghulu
- Mango Sago
- Mango Pudding (Hong Kong Style)
- Mango Chiffon Cake
Recipe
Pineapple Mooncakes
Equipment
- 1 mooncake plunger-style mold, with design stamps
Ingredients
Mooncake Dough
- 250 g all-purpose flour
- 180 g golden syrup, like Lyle's Golden Syrup
- 50 g light-tasting oil
- 1 teaspoon lye water
Pineapple Filling
- 1200 g crushed pineapple, about 4 large cans, drained
- 150 g granulated sugar
- ½ teaspoon salt
- salted duck egg yolks, optional
Egg Wash
- 1 egg yolk
- 1 teaspoon water
Instructions
Mooncake Dough
- Make dough: In a mixing bowl, stir together golden syrup, oil, and lye water. Add flour and fold together until mostly combined. Use your hand to knead the dough a few times until it forms a soft dough.
- Let rest: Cover the bowl with plastic wrap and let it chill in the fridge for about 1 hour while you make the filling.
Pineapple Filling
- Caramelize filling: In a small pot, stir together crushed pineapple, sugar, and salt. Cook on medium-high heat, stirring often, until most of the liquid has boiled off and the mixture has caramelized and thickened, about 30 minutes.
- Cool: Remove from heat and transfer to a bowl or spread it out on a plate to cool completely before using.
Assemble the mooncakes
- Prep: Preheat oven to 375°F. Line a baking sheet with parchment paper. Set aside.
- Determine mold size: Figure out the capacity of your mooncake mold. If you don't know what it is, wrap the mold in plastic wrap to prevent leaks and fill the mold with water. Pour the water into a cup that has been tared on a scale.
- Determine ratio: From there, you can decide on the ratio of dough to filling that you want to use. For baked mooncakes, I would recommend a ratio of 1:2 or 2:3 if you want a bit more dough. For a 75g mold, a 1:2 ratio would be 25g dough and 50g filling. A 2:3 ratio (what I used for mine) would be 30g dough and 45g filling.
- Portion out dough and filling: Weigh out the dough into 30g portions. Roll them in your hands to form balls. Weigh out the pineapple filling into 45g portions. Squeeze and roll them in your hands to form balls. If using salted egg yolks, weigh the egg yolks first and then add pineapple filling to make the total weight 45g. Pack the pineapple filling around the egg yolk. Place all the balls on a piece of parchment paper.
- Flatten dough: Dust your hands with a bit of flour to prevent sticking. Press a ball of dough between your hands to flatten it. Place the dough on the flat palm of one hand and press it out with your other fingers until it's quite thin, about 1/16".
- Wrap filling: Place a ball of pineapple filling in the middle and wrap it with the dough. Push the filling down, if needed, and push the dough towards the opening to close. Re-form into a ball. Use a bit of excess dough to patch any holes or tears. Place the ball with the seal side down on your baking sheet. Repeat with the rest of the dough and filling.
- Stamp design: Insert your desired stamping plate into your mooncake mold plunger. Lightly dust each mooncake ball and the plunger with flour, tapping any excess out. Carefully lower the plunger onto a ball of dough and firmly press the plunger down 5-10 times for a clear design. Repeat with the rest of the mooncakes.
- Bake: Bake mooncakes for 10 minutes. Remove them from the oven and let the tray cool on a wire rack for 15 minutes for the design to set before applying egg wash.
- Egg wash: Meanwhile, whisk an egg yolk with water for the egg wash. Use a pastry brush to very gently brush a very thin layer of egg wash across the top of each mooncake.
- Bake again: Return the tray to the oven to bake for another 10 minutes.
- Let mooncakes rest: Let the mooncakes cool completely at room temperature. They will be hard and crumbly when freshly baked. Transfer them to an airtight container and store them in the fridge for at least 24 hours. They will soften and gain an oily sheen like proper mooncakes. Let them come back to room temperature before serving.


Lucy says
This was my first time making these and there is a bit of a learning curve. I didn't use lye water and they turned out fine without it. Mine do not look like the photo, probably because of this. They are delicious!