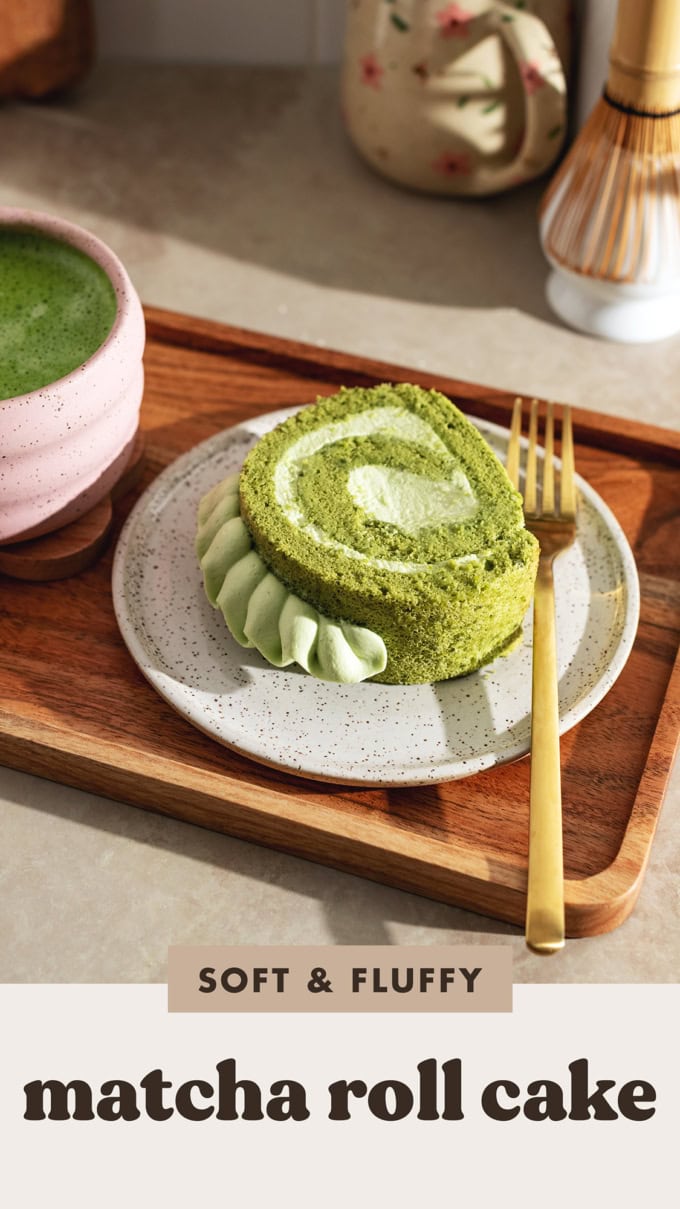
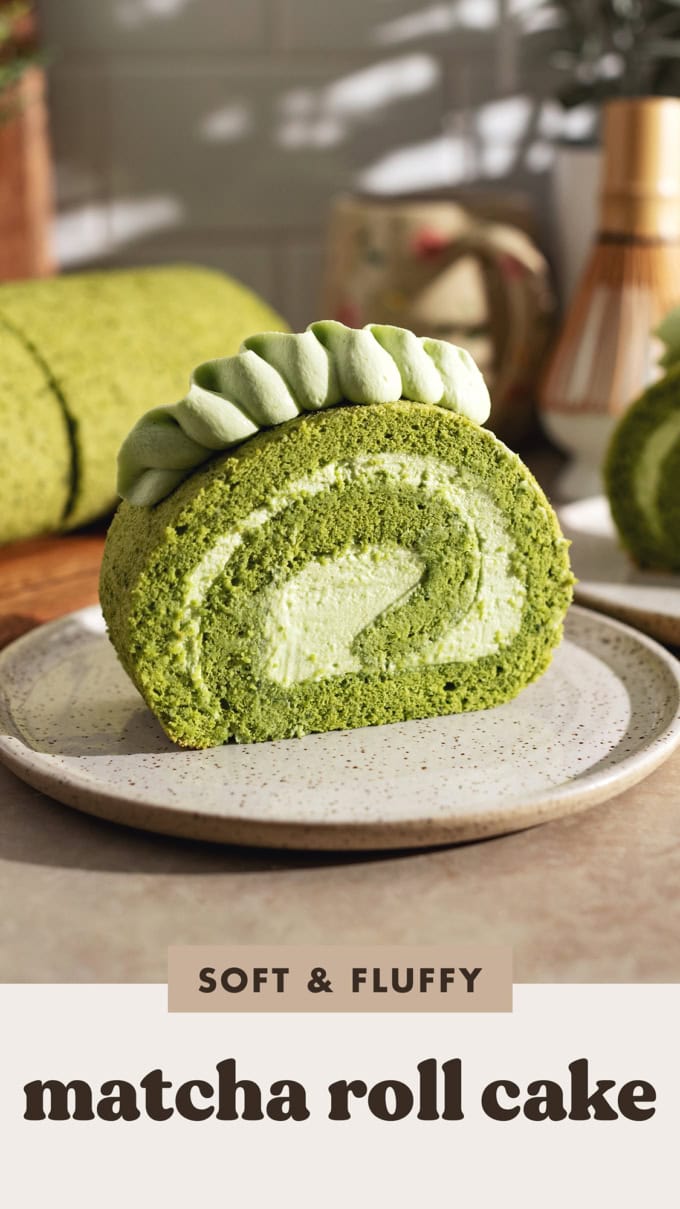
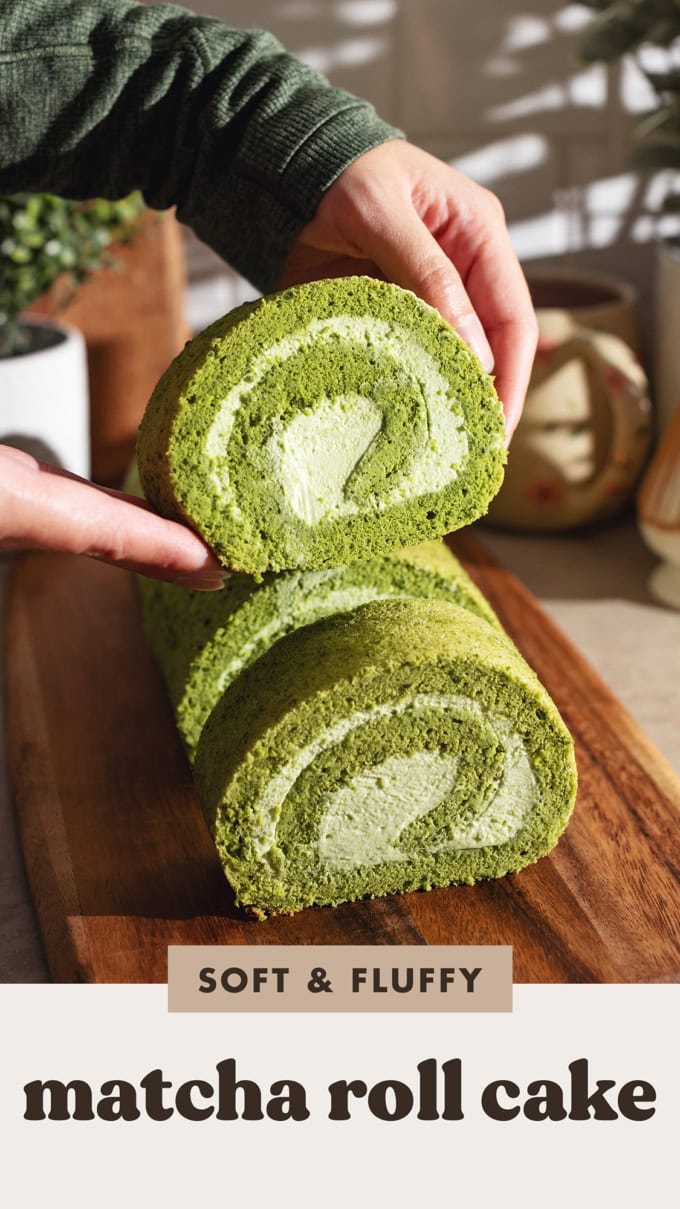
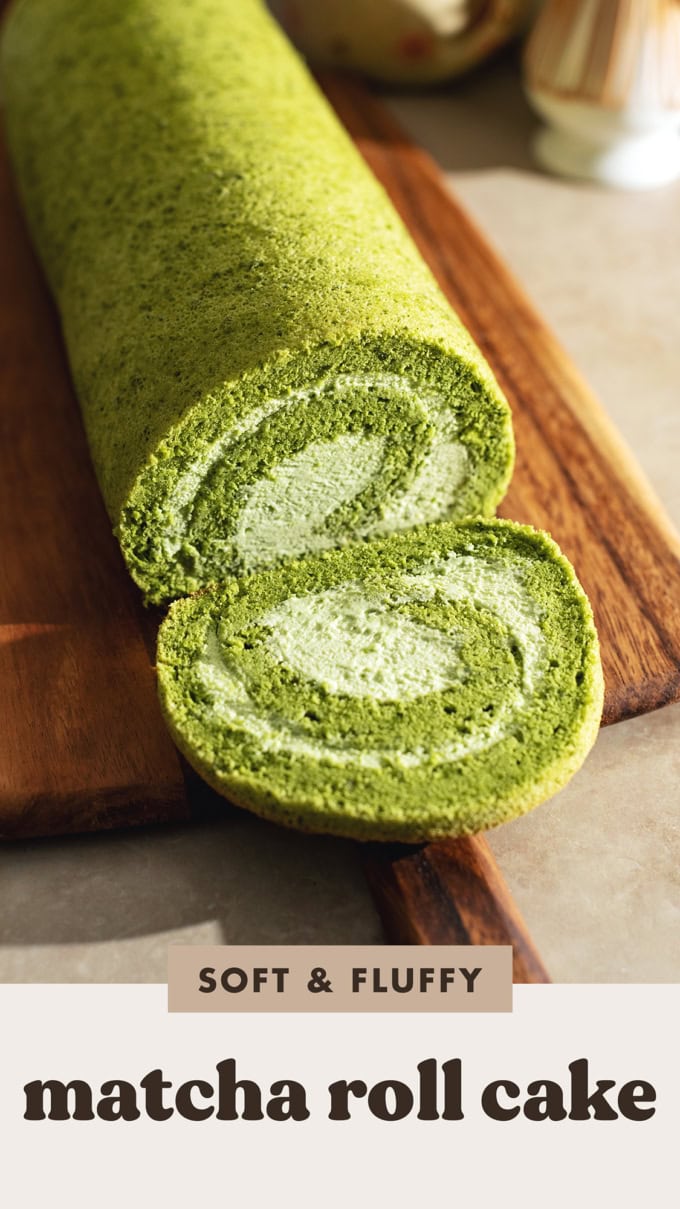
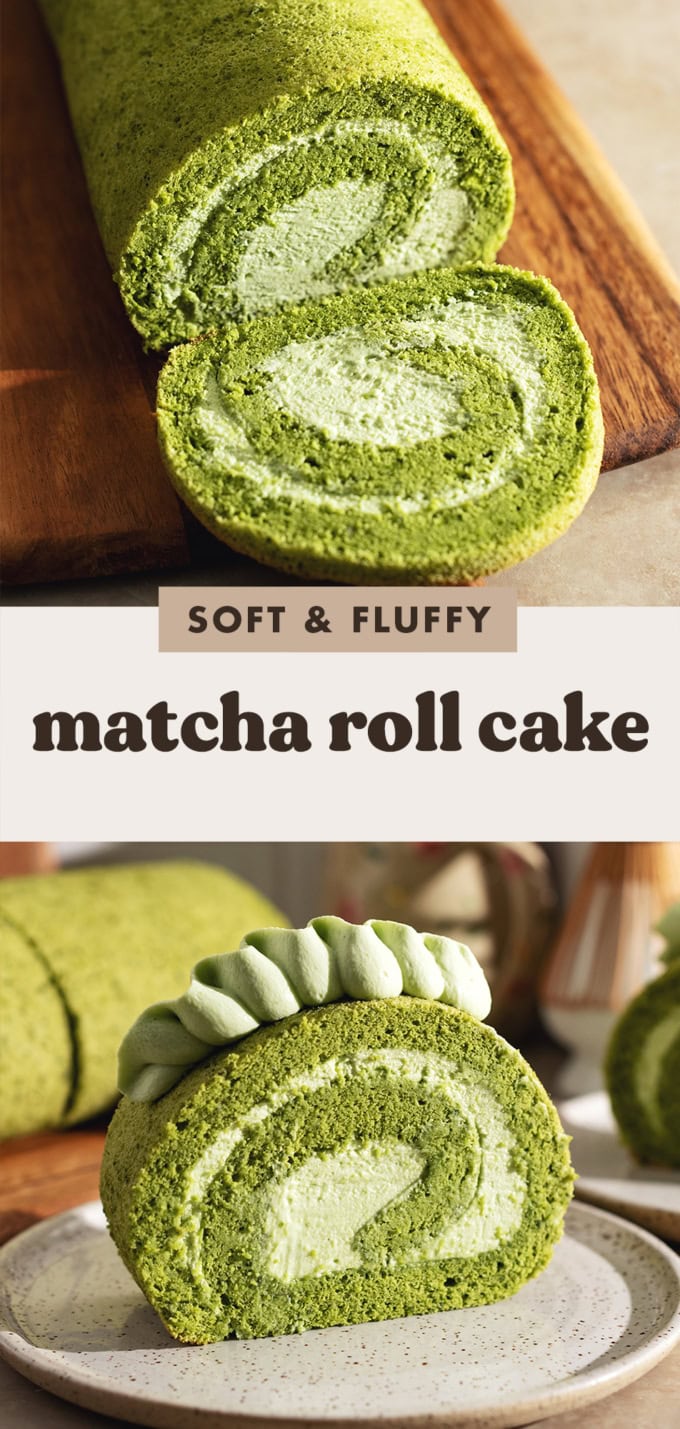
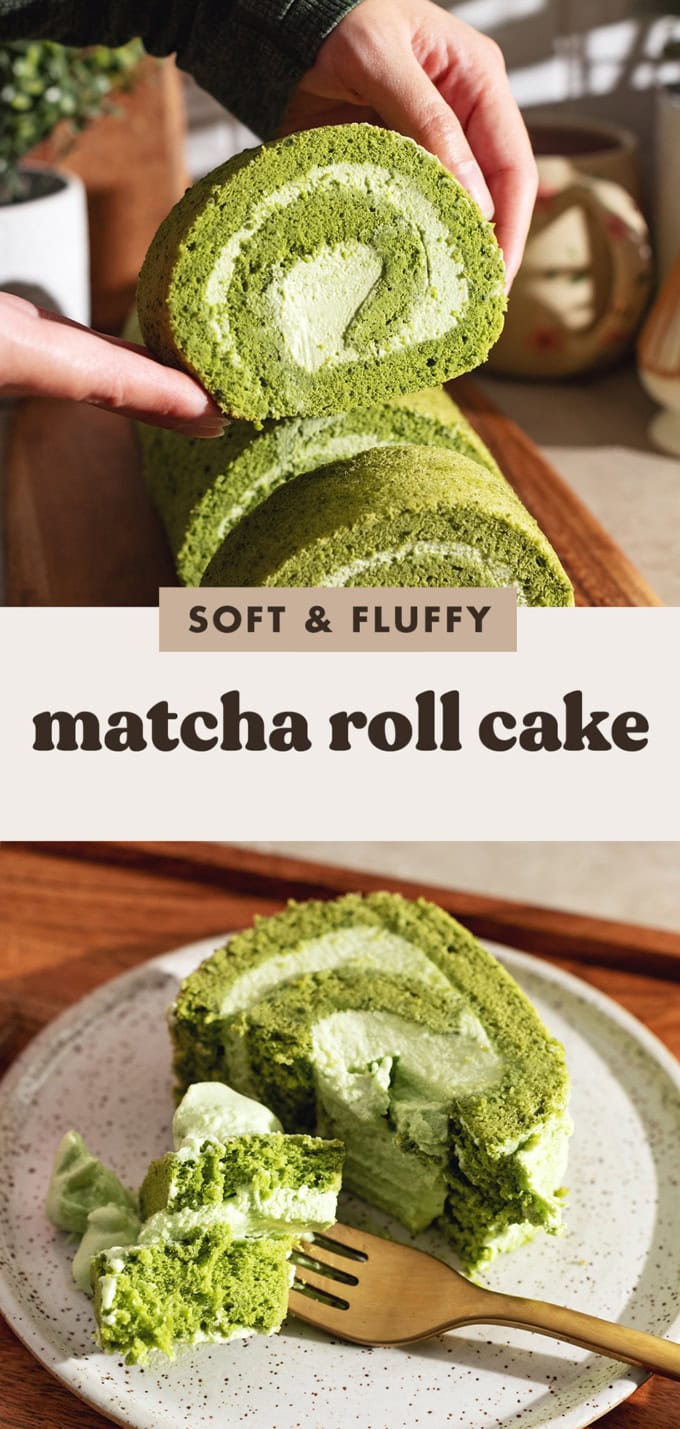
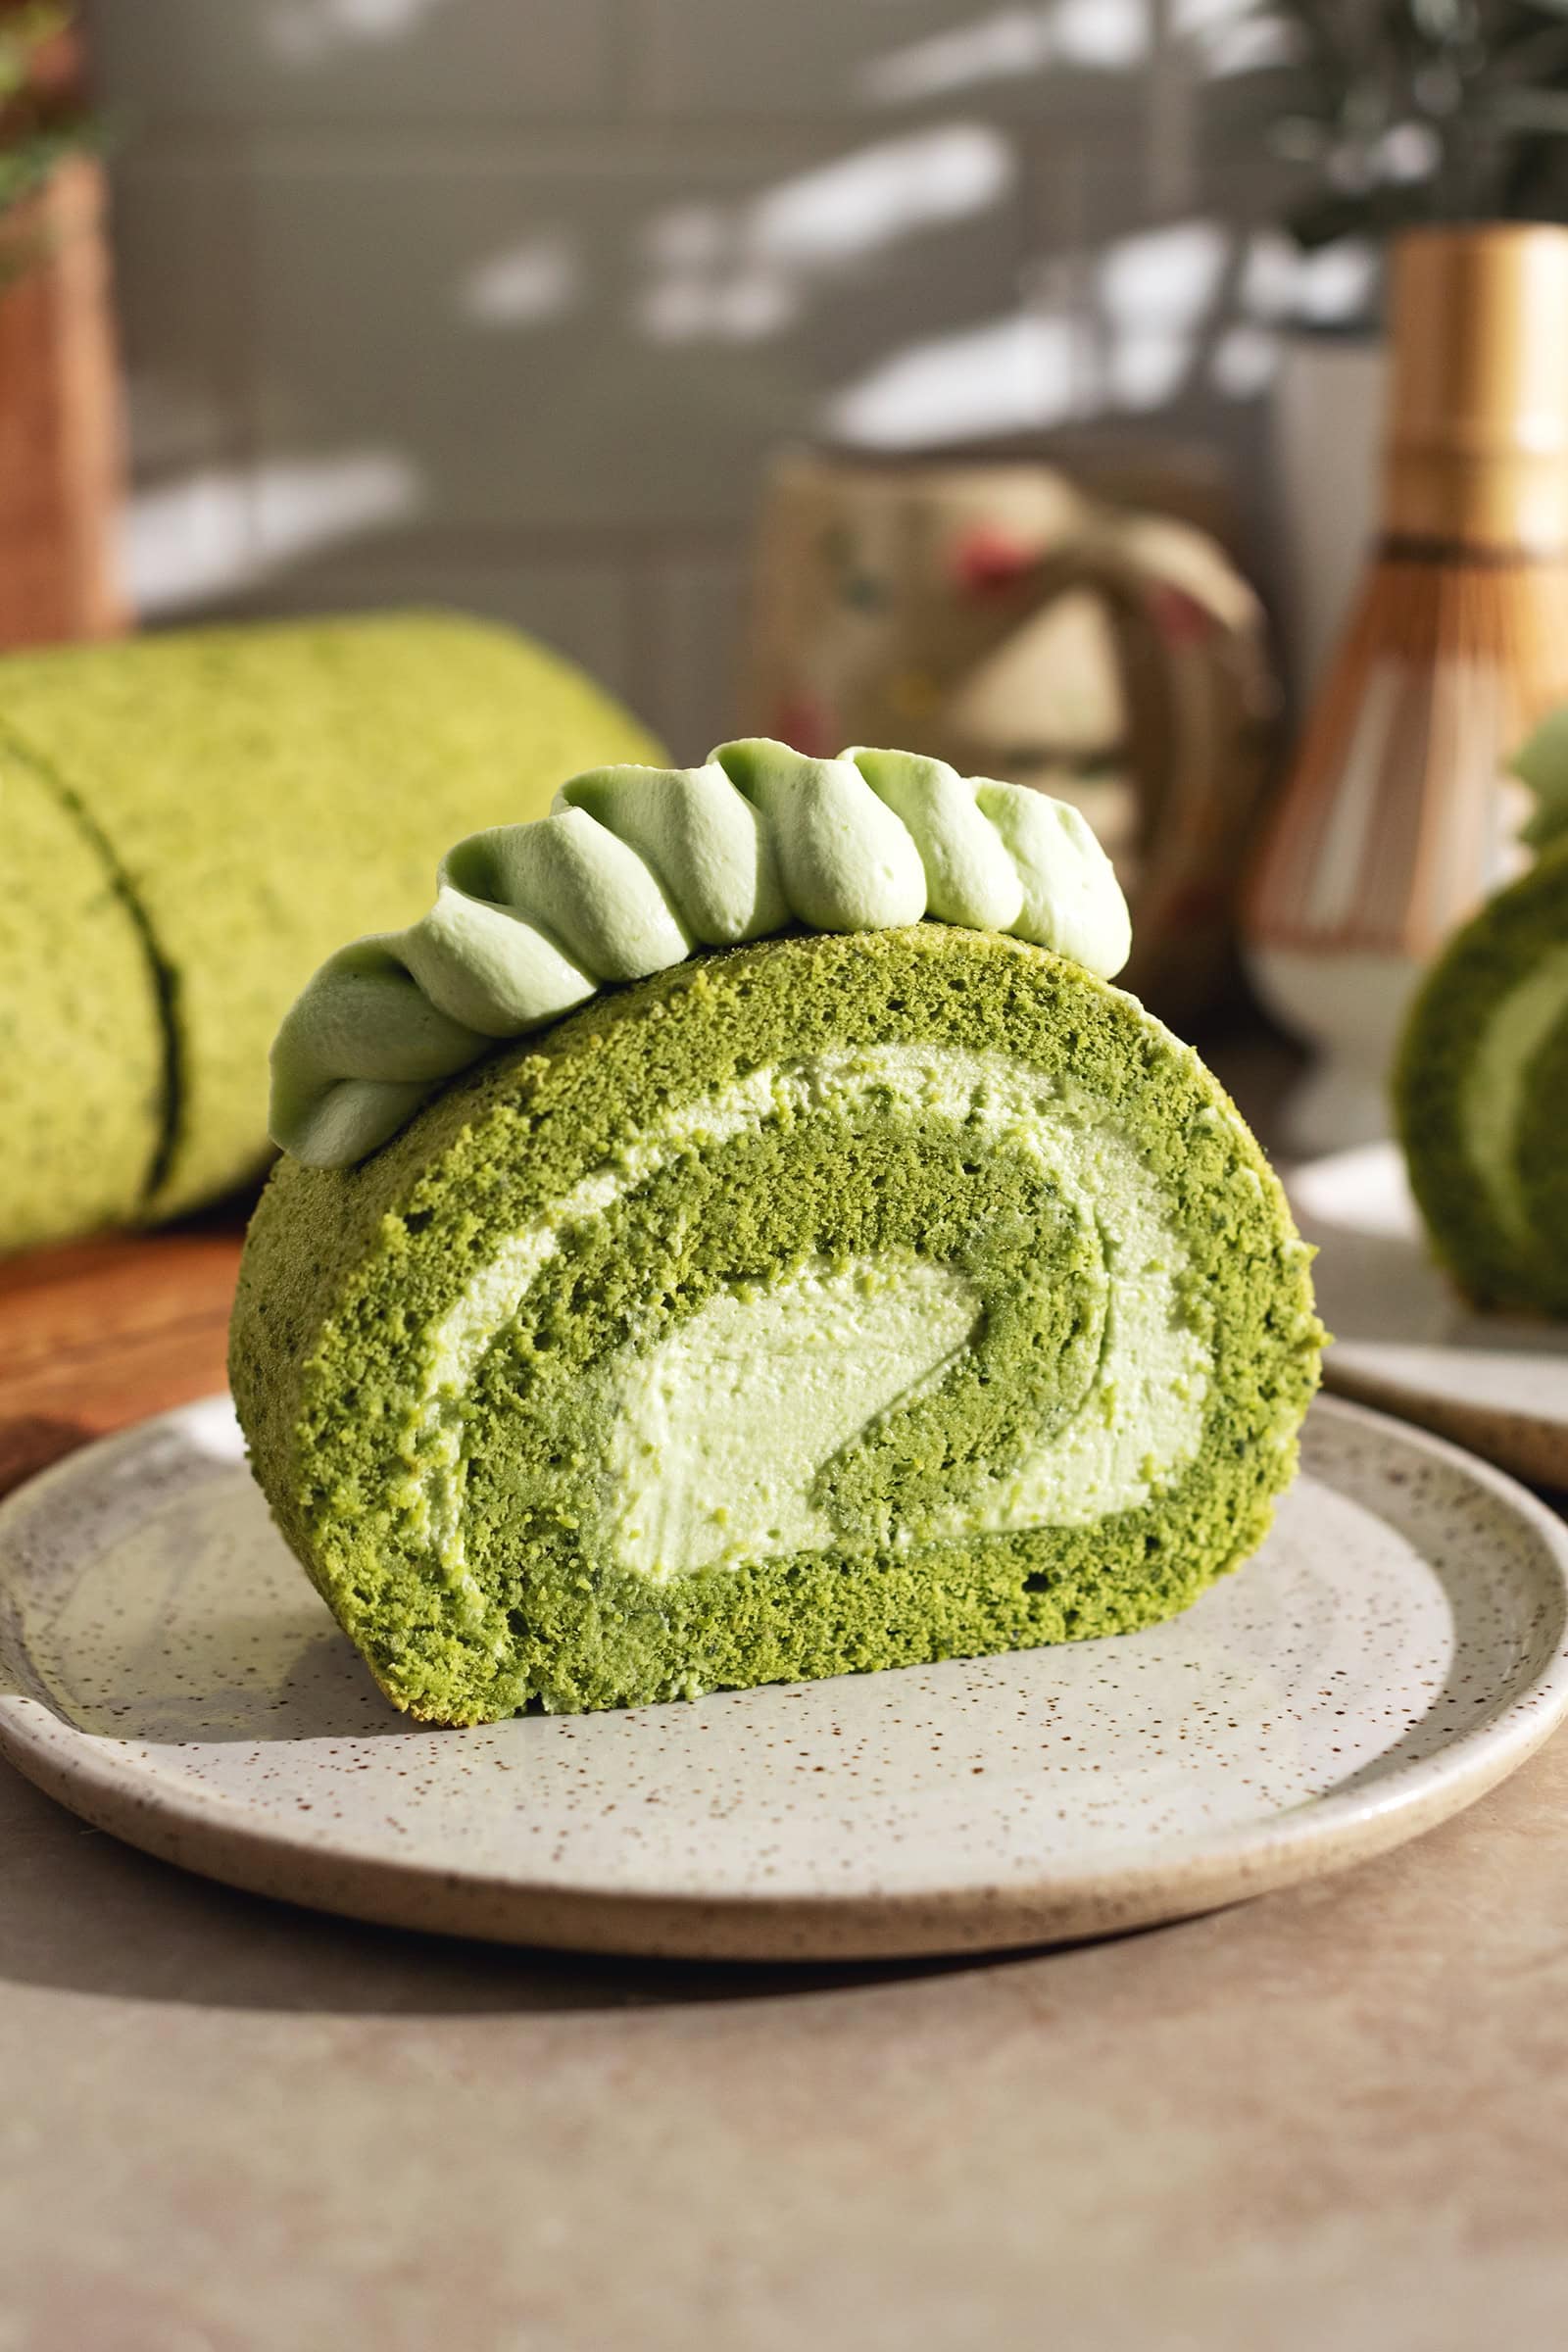
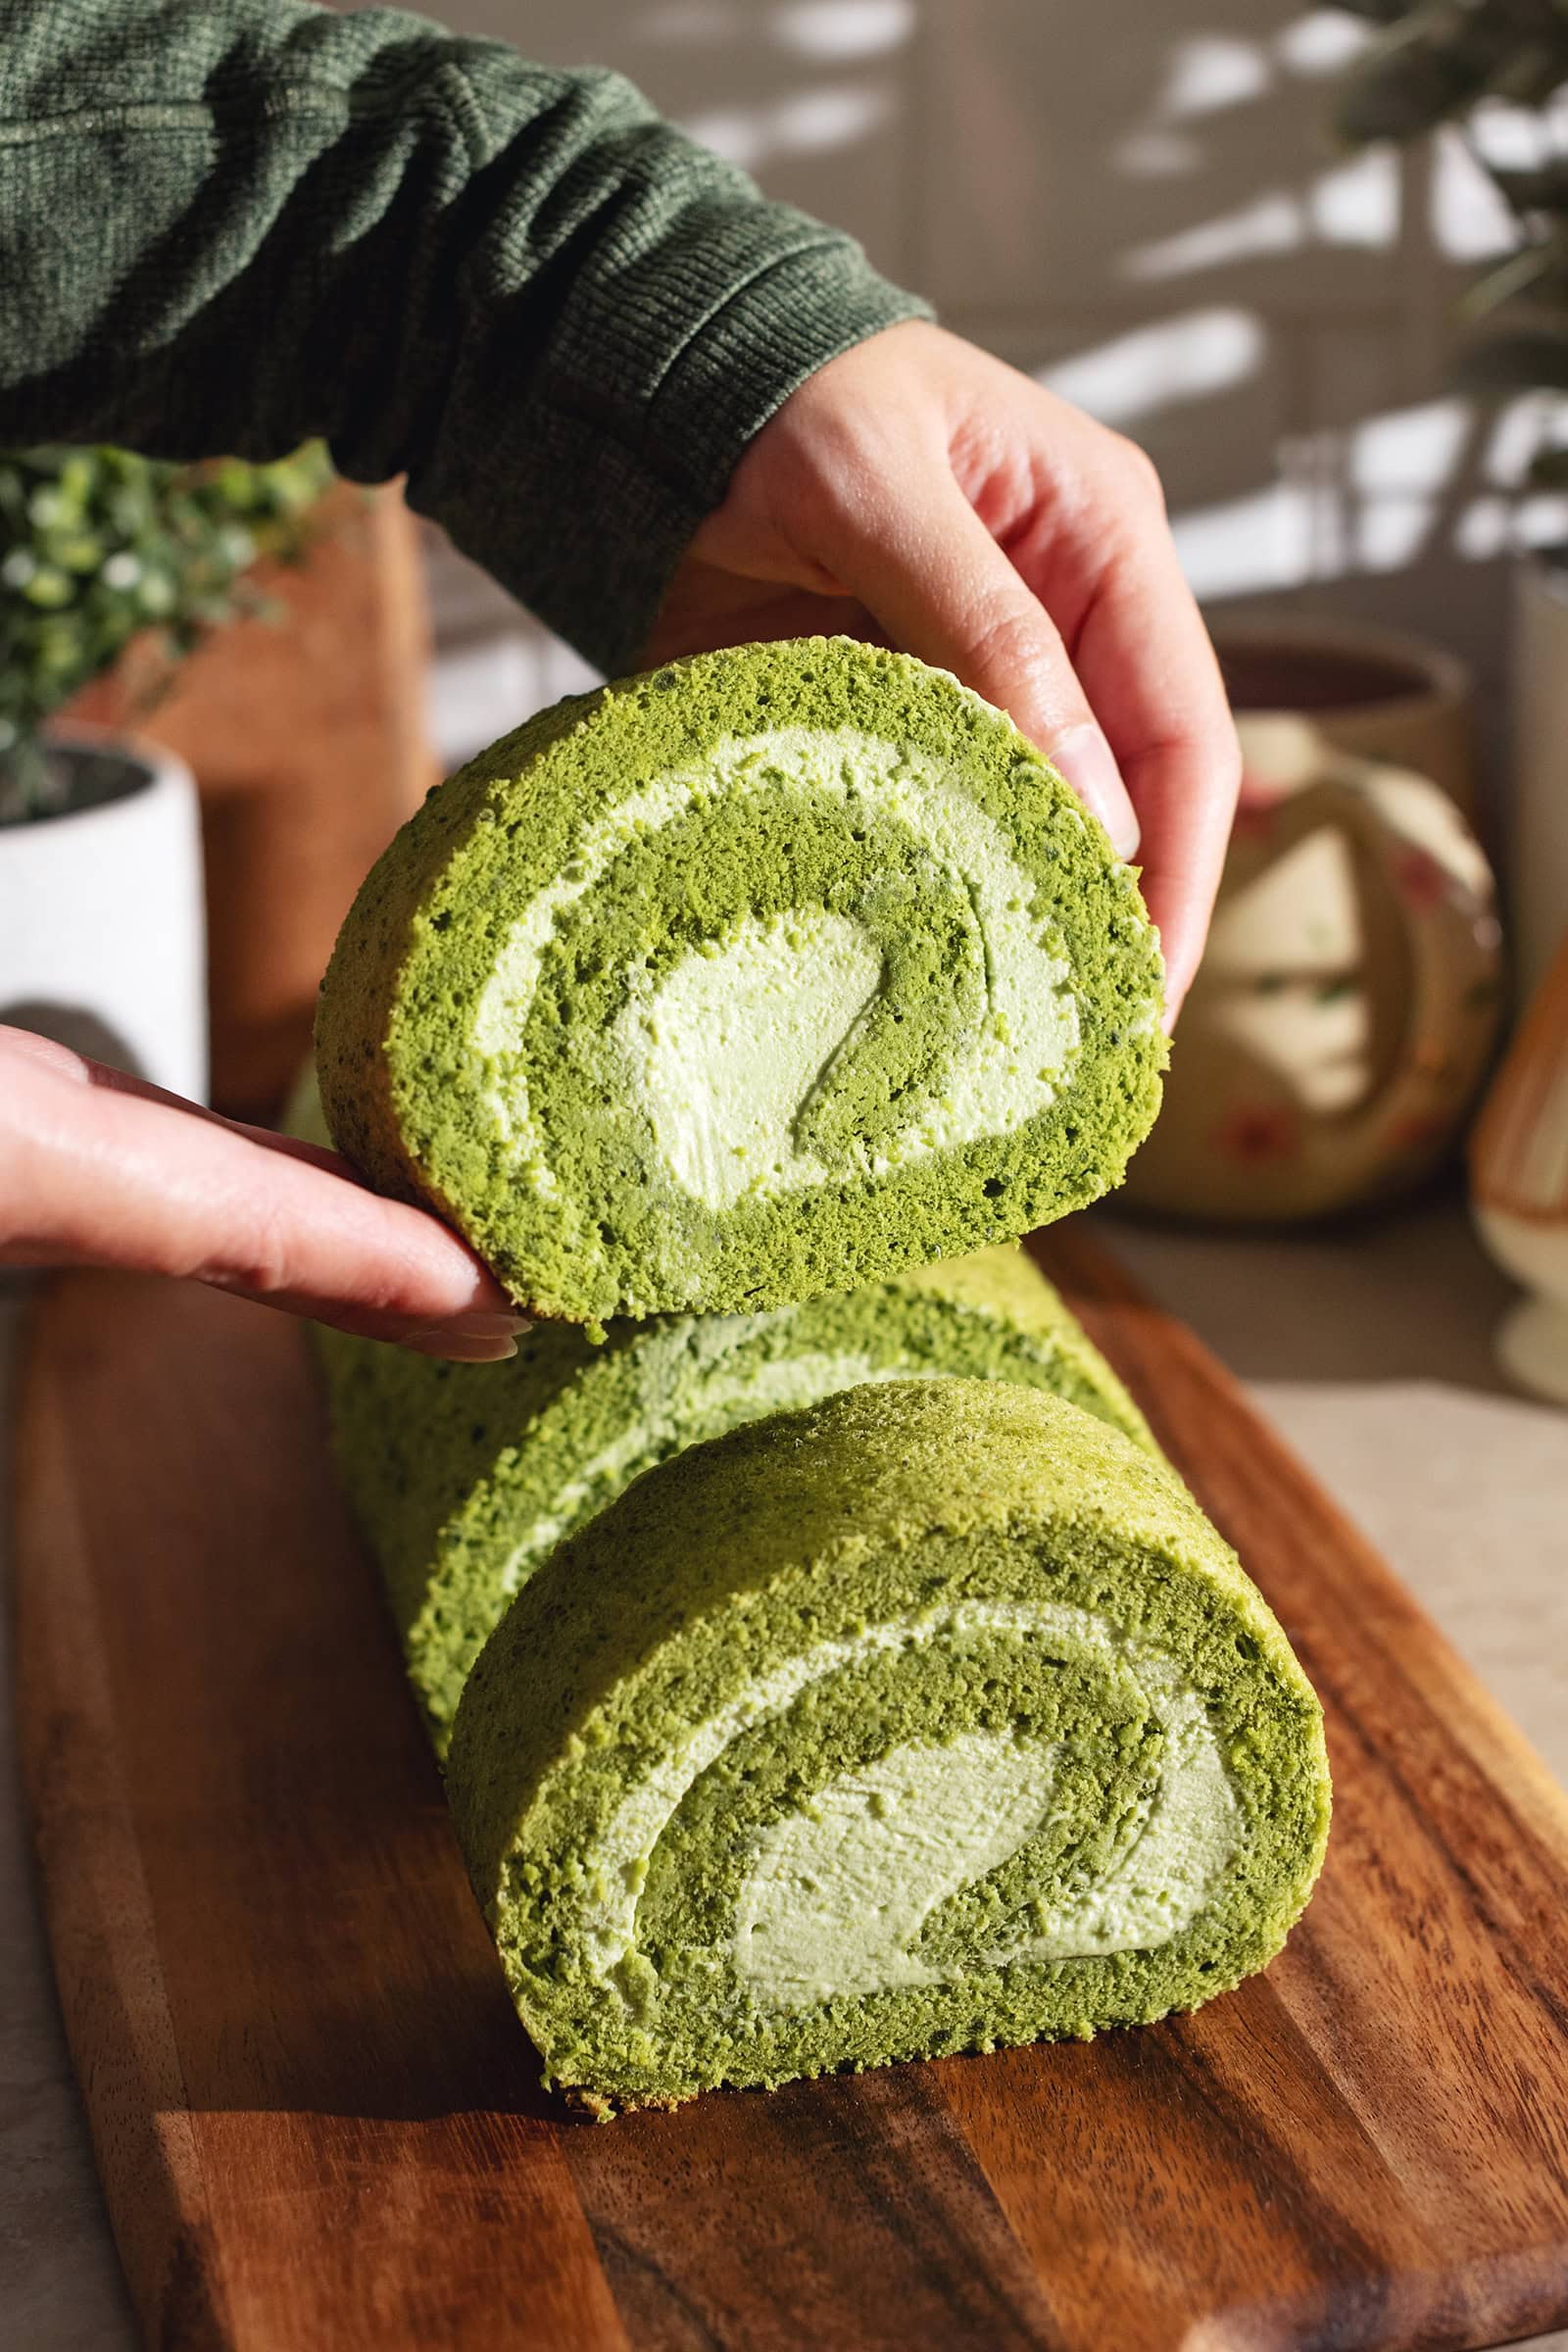
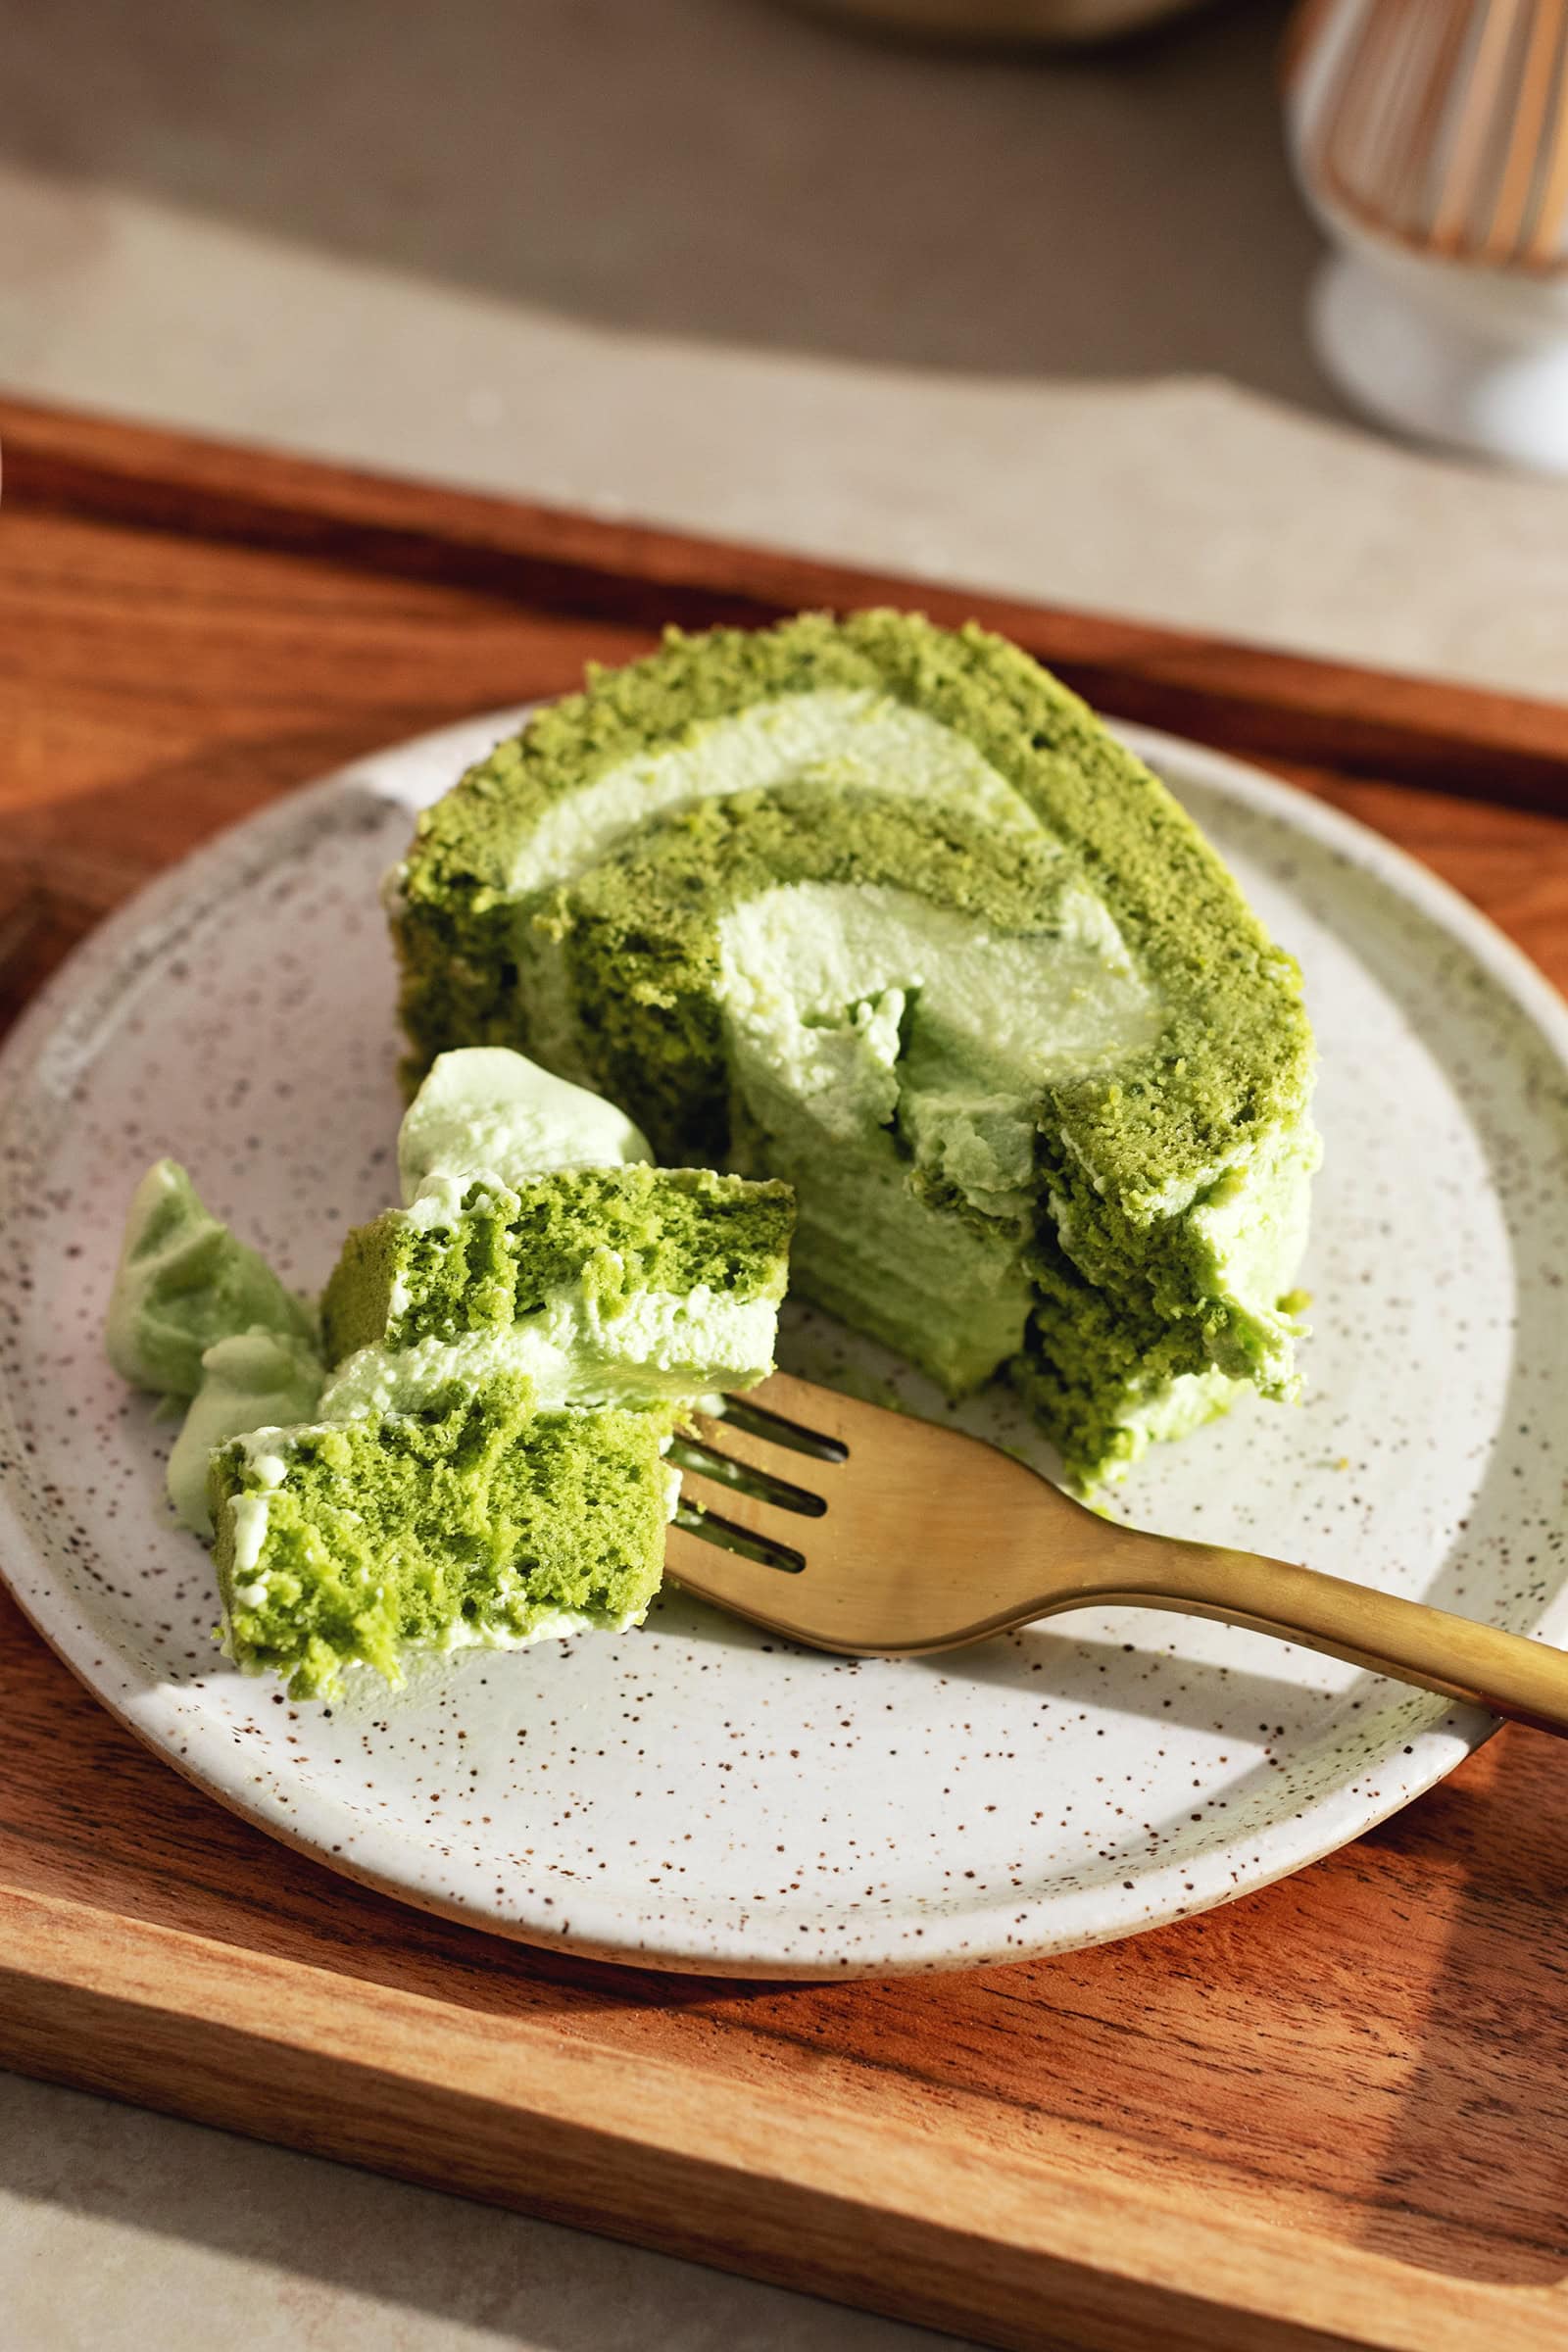
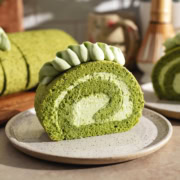
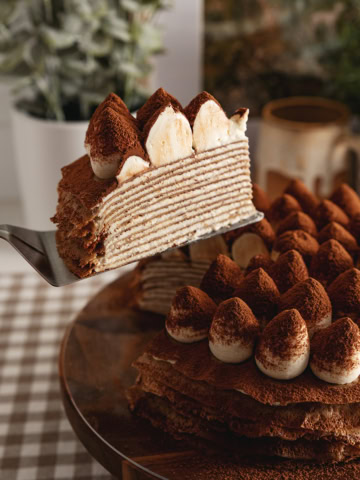
This matcha roll cake is made with a soft and fluffy matcha cake sheet that never rips when rolled and it's filled with matcha whipped cream for double the matcha green tea flavour.
Jump to:
Notes from the baker
I've made my fair share of roll cakes (also called swiss rolls) like my Ube Roll Cake and Strawberry Swiss Roll. It's one of my top 3 favourite kinds of cakes to make because they always turn out well and taste amazing.
This matcha roll cake is completely bakery-worthy and perfect for people who prefer light and airy cakes that aren't too sweet or heavy (my parents, basically). It looks like it came straight out of an Asian bakery. They might not even know the difference.
This is a cake I would make for a special occasion or if you're feeling extra fancy because it does use a lot of matcha powder (it's expensive, I know!). I always recommend using ceremonial grade matcha powder even for baking but go for more affordable varieties of matcha powder from reputable brands. For baking, I love Ippodo's Ikuyo matcha (lower $ per gram than their other matcha powders) and Paragon Tea Room's ceremonial matcha powder.
I hope you love this cake roll, fellow matcha lovers!
Why you'll love this recipe
- Soft and fluffy cake. This matcha swiss roll is made with my super soft chiffon cake recipe that stays soft even straight from the fridge because it doesn't contain any butter.
- Light and airy whipped cream. Each bite is like eating a cloud. The whipped cream gives the cake just the right amount of moisture and isn't too sweet.
- Full of matcha flavour. Yes, we're using a lot of matcha powder in this cake (in both the cake and the whipped cream!) but it's worth it for the amazing flavour and colour.
- Cake roll recipe that never cracks or rips. Tried and true, easy-to-follow recipe. This is the same recipe that I use for all my roll cakes and it hasn't failed me yet.
Tools
- 12x17" baking tray - This cake sheet is baked in a 12x17" baking tray (that I normally use for baking cookies), a jelly roll pan, or any similar-sized baking tray that has walls that are at least 1" tall.
- Electric hand mixer - A hand mixer is essential for beating the egg whites into a meringue quickly and easily. Don't try to do it with a manual whisk (you can but it will take a long time and it'll be an arm workout).
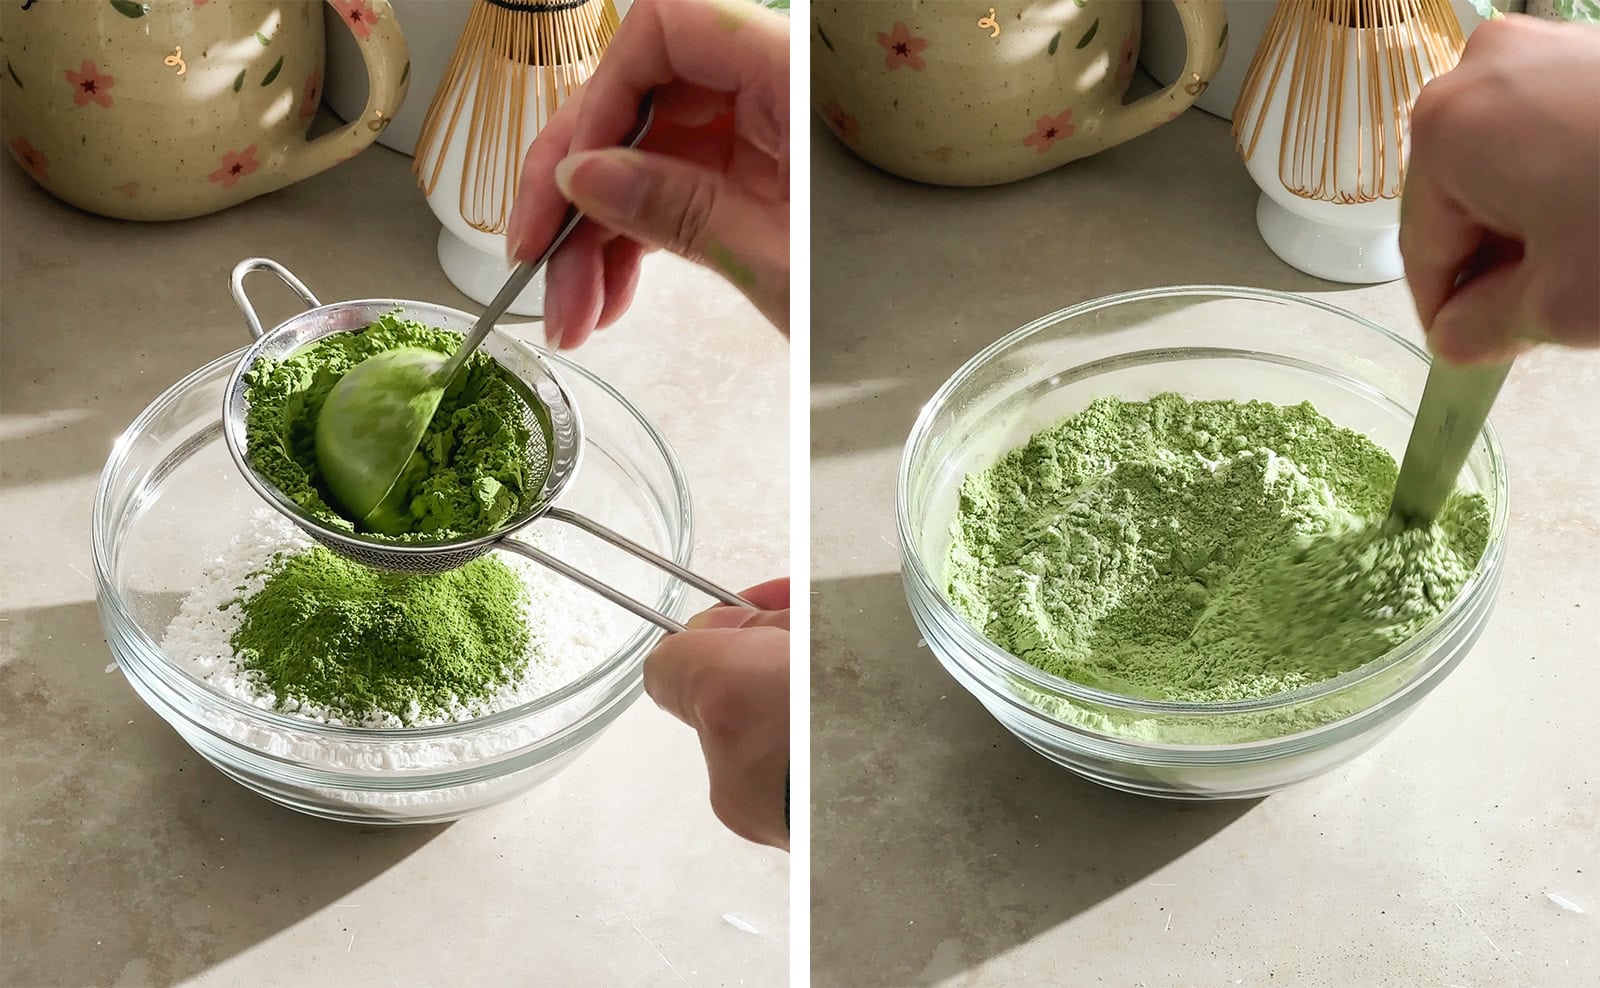
- Fine mesh sieve - You'll need this to aerate the flour mixture and break up any clumps in the matcha powder.
- Piping bag (optional) - You'll need this if you want to pipe a whipped cream design on top of your cake roll.
- Piping tip (optional) - I used a Wilton 125 piping tip for the squiggle of whipped cream on top of my cake roll but you can use any piping tip you like.
Ingredient notes
As always, the full recipe card with ingredient amounts and instructions is at the bottom of this post! Keep reading for more details on each ingredient or skip ahead to the recipe.
- Cake flour - Cake flour contains less gluten than all-purpose flour and makes for lighter and softer cakes.
- Matcha powder - Use a ceremonial grade matcha powder for the best matcha flavour and vibrant green colour. You can also use a good quality culinary grade matcha powder but they tend to be duller in colour and hit or miss so only use this if you have one that you love.
- Baking powder
- Eggs - Let your eggs come to room temperature before using them. Room-temperature egg whites whip up into stiff peaks faster.
- Cream of tartar - This is an acidic powder that helps stabilize the egg white meringue and helps it whip up faster. If you don't have any, you can either omit it or substitute it with 1 teaspoon of vinegar or lemon juice.
- Granulated sugar
- Milk - Use any dairy or non-dairy milk you prefer. I usually use oat milk or almond milk because it's what I have on hand.
- Oil - Use any light-tasting oil like canola oil, avocado oil, or grapeseed oil.
- Vanilla extract
- Whipping cream or heavy cream - You can use whipping cream for a lighter cream filling or heavy cream for a thicker, richer filling. Use it cold straight from the fridge. Cold cream whips up faster.
- Powdered sugar
How to make a matcha roll cake
Make the matcha cake sheet
Prep: Preheat oven to 350°F. Line a 12x17" baking tray with parchment paper cut to size and set aside.
Flour mixture: In a small bowl, stir together flour, matcha powder (sift it in if clumpy), and baking powder. Set aside.
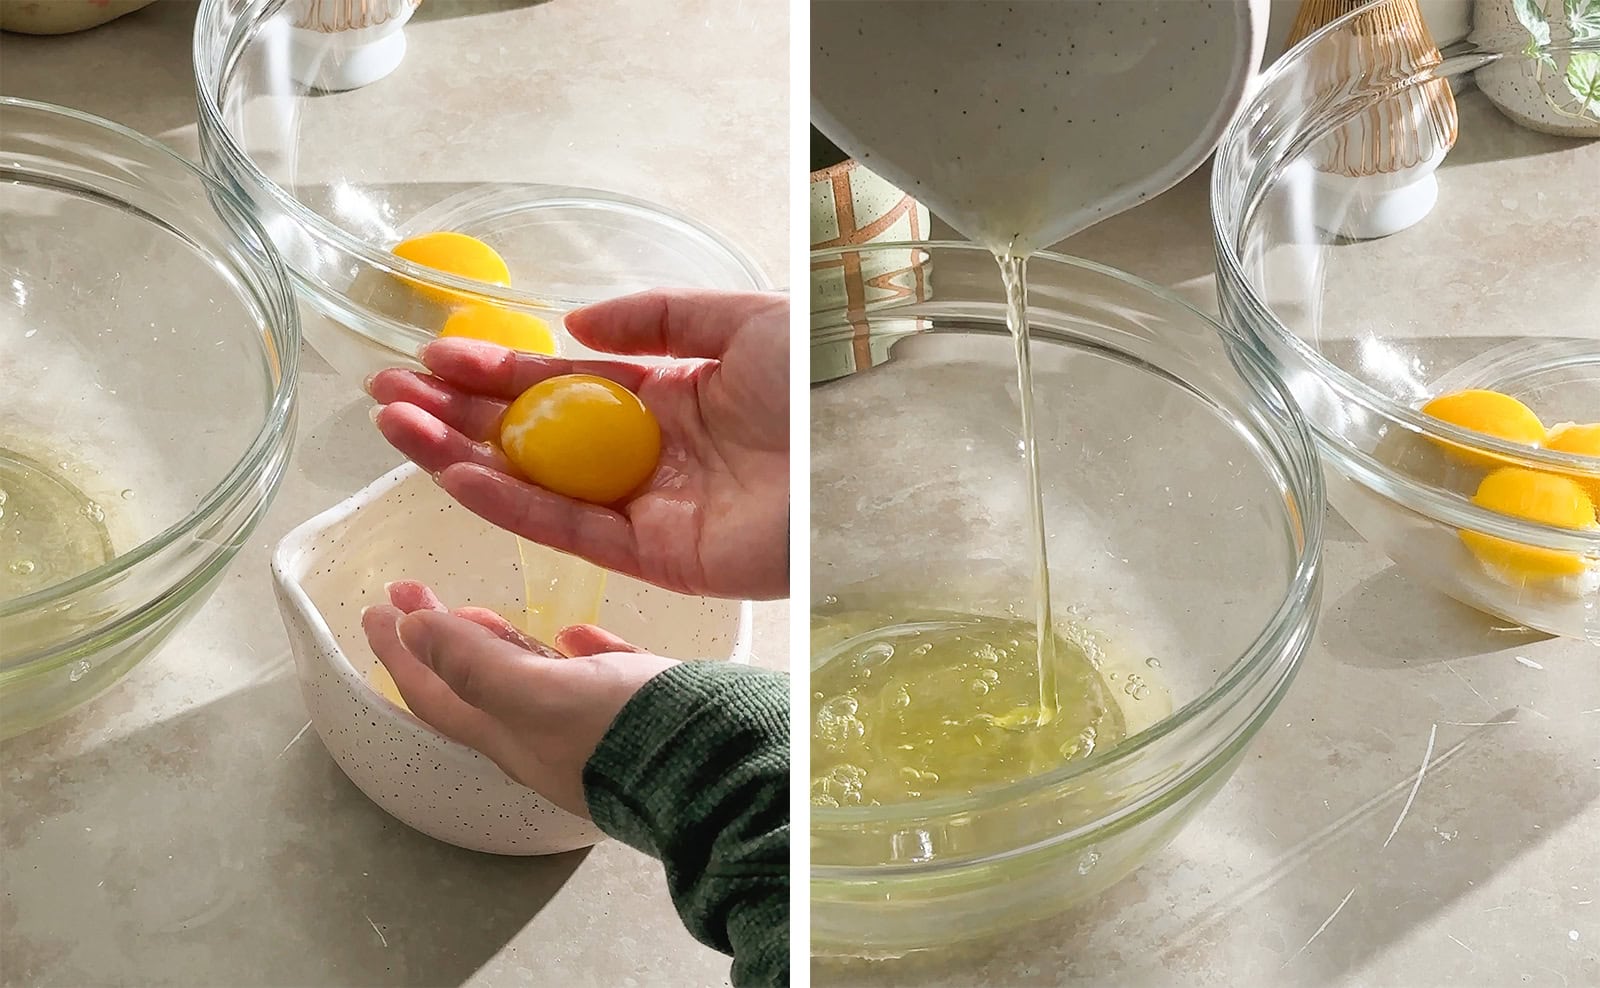
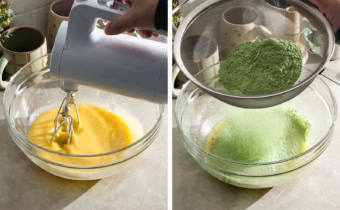
Separate eggs: Separate the egg whites and egg yolks into two large mixing bowls, being careful not to get any yolk in the egg whites. Set the bowl of egg yolks aside.
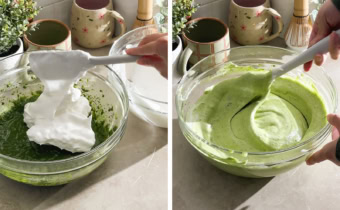
Egg white meringue: To the egg whites, add cream of tartar. Use an electric hand mixer to beat the egg whites on low-medium speed until they become frothy like cappuccino foam. Add 100g of sugar, one spoonful at a time, mixing in between each addition. After all the sugar has been added, continue beating on medium-high speed until the meringue becomes stiff peaks. Set aside.

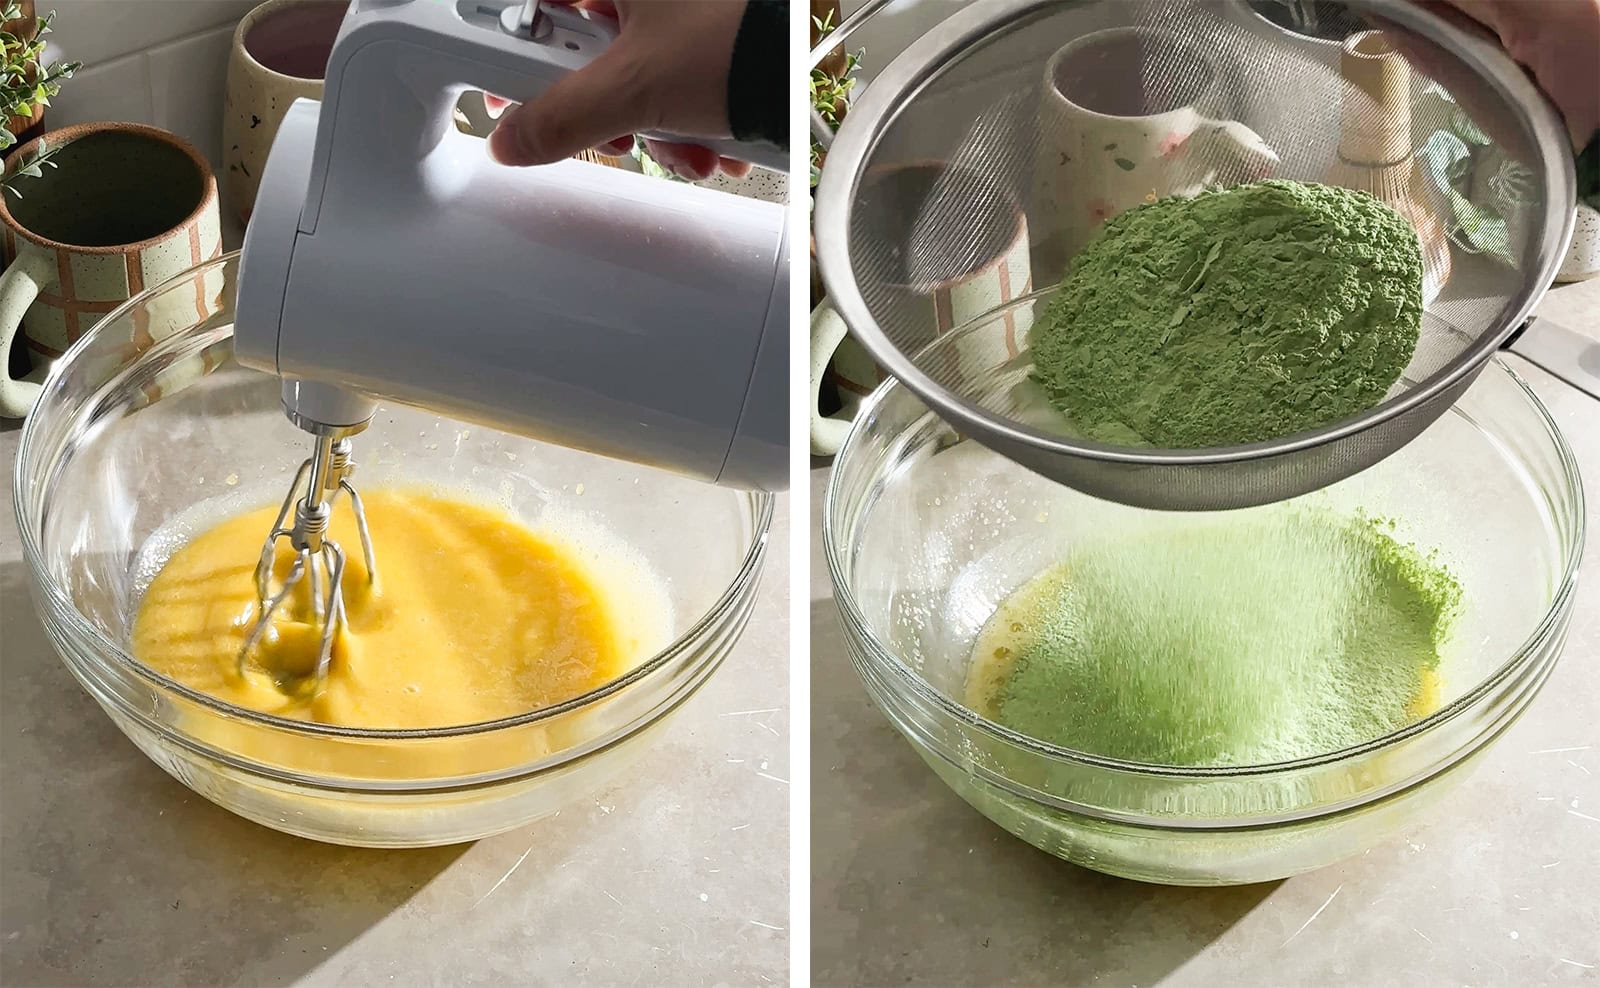
Egg yolk mixture: To the egg yolks, add the remaining 50g of sugar. Use the same hand mixer to mix until combined. Add the milk, oil, and vanilla extract and mix until combined. Use a fine mesh sieve to sift the flour mixture into the egg yolk mixture. Mix on low speed until the flour has just combined.
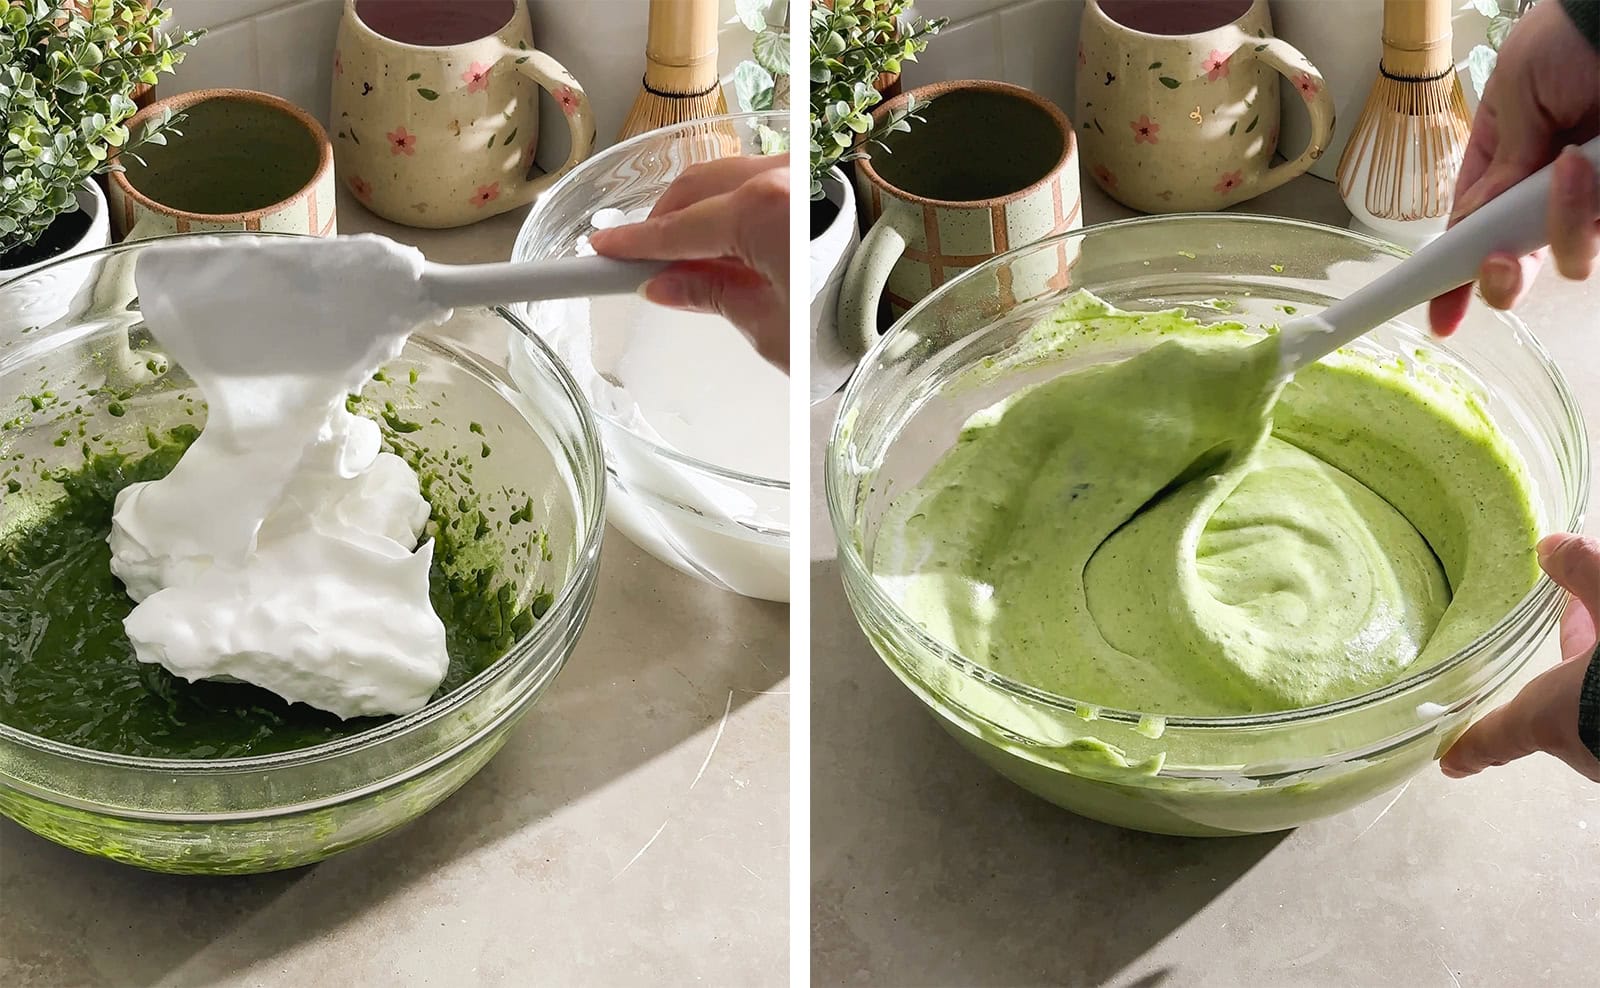
Combine meringue and egg yolk mixture: Add about ⅓ of the egg white meringue into the egg yolk mixture and fold together with a spatula, making sure to scrape the bottom of the bowl. Add the rest of the meringue and fold together until no streaks remain. Again, make sure to scrape the bottom and sides of the bowl where thicker batter can stick. Don't overmix.
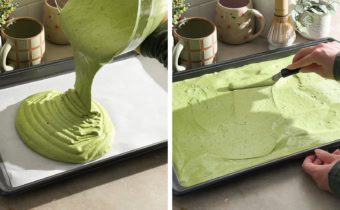
Fill pan: Pour the batter into your lined baking tray. Use an offset spatula to spread the batter into the corners and edges of the pan and smooth the batter into an even layer.

Bake: Bake for 12-15 minutes or until the edges are lightly browned and the top of the cake sheet is puffed up.
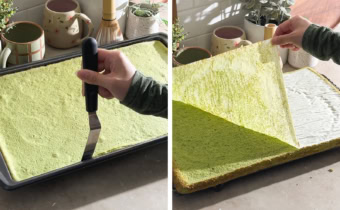
Release cake: Let the cake cool on a wire rack for only about 5 minutes before running an offset spatula around the edges of the pan to release the cake. Place a wire rack on top of the pan, grip both sides of the pan and rack (with oven mitts), and flip the cake onto the rack. Peel the parchment paper off the cake. Place a fresh sheet of parchment paper on top and flip the cake onto the parchment paper.

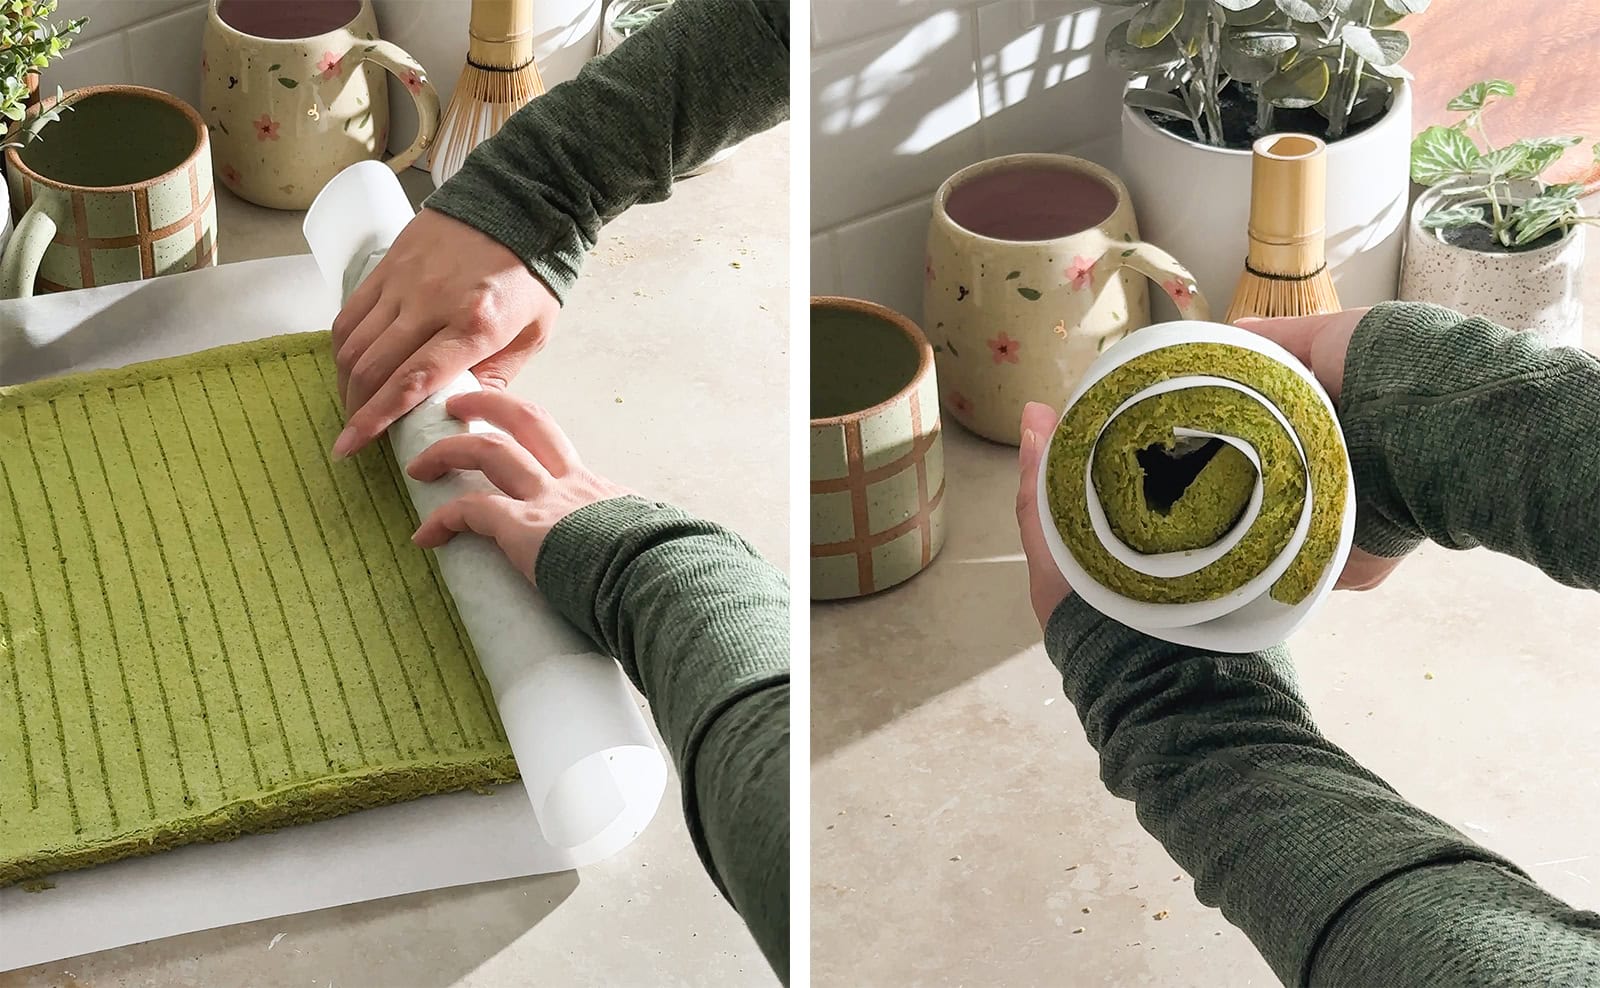
Pre-roll cake: Cut the browned edges off the two short ends of the cake sheet. While the cake is still warm, roll the the cake up with the parchment paper starting from a short end. Let the cake cool completely in this rolled-up log shape.
Make the matcha whipped cream
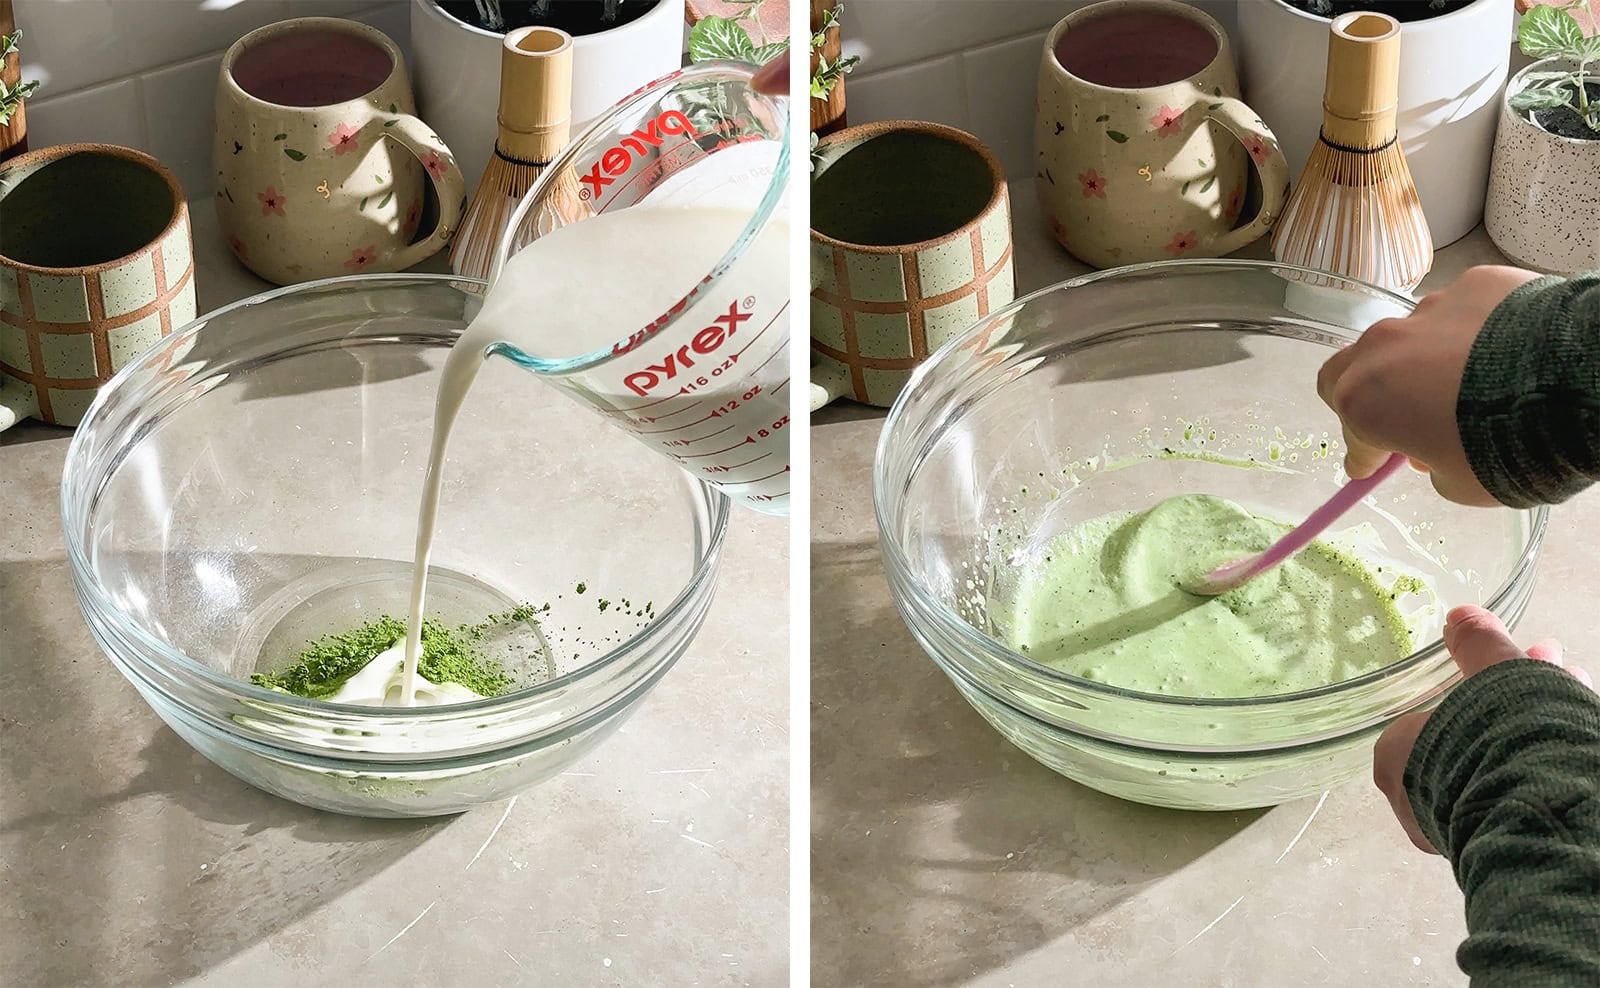
Mix matcha: In a large mixing bowl, sift in the matcha powder and add a small amount of whipping cream. Use a spatula to mix them together, smearing the matcha powder against the bottom and sides of the bowl to get rid of the clumps.
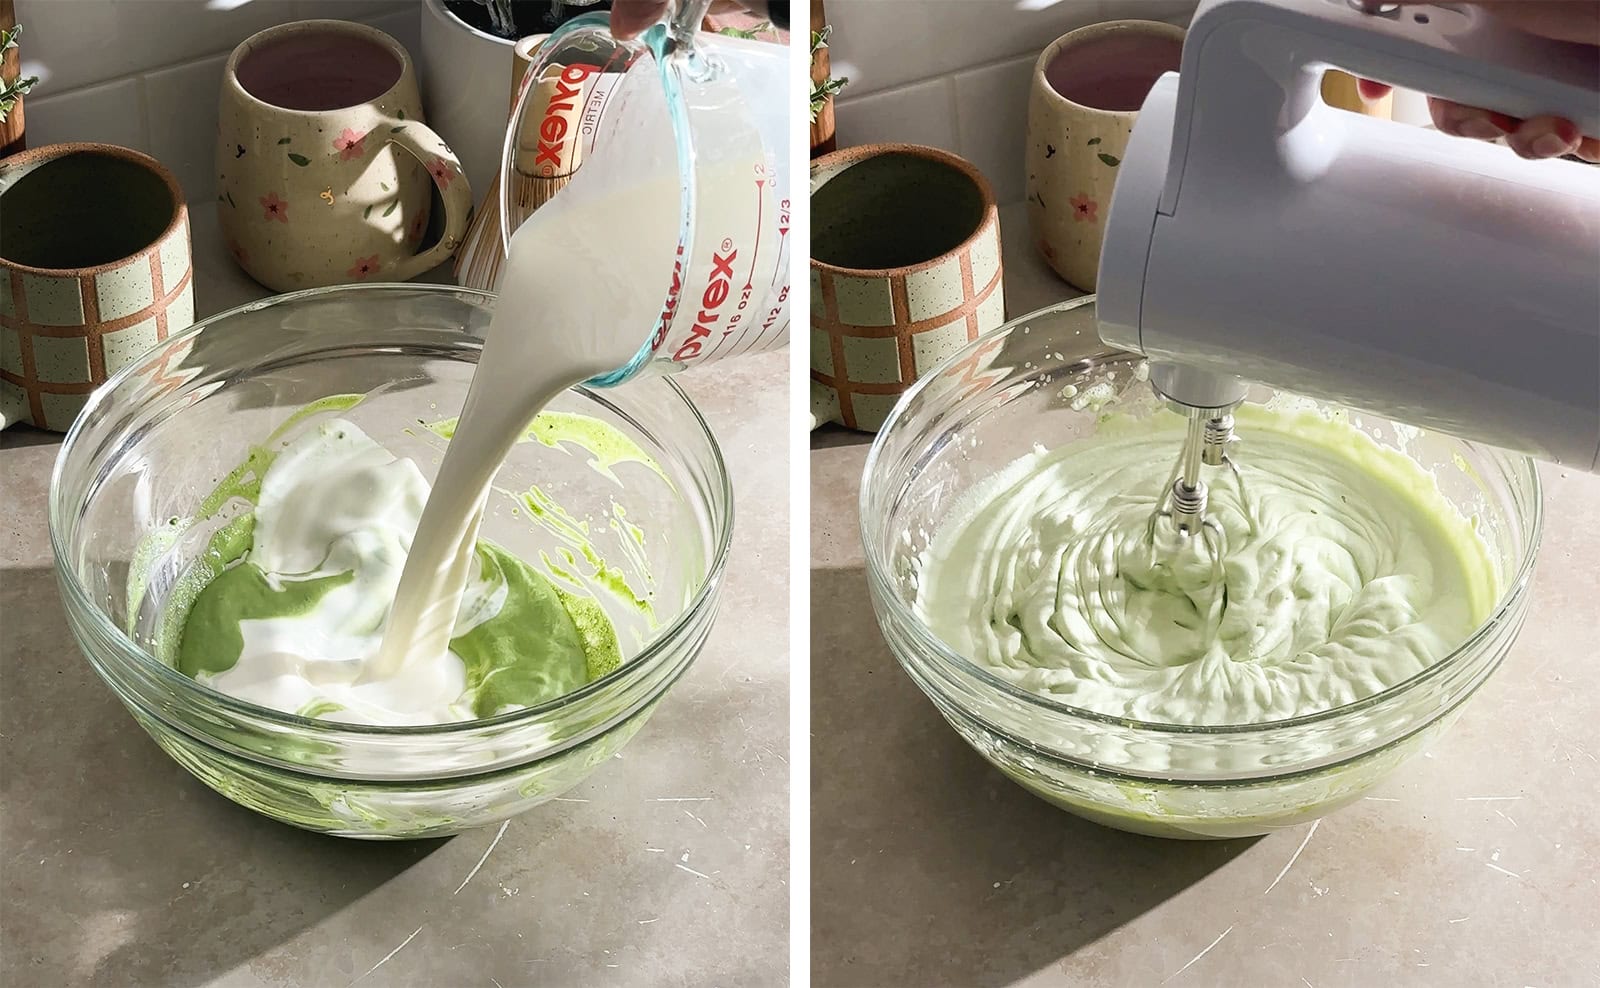
Whip cream: Add the rest of the whipping cream, powdered sugar, and vanilla extract. Use an electric hand mixer to beat until it becomes stiff peaks.
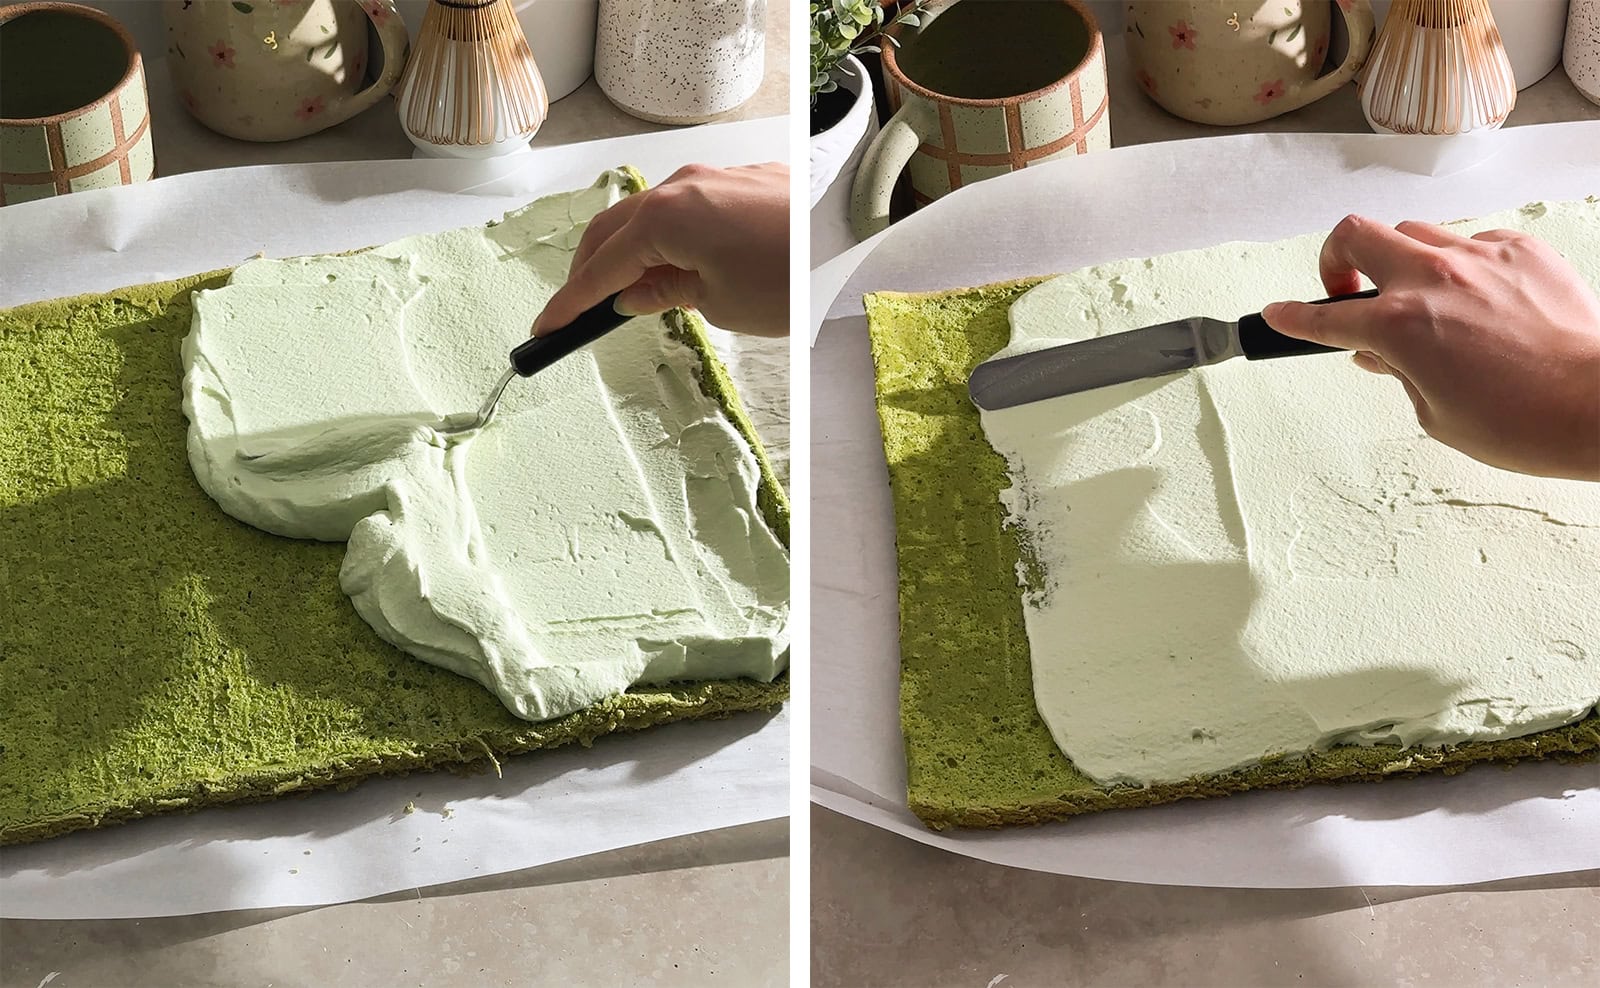
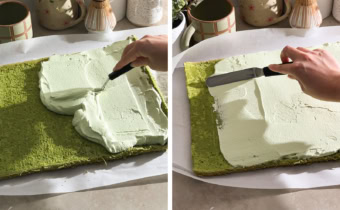
Spread cream on cake: Unroll your cooled cake sheet. Add dollops of whipped cream on top of cake. Use an offset spatula to spread the cream into a thick, even layer. Leave the last 2" at the end of the cake sheet empty. Save any remaining whipped cream for decoration later.
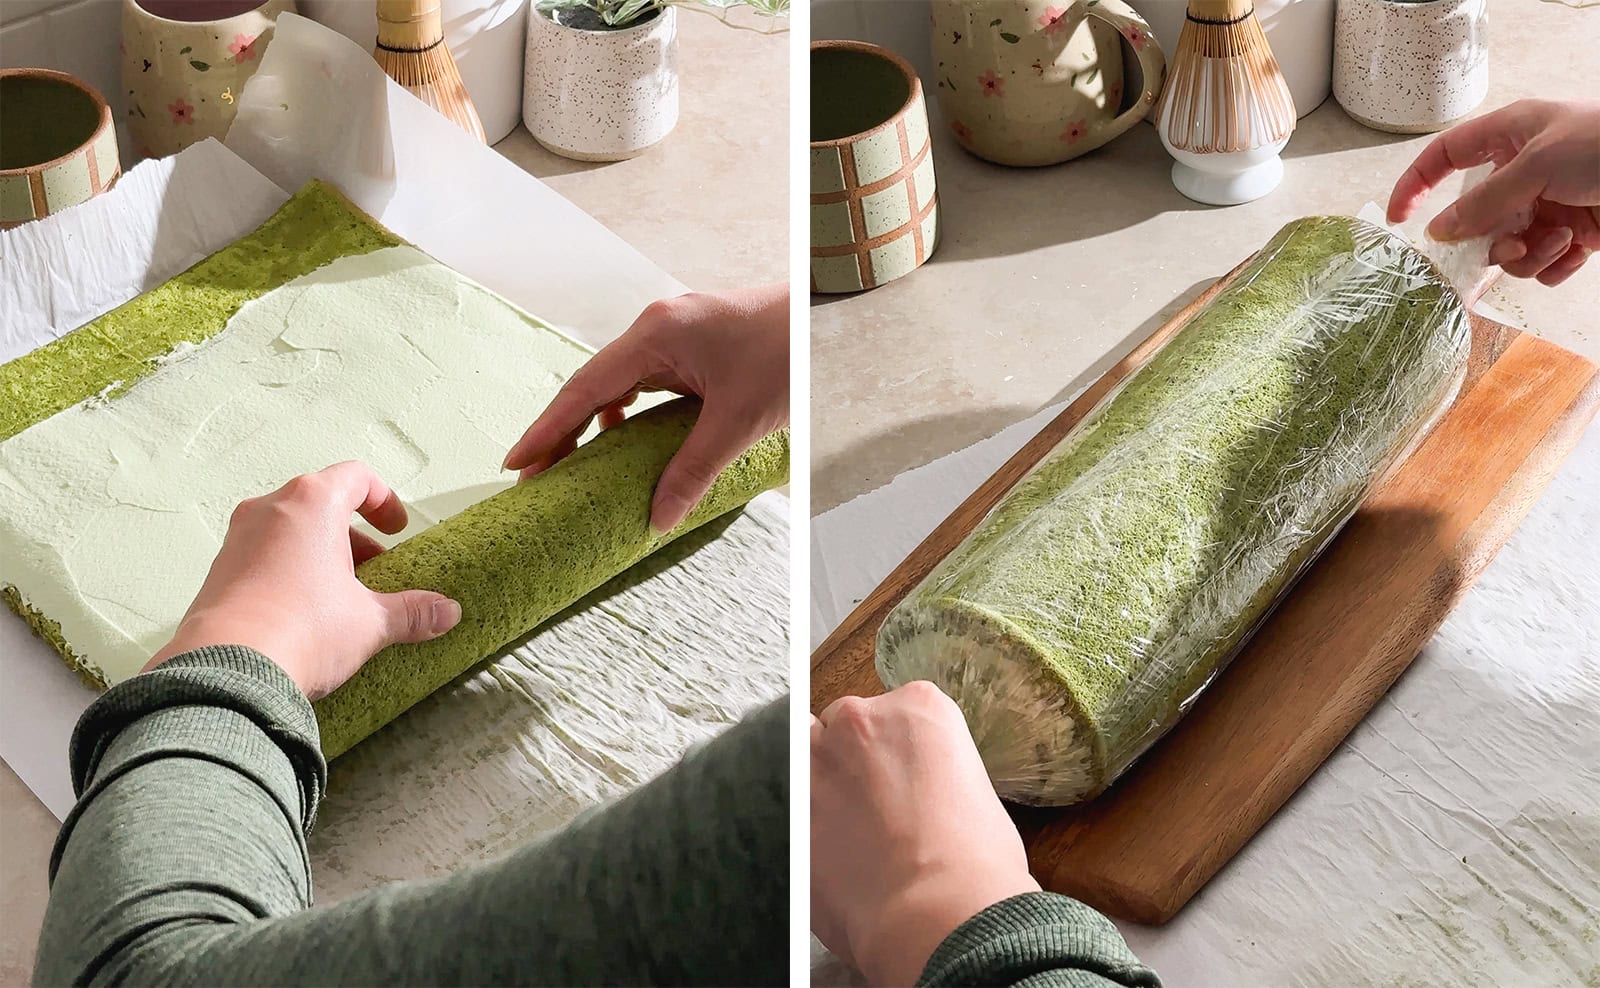
Roll cake: Roll the cake up in the same way as before. When you get to the end of the roll, place a sheet of plastic wrap next to the cake so that you can roll the cake right onto the plastic wrap. Use an offset spatula to remove any excess cream that squishes out of the seam and push any cream that comes out from the two ends of the roll. Wrap the cake roll in plastic wrap and chill the in fridge for at least 3 hours or overnight to allow the cream to set.
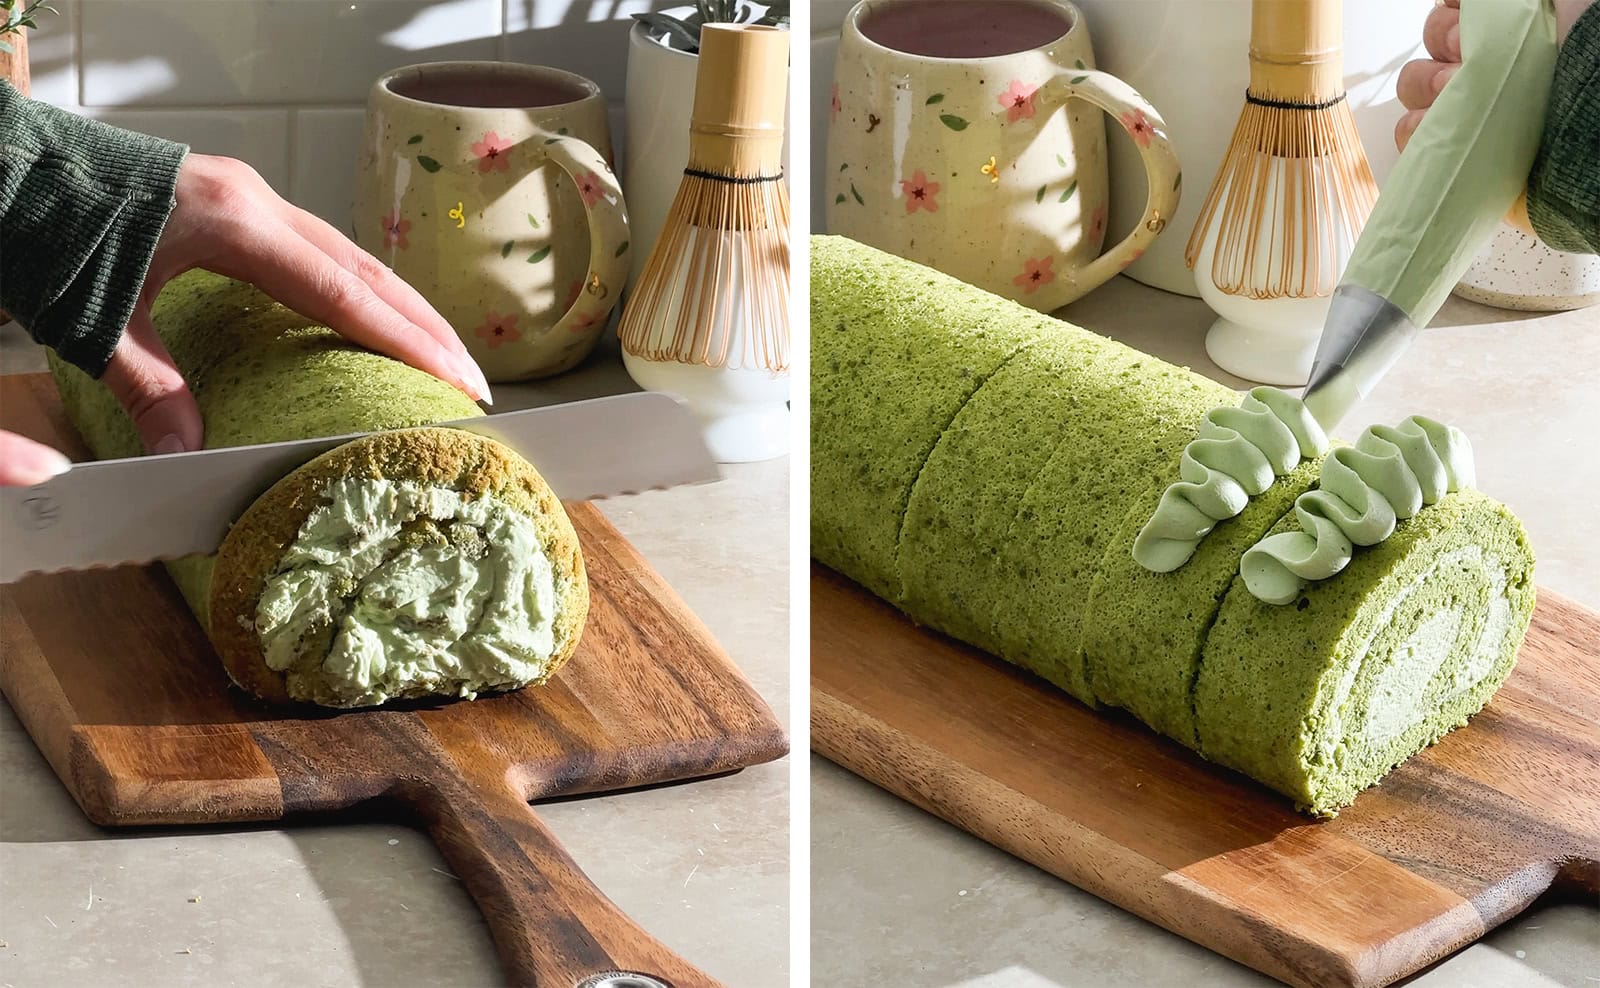
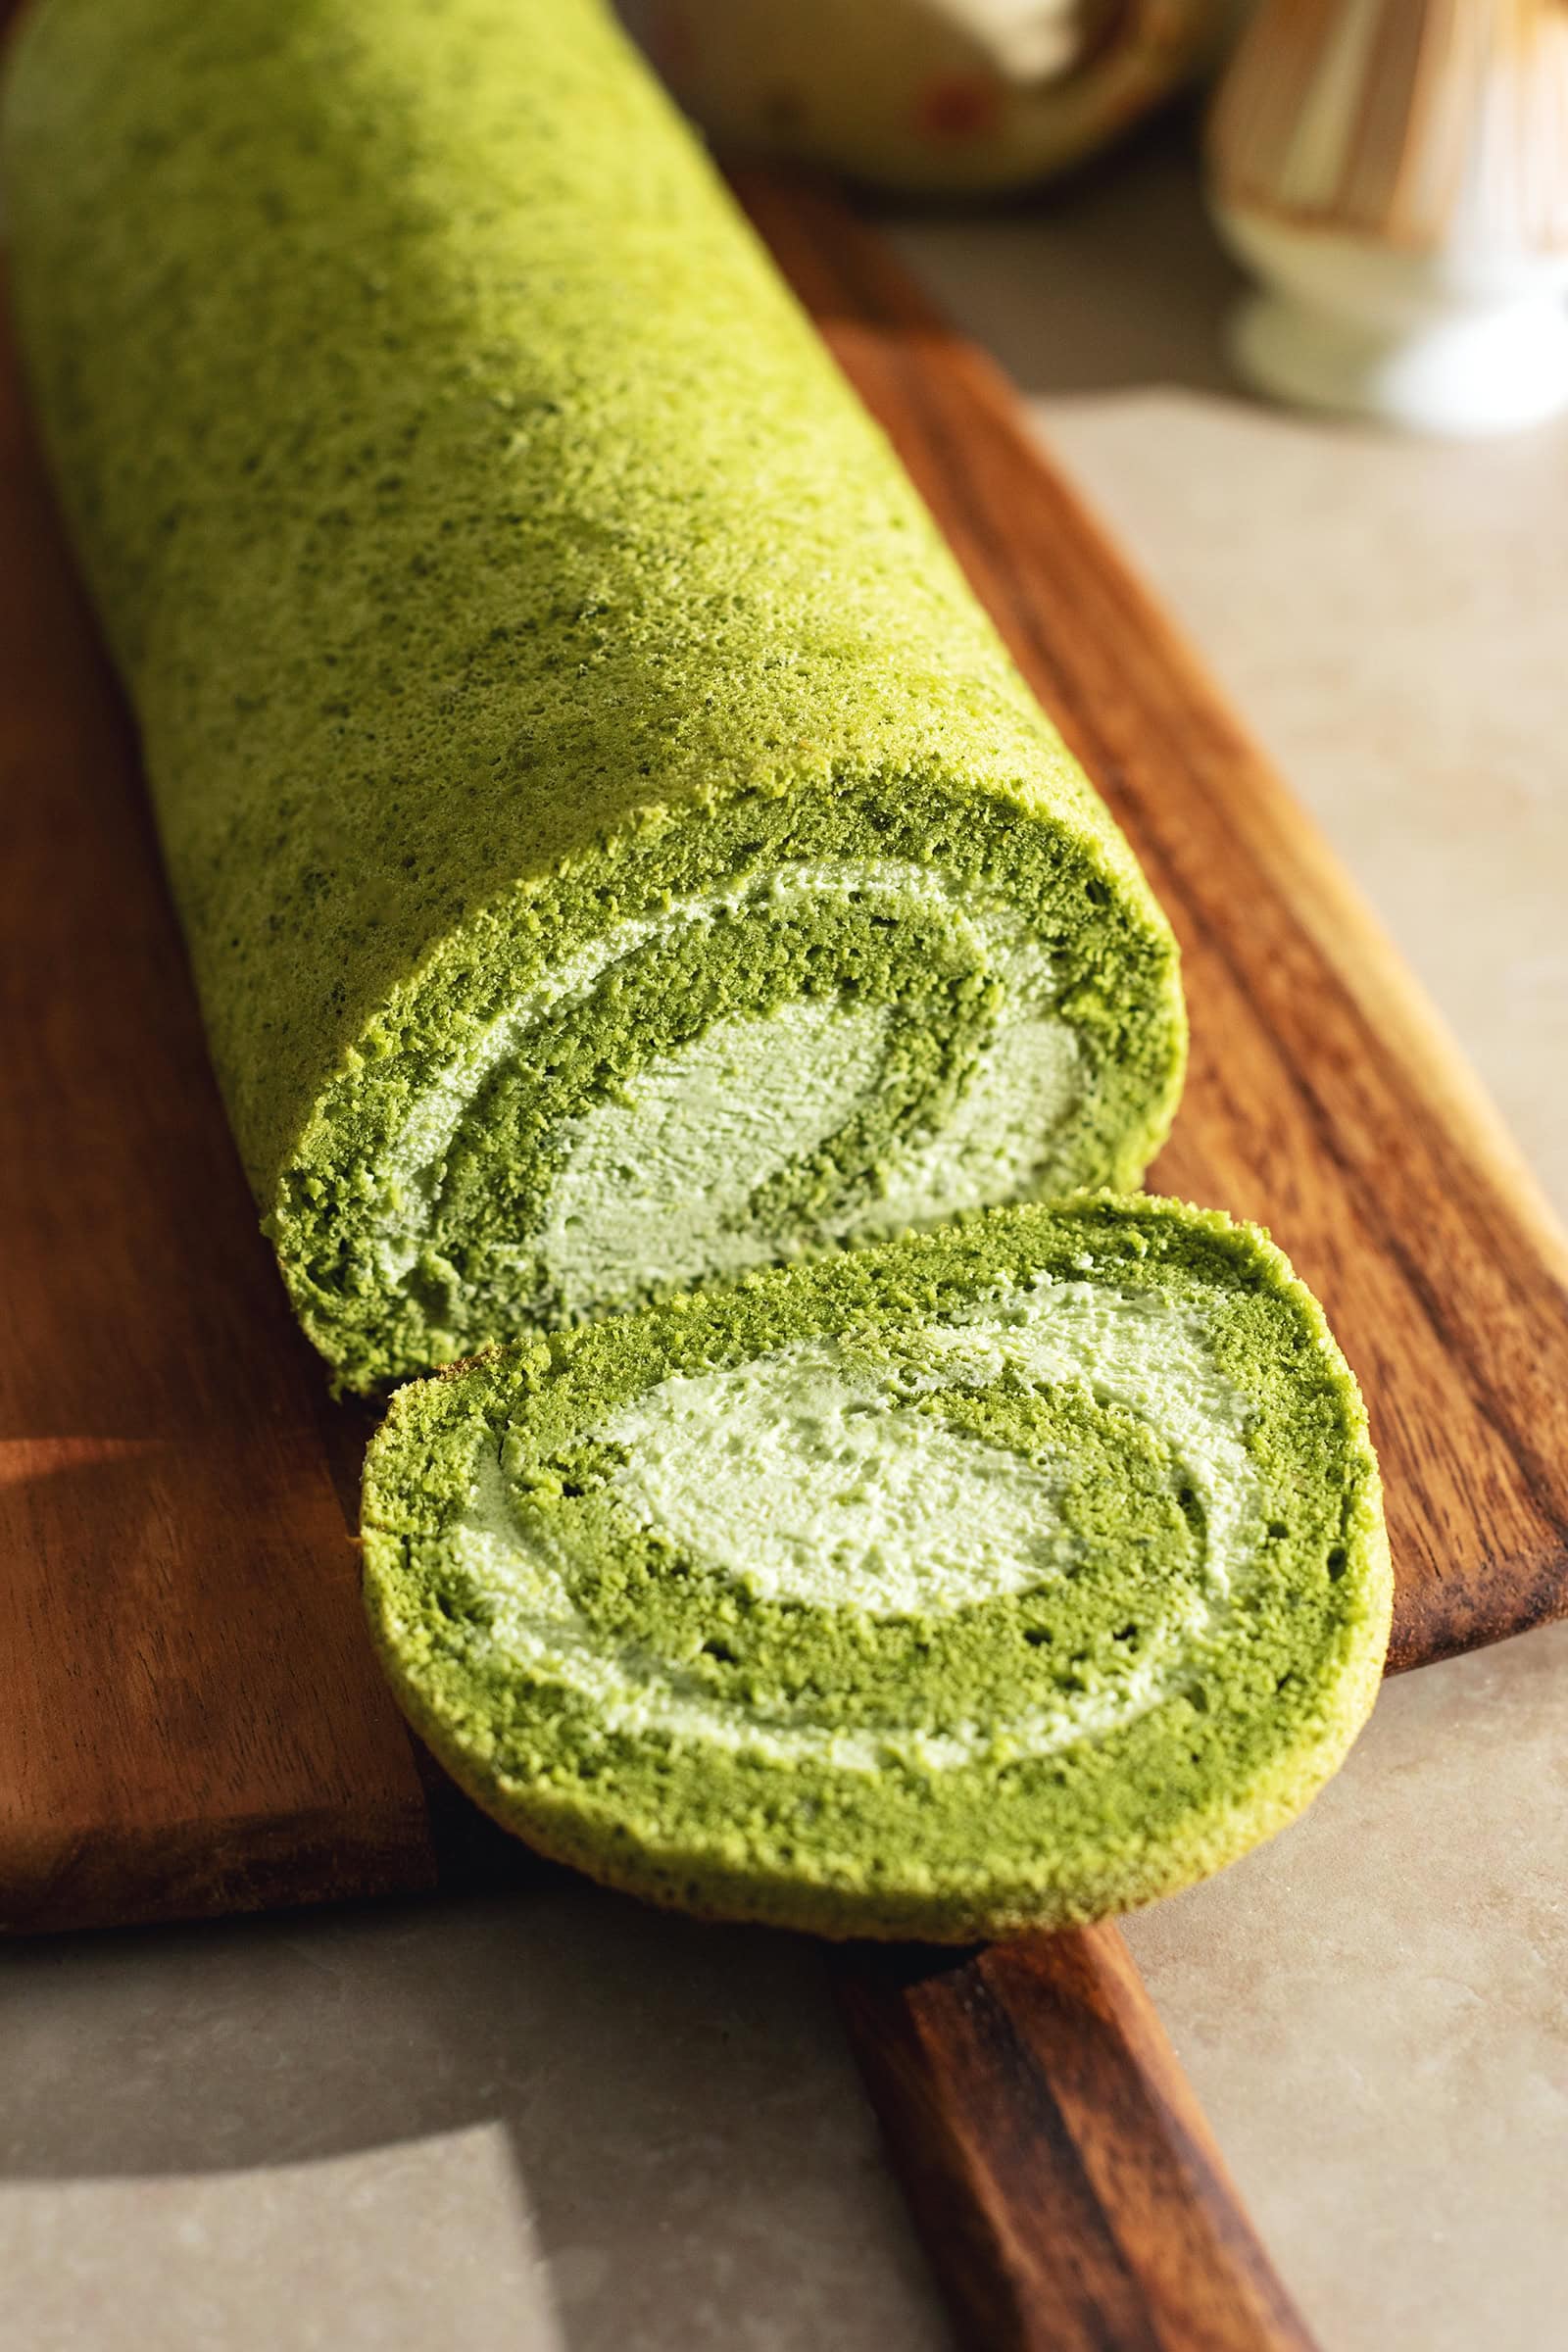
Slice: Before serving, use a serrated knife to cut off about ½" off both ends of the roll to reveal the swirl. Cut the cake into 1-1.5" slices and pipe any remaining whipped cream on top (optional).
Storage
This matcha roll cake can be stored in an airtight container or wrapped in plastic wrap in the fridge for up to 5 days.
Leftovers can be stored in an airtight container or wrapped well in plastic wrap and/or aluminum foil and frozen for up to 1 month. Thaw in the fridge overnight or at room temperature for a few hours before eating.
Frequently asked questions
In general, roll cakes crack if the cake is too dry or dense. Using a chiffon cake recipe as the cake sheet (like this recipe) is the best way to prevent cracking or rippling when rolling the cake up because chiffon cake is naturally soft, spongey, and flexible. Pre-rolling the cake while it's still warm also helps "train" the cake sheet to stay in that shape when cooled. You can also try baking your cake with a tray of water at the bottom of the oven so that the steam adds moisture to the cake.
Baking by weight is much more accurate than volume. When using US standard cups, ingredients like flour and sugar can easily be overpacked into the cup causing you to add too much of certain ingredients. Recipes with weight measurements are also easier to scale to smaller or bigger batches without dealing with weird fractions. To measure by weight, you simply need a kitchen scale which you can usually pick up for less than $20.
Small measurements are given in tablespoons and teaspoons because most kitchen scales are not accurate under about 10g. Tiny amounts like a ¼ teaspoon may not register accurately unless you have a drug scale. Mixing these measurements is a common practice among other recipe sites and commercial kitchens.
More roll cake recipes to try
Recipe
Matcha Roll Cake (Swiss Roll)
Equipment
- 1 piping bag, optional
- 1 piping tip, optional
Ingredients
Matcha Cake Sheet
- 110 g cake flour
- 2 tablespoons matcha powder, sifted
- ½ teaspoon baking powder
- 6 large eggs, room temperature
- ½ teaspoon cream of tartar
- 150 g granulated sugar, divided into 100g + 50g
- 50 g milk, dairy or non-dairy
- 50 g oil, e.g. canola oil, avocado oil, etc
- 1 teaspoon vanilla extract
Matcha Whipped Cream Filling
- 1 teaspoon matcha powder, sifted
- 400 g whipping cream or heavy cream, cold
- 40 g powdered sugar
- 1 teaspoon vanilla extract
Instructions
Matcha Cake Sheet
- Prep: Preheat oven to 350°F. Line a 12x17" baking tray with parchment paper cut to size and set aside.
- Flour mixture: In a small bowl, stir together flour, matcha powder (sift it in if clumpy), and baking powder. Set aside.

- Separate eggs: Separate the egg whites and egg yolks into two large mixing bowls, being careful not to get any yolk in the egg whites. Set the bowl of egg yolks aside.
- Egg white meringue: To the egg whites, add cream of tartar. Use an electric hand mixer to beat the egg whites on low-medium speed until they become frothy like cappuccino foam. Add 100g of sugar, one spoonful at a time, mixing in between each addition. After all the sugar has been added, continue beating on medium-high speed until the meringue becomes stiff peaks. Set aside.
- Egg yolk mixture: To the egg yolks, add the remaining 50g of sugar. Use the same hand mixer to mix until combined. Add the milk, oil, and vanilla extract and mix until combined. Use a fine mesh sieve to sift the flour mixture into the egg yolk mixture. Mix on low speed until the flour has just combined.
- Combine meringue and egg yolk mixture: Add about ⅓ of the egg white meringue into the egg yolk mixture and fold together with a spatula, making sure to scrape the bottom of the bowl. Add the rest of the meringue and fold together until no streaks remain. Again, make sure to scrape the bottom and sides of the bowl where thicker batter can stick. Don't overmix.
- Fill pan: Pour the batter into your lined baking tray. Use an offset spatula to spread the batter into the corners and edges of the pan and smooth the batter into an even layer.
- Bake: Bake for 12-15 minutes or until the edges are lightly browned and the top of the cake sheet is puffed up.
- Release cake: Let the cake cool on a wire rack for only about 5 minutes before running an offset spatula around the edges of the pan to release the cake. Place a wire rack on top of the pan, grip both sides of the pan and rack (with oven mitts), and flip the cake onto the rack. Peel the parchment paper off the cake. Place a fresh sheet of parchment paper on top and flip the cake onto the parchment paper.
- Pre-roll cake: Cut the browned edges off the two short ends of the cake sheet. While the cake is still warm, roll the the cake up with the parchment paper starting from a short end. Let the cake cool completely in this rolled-up log shape.


Matcha Whipped Cream Filling
- Mix matcha: In a large mixing bowl, sift in the matcha powder and add a small amount of whipping cream. Use a spatula to mix them together, smearing the matcha powder against the bottom and sides of the bowl to get rid of the clumps.
- Whip cream: Add the rest of the whipping cream, powdered sugar, and vanilla extract. Use an electric hand mixer to beat until it becomes stiff peaks.
- Spread cream on cake: Unroll your cooled cake sheet. Add dollops of whipped cream on top of cake. Use an offset spatula to spread the cream into a thick, even layer. Leave the last 2" at the end of the cake sheet empty. Save any remaining whipped cream for decoration later.
- Roll cake: Roll the cake up in the same way as before. When you get to the end of the roll, place a sheet of plastic wrap next to the cake so that you can roll the cake right onto the plastic wrap. Use an offset spatula to remove any excess cream that squishes out of the seam and push any cream that comes out from the two ends of the roll. Wrap the cake roll in plastic wrap and chill the in fridge for at least 3 hours or overnight to allow the cream to set.
- Slice: Before serving, use a serrated knife to cut off about ½" off both ends of the roll to reveal the swirl. Cut the cake into 1-1.5" slices and pipe any remaining whipped cream on top (optional).


Jacqui says
This was delicious and not overly sweet! I was wondering how did you keep your cake a bright green even after baking? Mine turned out more like a very light brown/dull green. Did I bake it too long? Thank you!
Kara says
Turned out so yummy on the first try! Thank you!!
Şule says
I havent tried it yet, but I love your website so much!!! So beginner friendly, you have everything you do shown and listed. Thank you so much!!!!
Sadia Khan Chowdhury says
The cake came out soooo soft and pillowy. Thanks for the recipe. ❣️❣️
Amy says
The cake turned out super good! I'm very happy with this recipe.
Katia says
Hello! Is there a way I could adjust this to a 10"x15" pan? Thank you 🙂
Miranda says
Absolutely divine! Exactly what I was looking for. I have ordered a cake like this from a local baker for the past few years on my birthday, but she has stopped selling her goods. This recipe will allow me to make my birthday cake now! I have tasted the roll cakes from the Asian bakeries that are around and they just aren’t as fresh and delicious as this one. Thank you!
Mary says
Excellent recipe! Turned out exactly as pictured, and will definitely be making this again.
S says
Hi! was wondering if you had any tips for avoiding wrinkles in the parchment paper? I make sure to always cut my paper to fit the pan, and when I pour the batter it seems fine. But it always ends up wrinkling and results in long lines/indents down the roll cake. Any advice would be appreciated!
quintin pasquarelli says
you need too roll the cake while it is still hot
Jenny says
I'm wondering why I need to flip the cake over and then add new parchment and flip again. It seems like I should just be able to roll it up with the parchment that it baked on. Otherwise, I like how this recipe uses a standard 12 x 17 inch pan and not some oddball sized jelly roll. I will be making this!
Gail Ng says
You can absolutely do that! I just like using a fresh sheet of parchment paper that's larger than the cake sheet because the excess paper prevents the cake from sticking to itself and the cake roll can sit on top of the overhang at the end and prevent it from unrolling, if that makes sense. But it should honestly work either way - that's a good idea actually.