
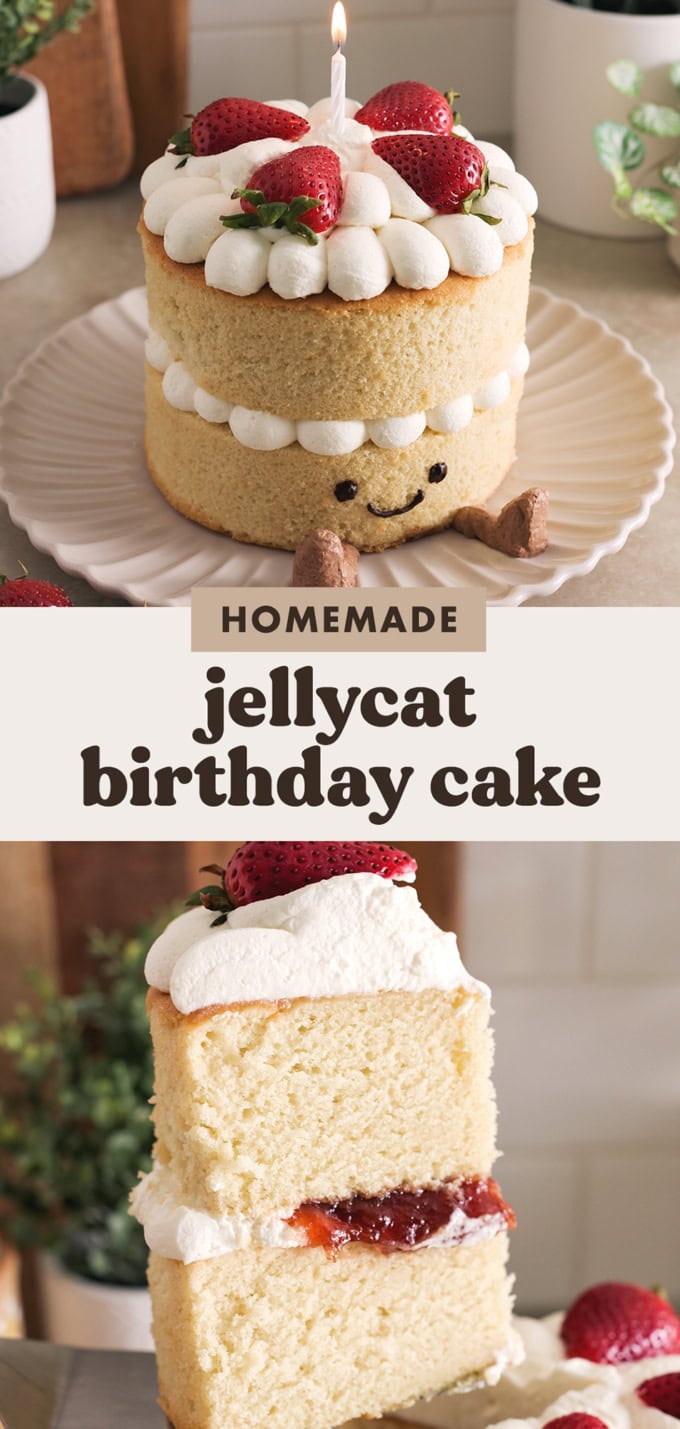

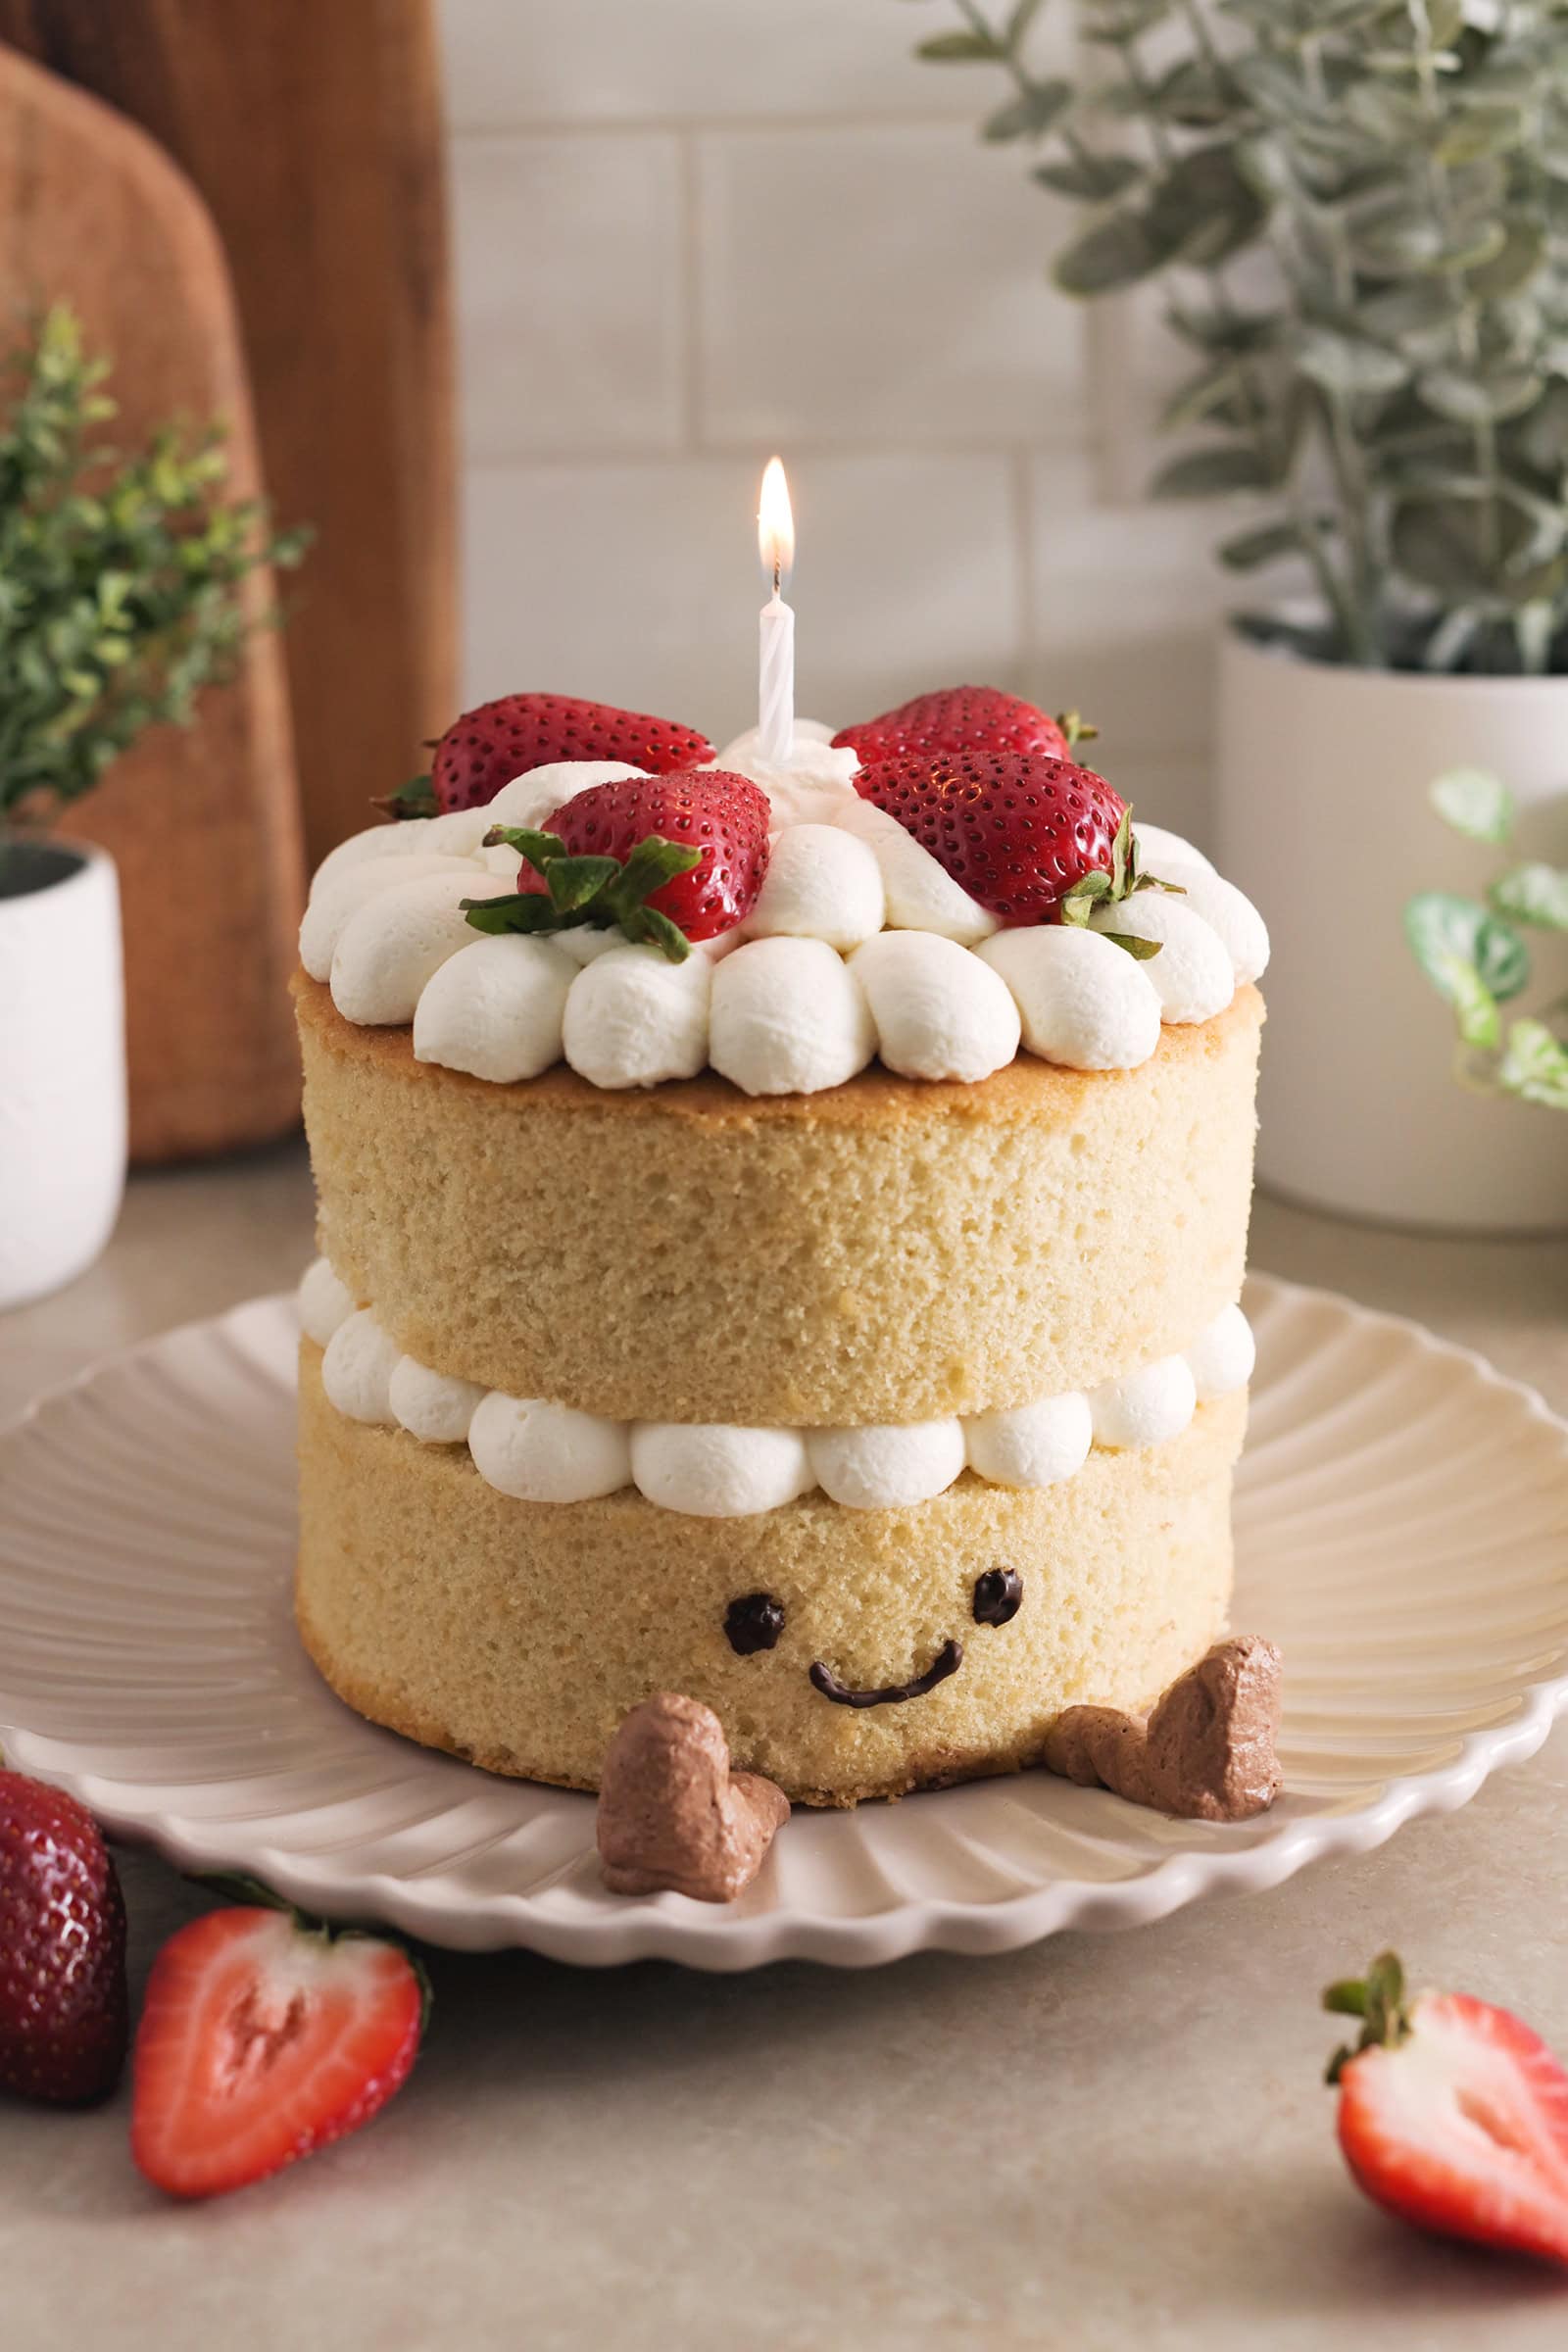
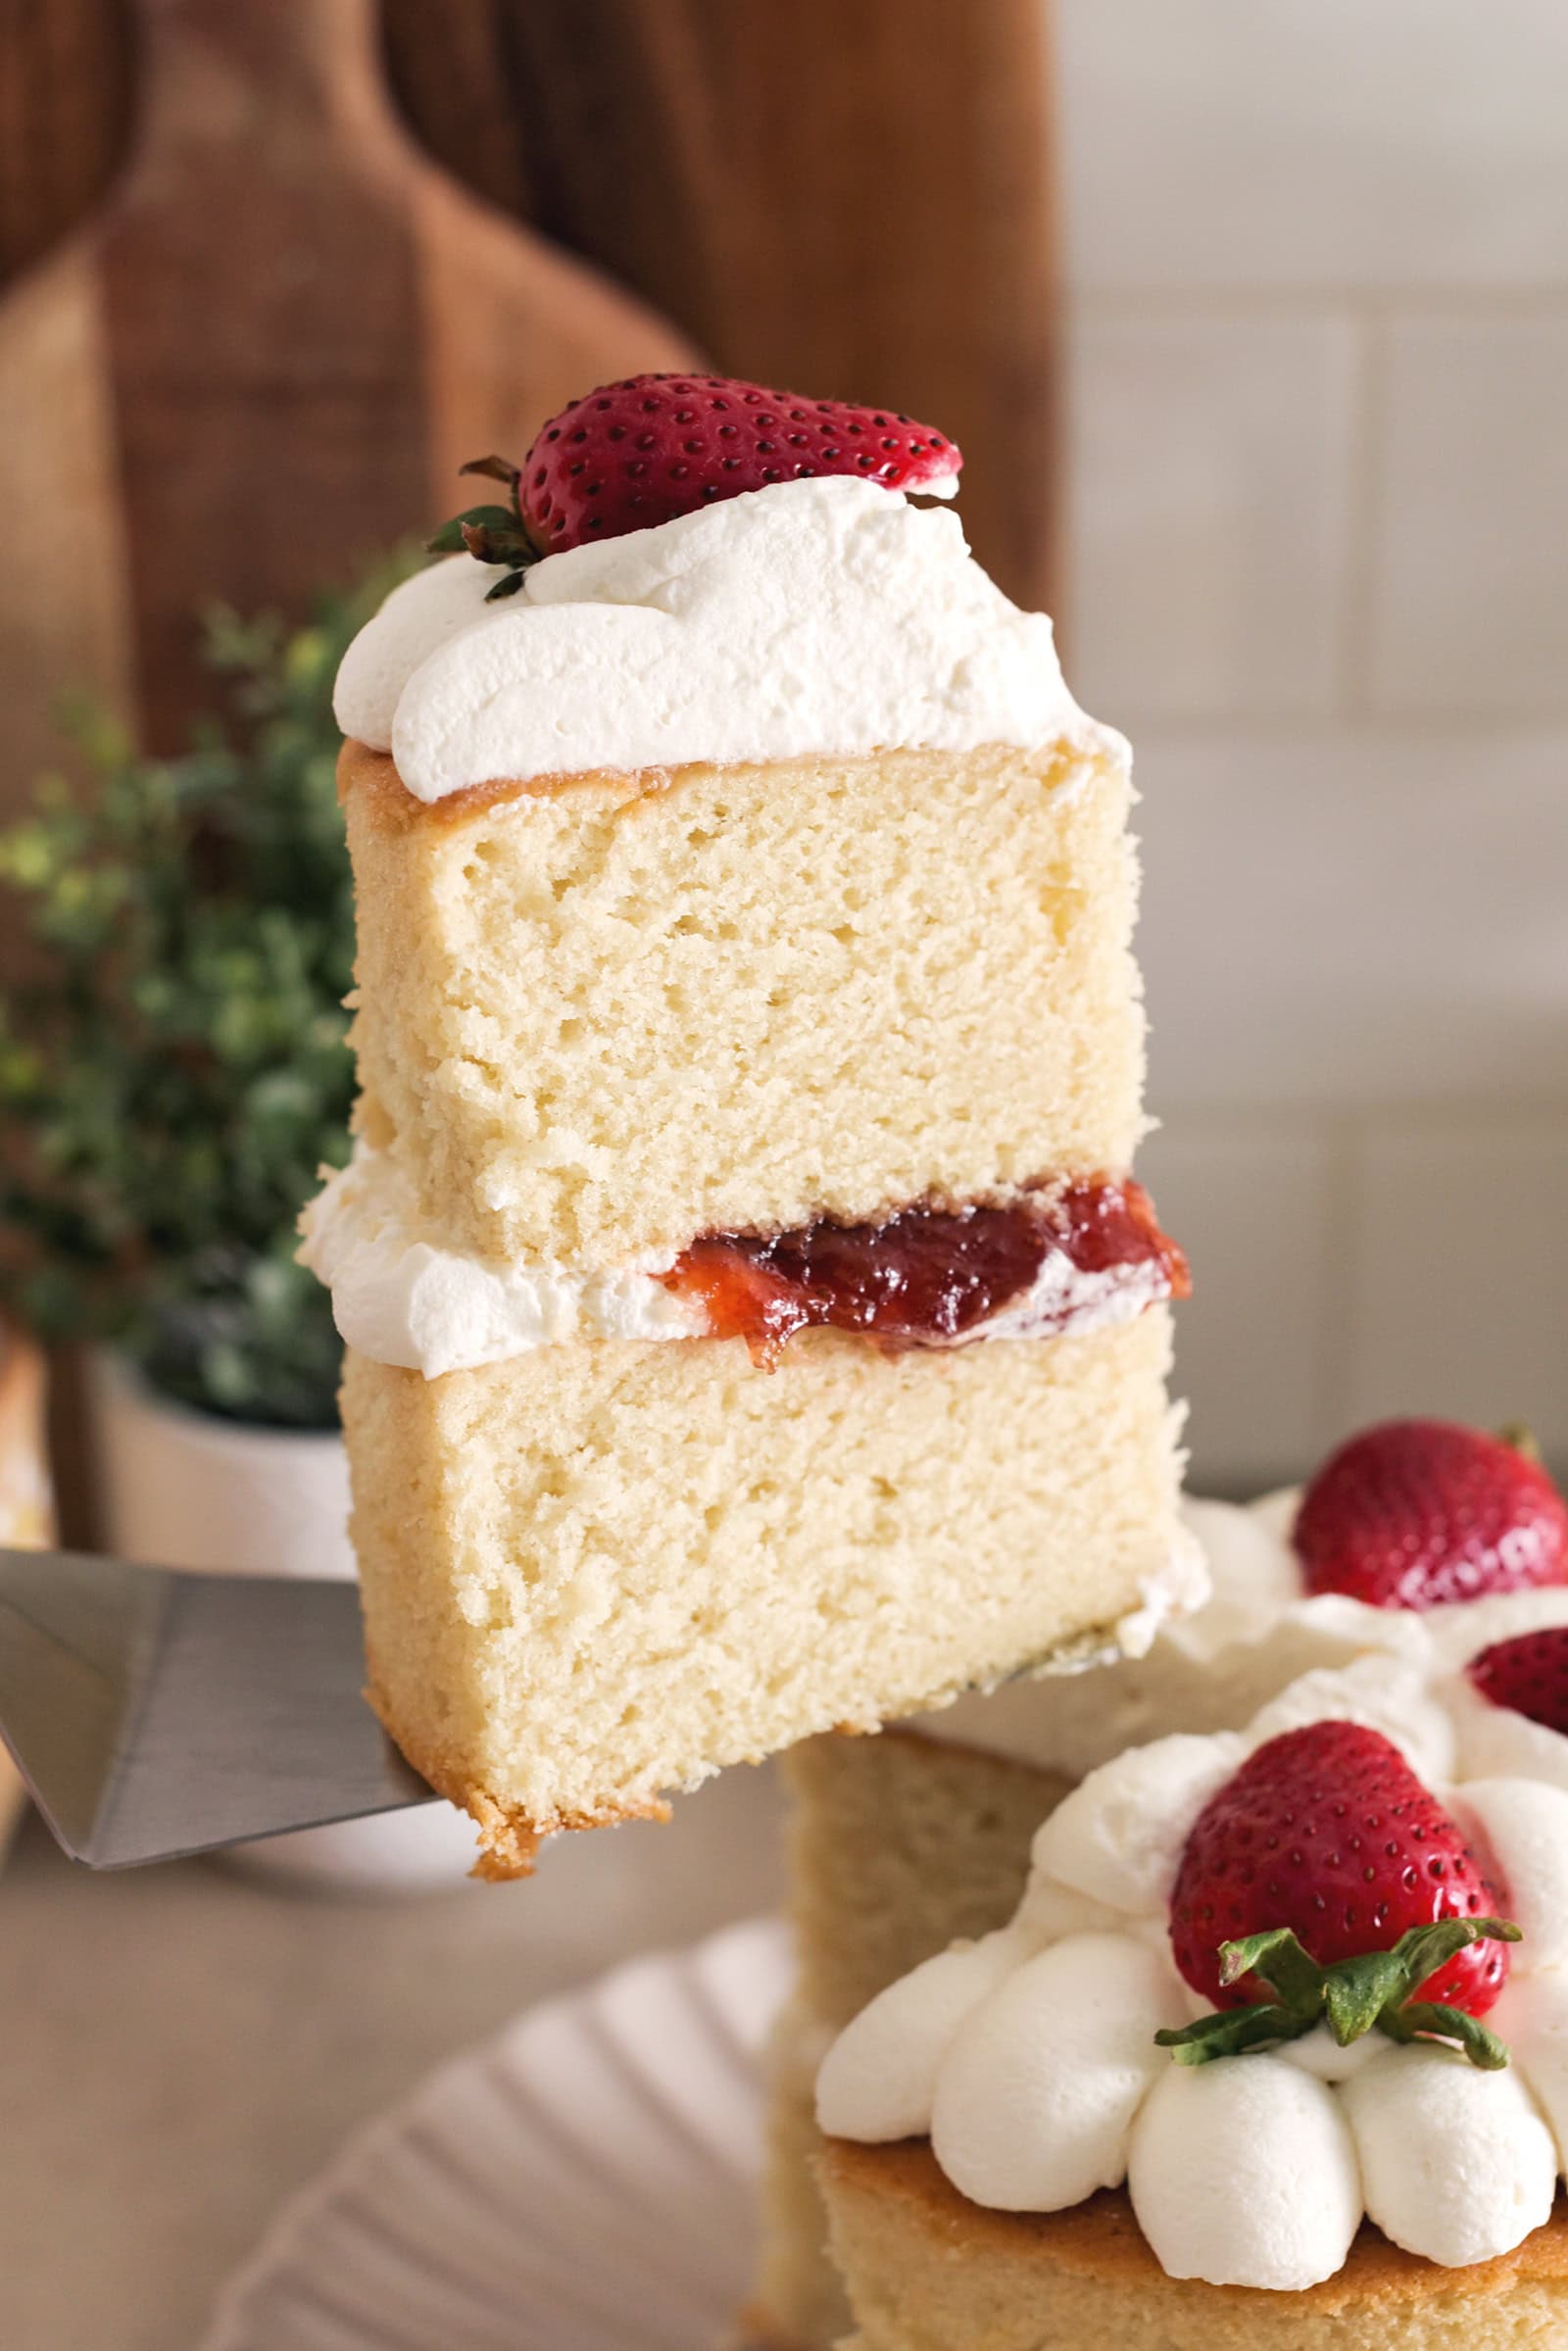
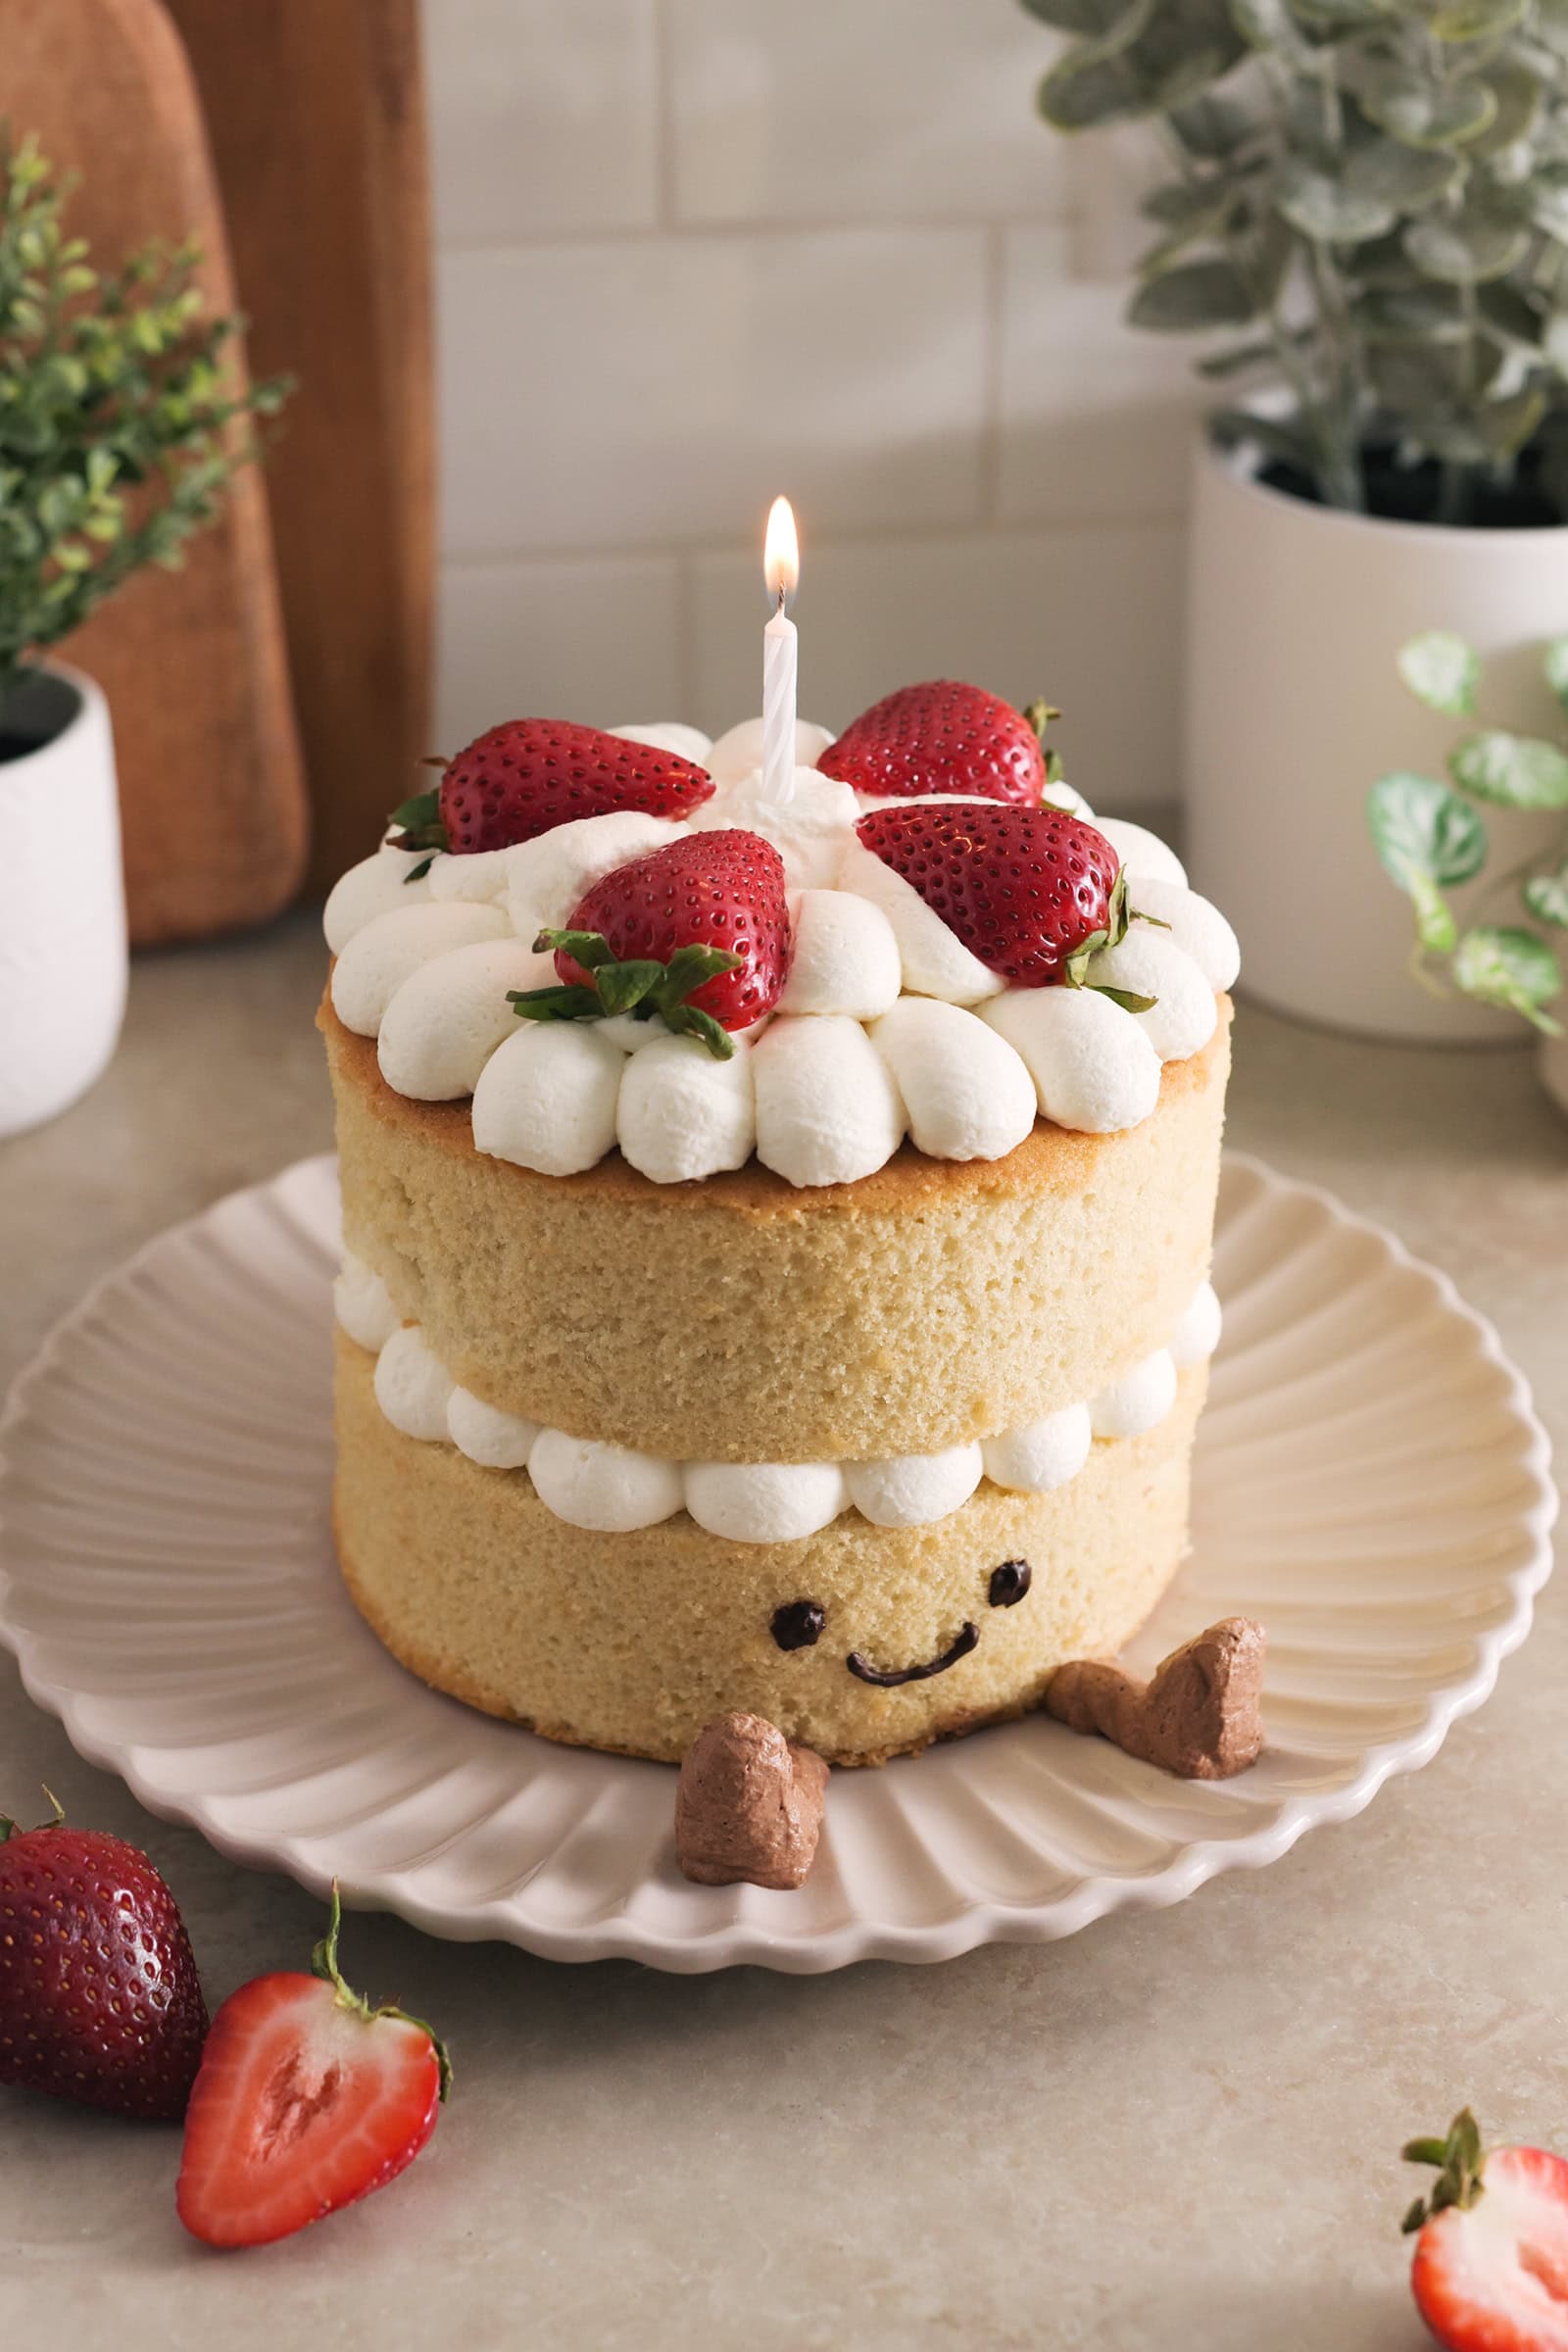
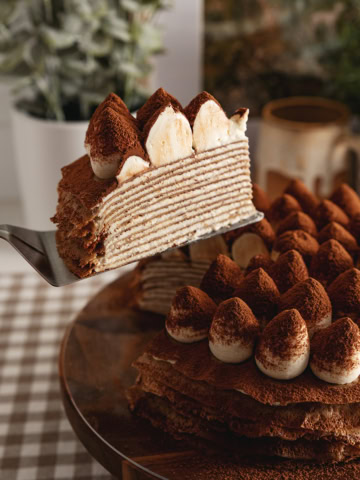
Your favourite jellycat birthday cake plushie in edible cake form! It's made with two layers of soft vanilla cake, strawberry jam, whipped cream, and fresh strawberries.
Jump to:
This is officially the cutest cake I've ever made. Ever since I saw the Jellycat birthday cake, I knew I had to have it, in one way or another. The plushie is a cake so naturally it makes sense to make an actual cake of it! The moment I added his little feet and smiley face, I could not stop smiling.
Why you'll love this recipe
- Looks just like the original Jellycat birthday cake plushie. How can you not love this little guy?? This is a cake that will make anyone smile.
- Soft hot milk cake layers. We're using the hot milk method to make a cake that's fluffy and stays fresh for days.
- Strawberry jam filling. To make this cake easier, we're using store-bought strawberry jam but you can make your own if you want it to taste even better.
- Light and airy whipped cream. Whipped cream is easy to make and complements this cake perfectly. No need to mess with buttercream.
Tools
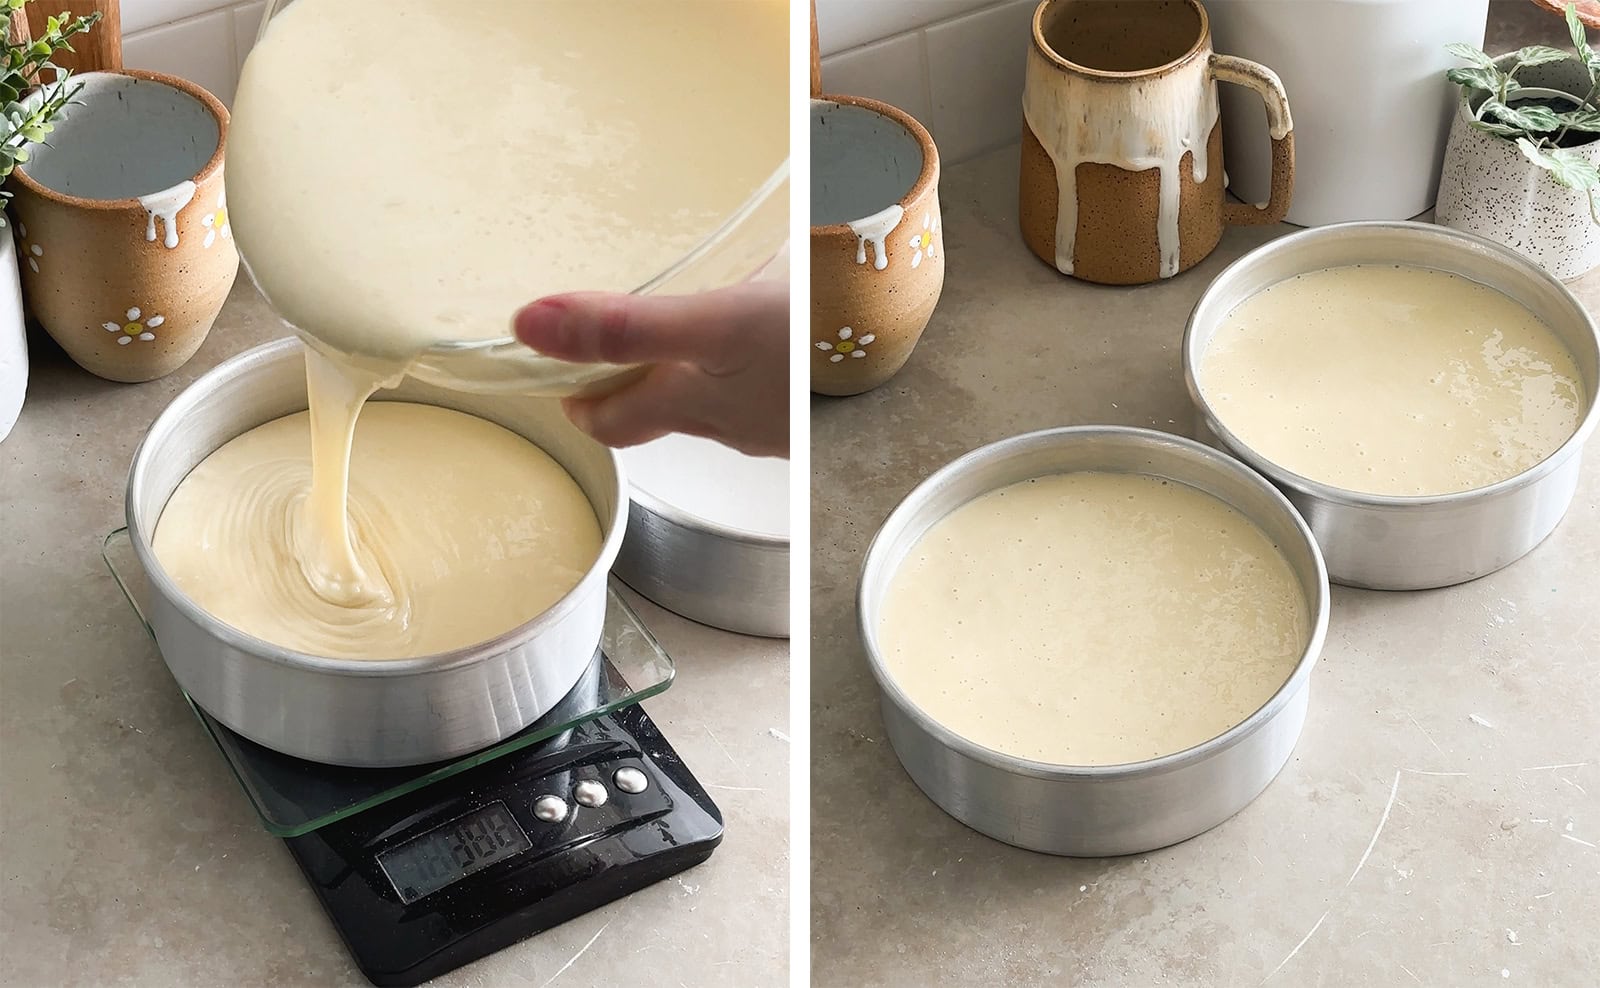
- 6" round cake pans - This recipe makes two thick 6" cake layers to match the height of the actual jellycat birthday cake plushie. Be careful not to fill the pans past ⅔ full even if you have extra batter left because it will overflow in the oven.
- Electric hand mixer - You'll need a hand mixer to make the cake batter and whipped cream. You'll need to beat the eggs and sugar together for about 6 whole minutes so a hand mixer or stand mixer is essential for this.
- Piping bags - You'll need a piping bag for the whipped cream, the cream for the legs, and the chocolate for the face. You don't need any piping tips but you can use round piping tips if you'd like to.
Ingredient notes
As always, the full recipe card with ingredient amounts and instructions is at the bottom of this post! Keep reading for more details on each ingredient or skip ahead to the recipe.
- All-purpose flour
- Baking powder
- Salt
- Eggs - These should be at room temperature. This cake recipe relies on beating the eggs and sugar together until they've tripled in size for a fluffy cake. Room-temperature eggs will whip up faster.
- Granulated sugar
- Unsalted butter - You can use cold butter straight from the fridge because you'll be heating it anyway.
- Milk - You can use any dairy or non-dairy milk.
- Oil - Use a light-tasting oil like canola oil, avocado oil, or grapeseed oil. The oil makes the cake extra moist and soft.
- Vanilla extract
- Whipping cream or heavy cream - Use whipping cream for a light and airy whipped cream or heavy cream for a richer, thicker, and more stable whipped cream. Cold cream whips up faster so keep it in the fridge until you're ready to use it.
- Powdered sugar
- Cocoa powder - We're using cocoa powder to tint the cream brown for the Jellycat's legs. You can also use brown gel food colouring.
- Strawberry jam - You can use store-bought strawberry jam or homemade strawberry jam like I did in my Strawberry Chocolate Cake. Try to go for a jam with less sugar and chunks of strawberries for a nice touch.
- Strawberries - Use fresh strawberries cut in half to decorate the top of the cake. The original Jellycat birthday cake has five strawberries on its head.
- Dark chocolate - Use any kind of dark chocolate, semi-sweet chocolate, or milk chocolate. You only need a little bit to draw the Jellycat's face.
How to make a jellycat birthday cake
Make the cake layers
Prep - Preheat oven to 350°F. Line two 6" round cake pans with a round of parchment paper on the bottom of each pan. Set aside.
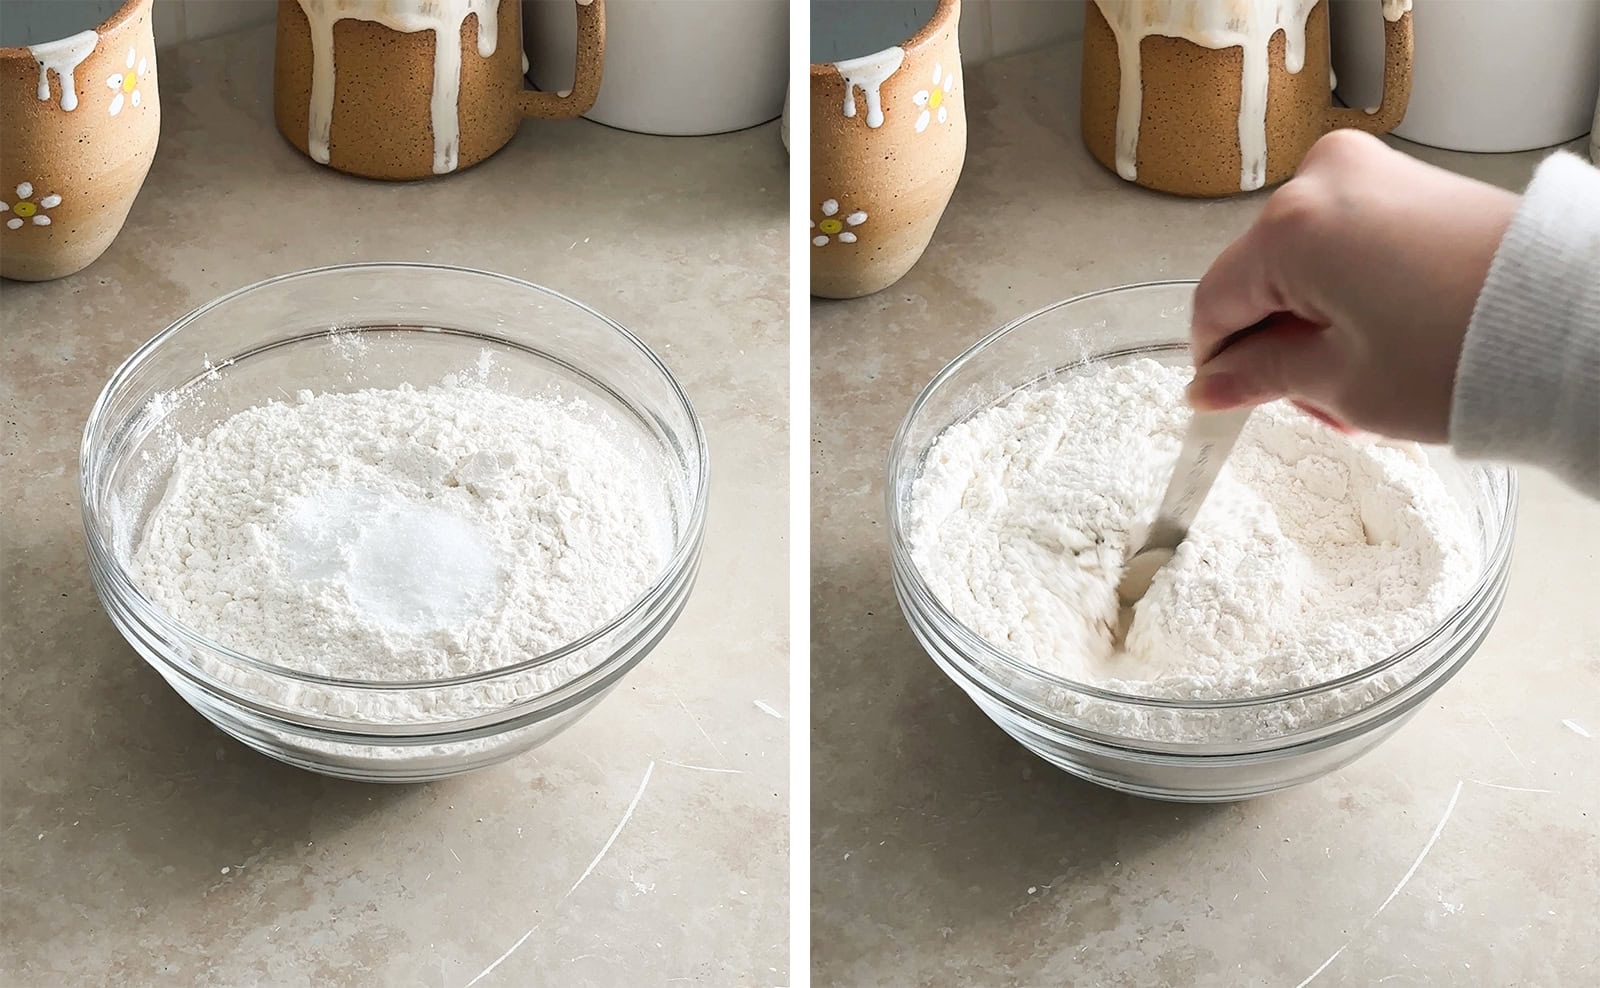
Dry mixture - In a small bowl, stir together flour, baking powder, and salt. Set aside.
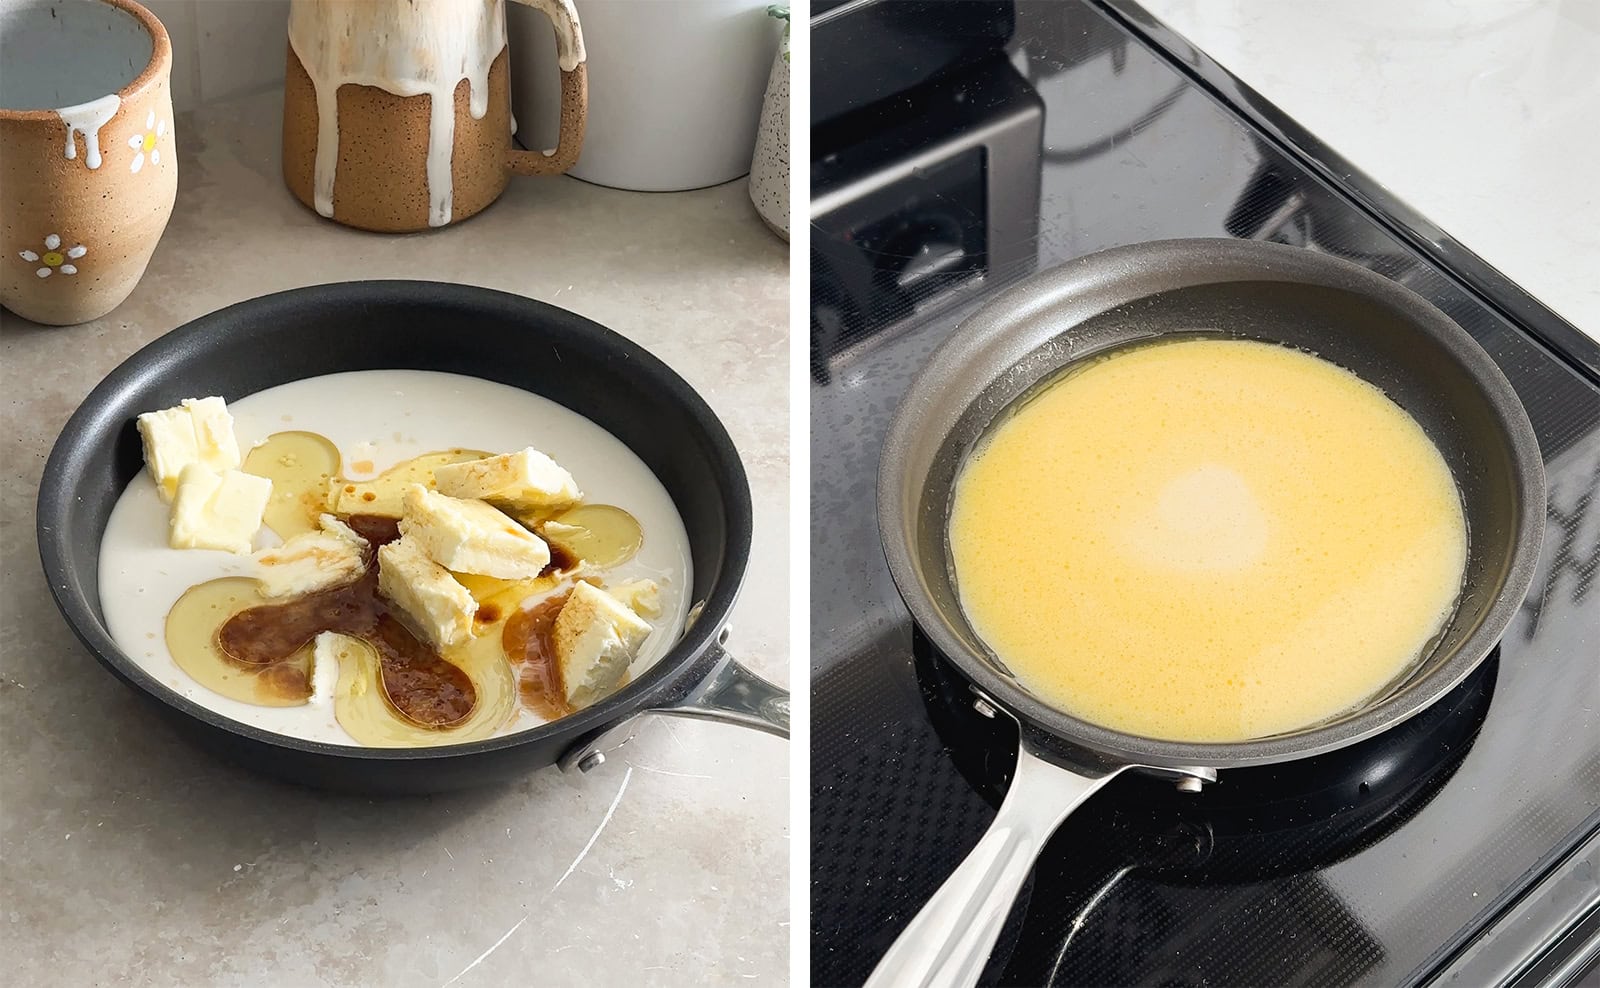
Hot milk mixture - In a small pot or microwave-safe bowl, add the butter, milk, oil, and vanilla extract. Heat it on the stovetop or in the microwave until the butter has melted. Don't let it boil. Remove it from the heat and cover to keep it warm while you start making the batter.
Beat eggs and sugar - In a large mixing bowl, add the eggs and sugar. Use an electric hand mixer fitted with a whisk attachment to beat the mixture for a full 6 minutes at medium speed or until the mixture has tripled in size and becomes very pale (almost white) in colour.
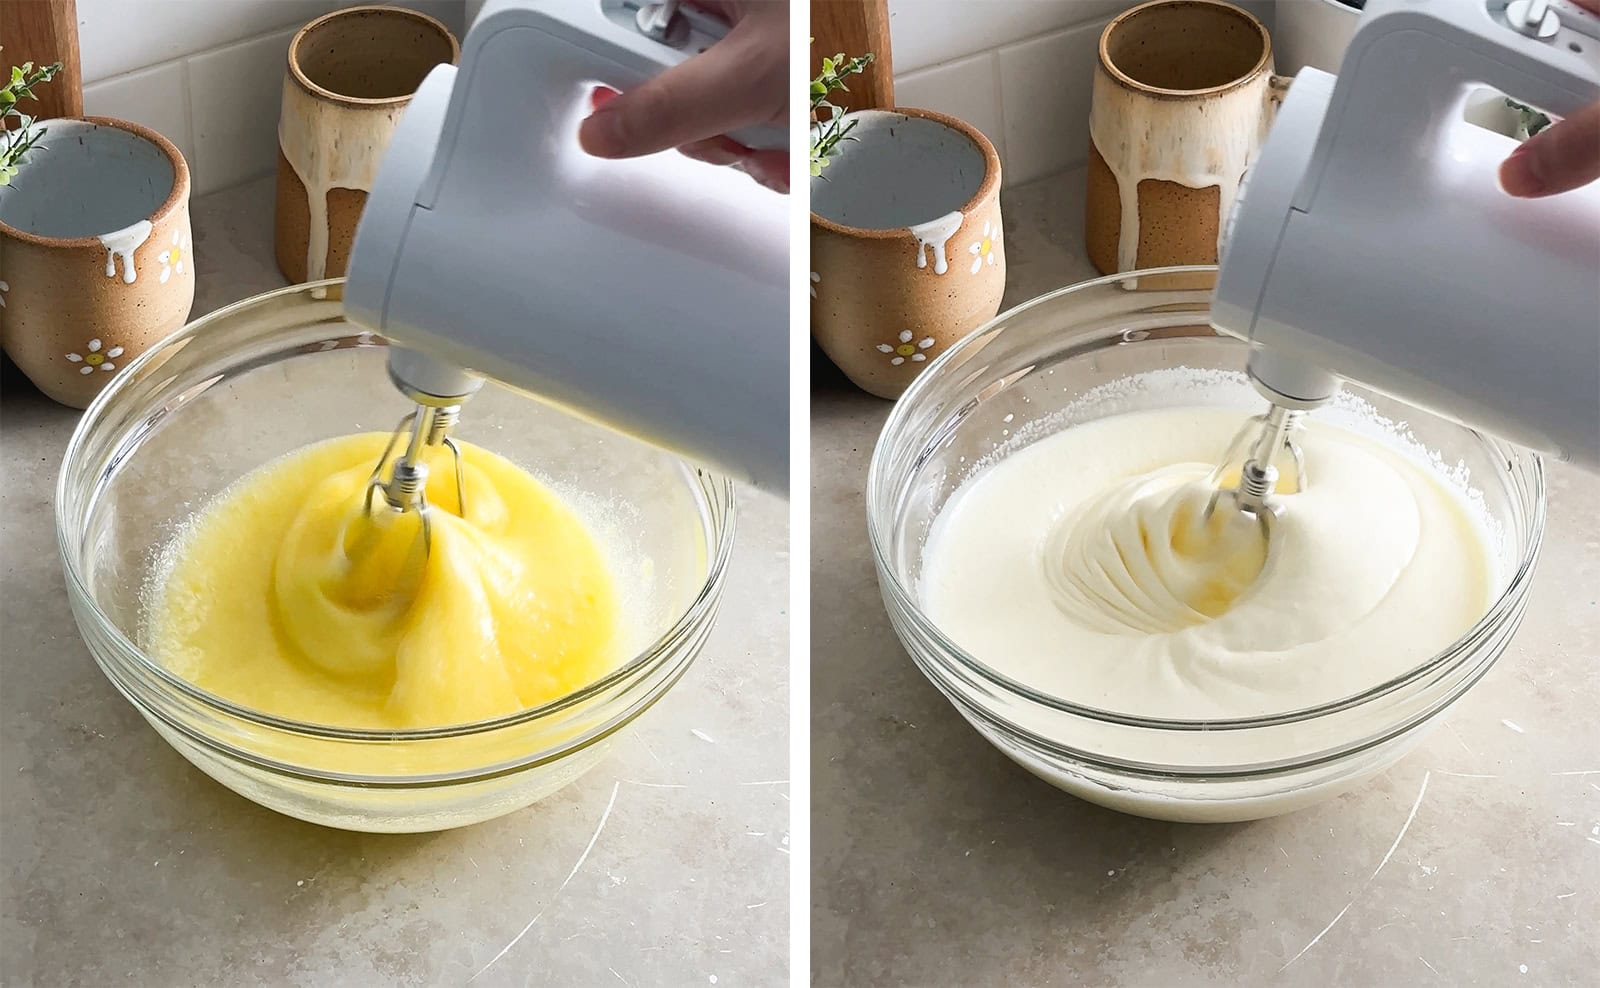
Combine dry and wet mixtures - Add half of the flour mixture and mix on low speed until just barely combined. Add the rest of the flour and mix until mostly combined. Some flour patches are fine because you'll continue mixing some more in the next step and we don't want to overmix.
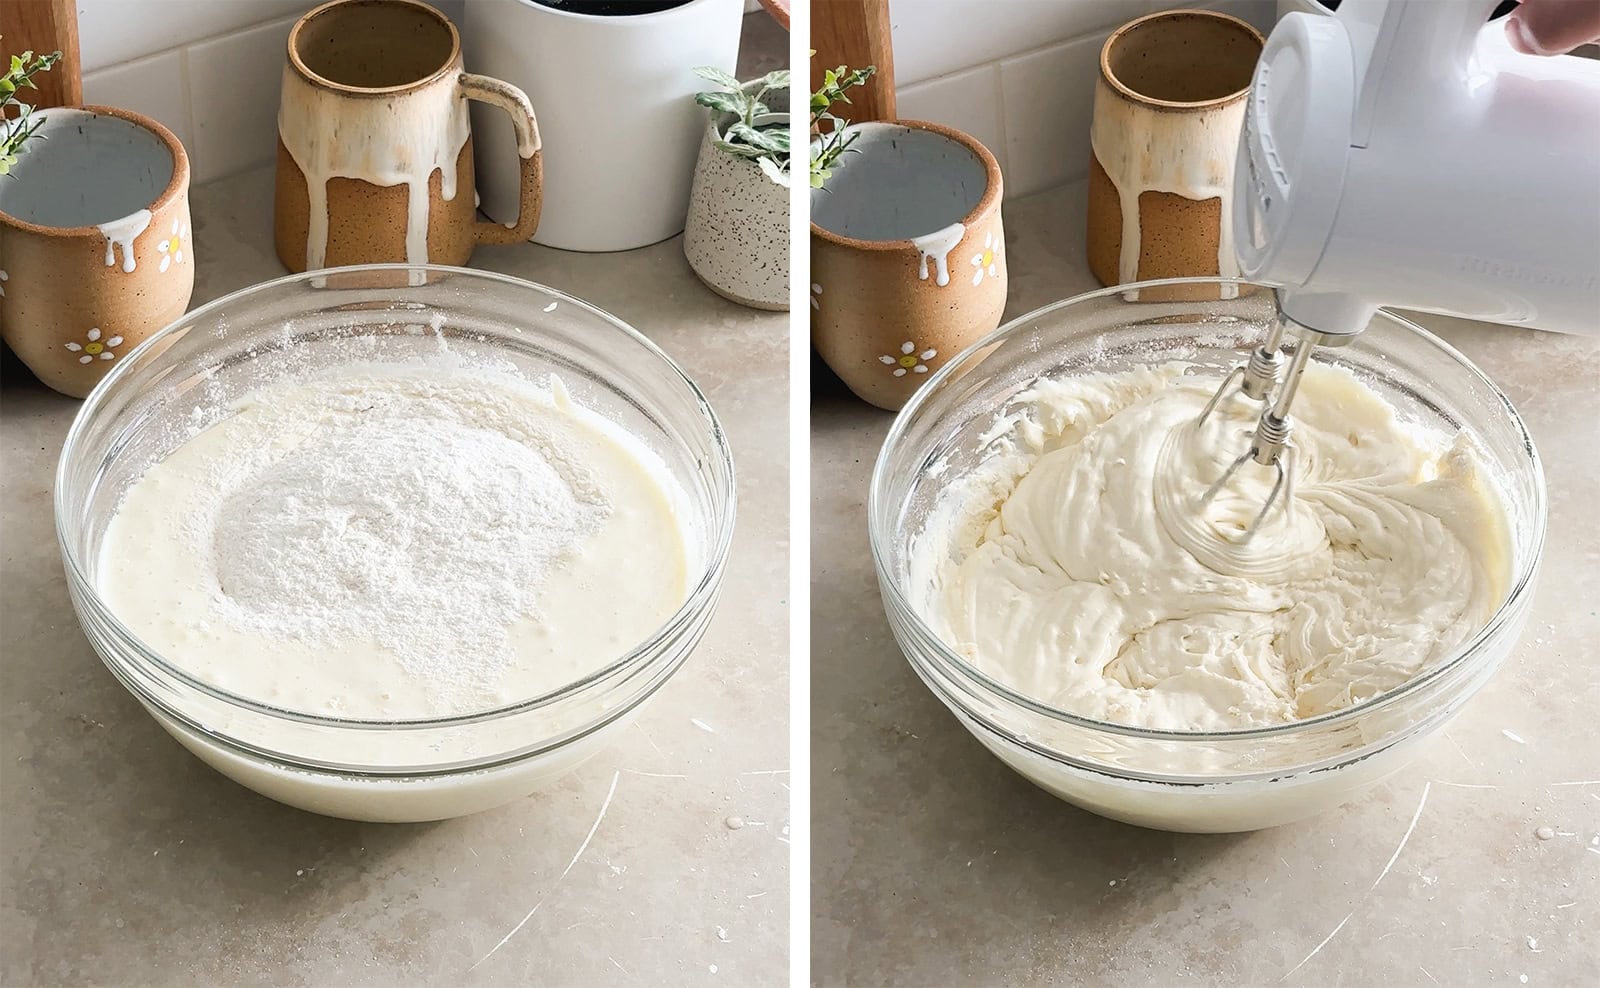
Add hot milk mixture - With the mixer on low speed, slowly stream in the hot milk mixture until you have a smooth and fluid batter.

Fill pans - Divide the batter into your lined cake pans until about halfway full.
Bake - Bake cakes for about 35-40 minutes or until a toothpick inserted in the middle comes out mostly clean with a few crumbs.
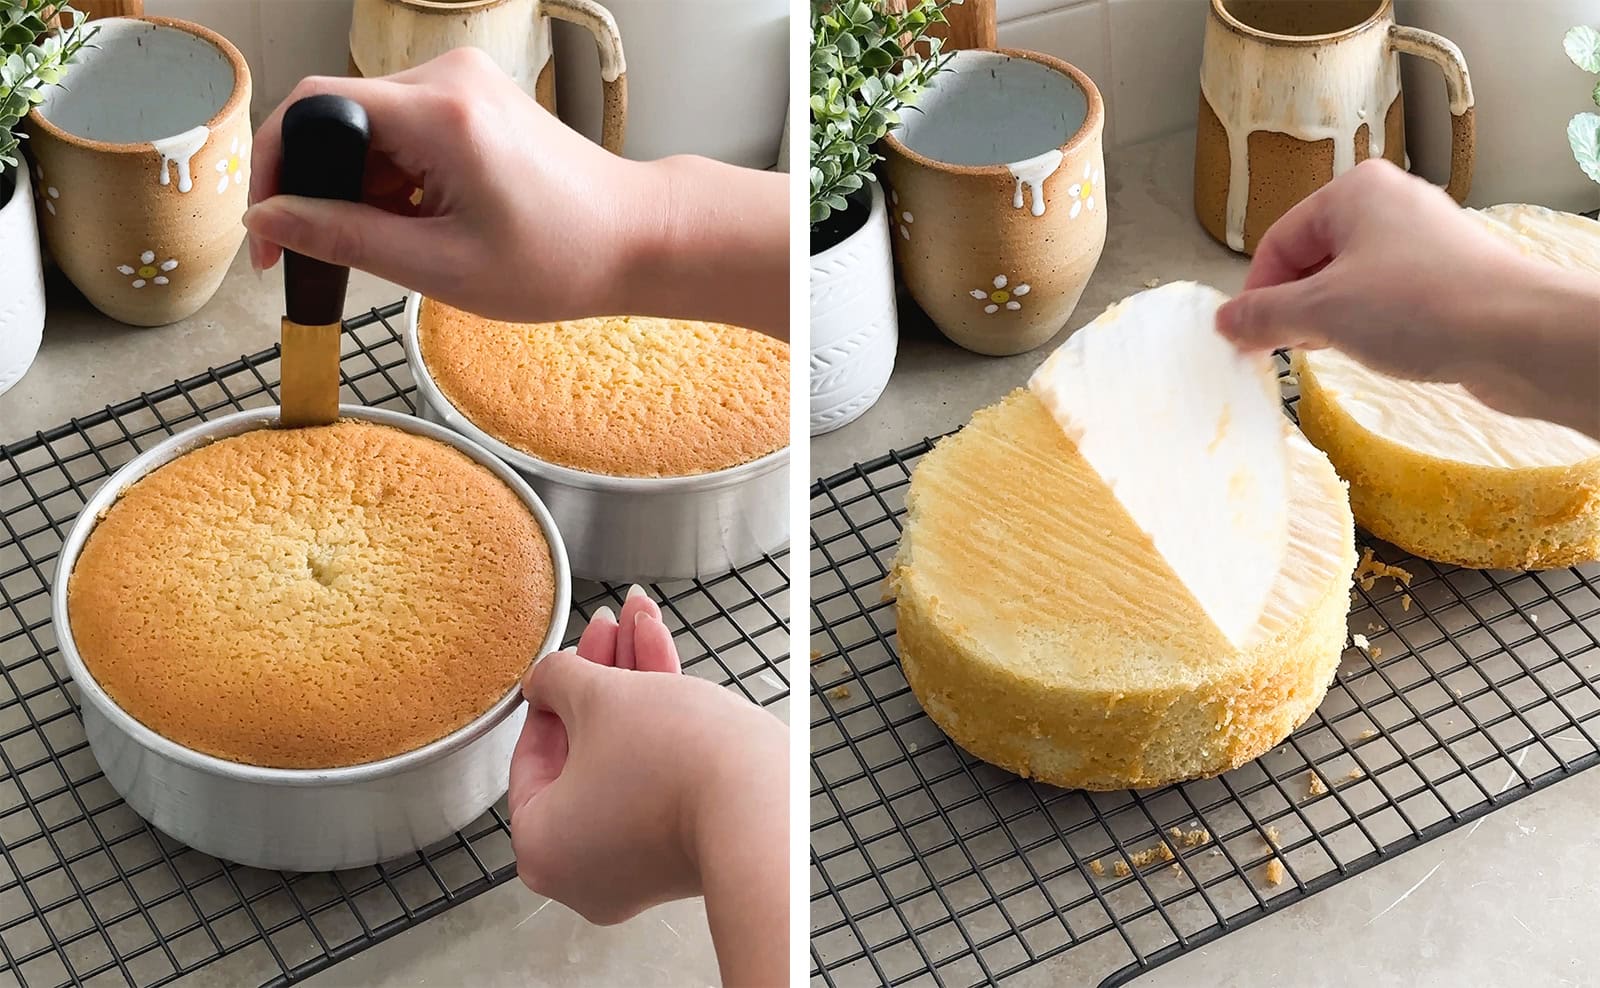
Let cool - Let the cakes cool in the pans for about 15 minutes before running an offset spatula around the edges of the pan. Release the cakes onto a wire rack to cool completely.
Make the filling
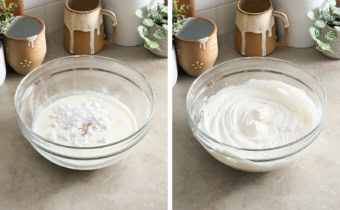
Whip cream - In a large mixing bowl, add the whipping cream, powdered sugar, and vanilla extract. Use an electric hand mixer fitted with a whisk attachment to beat the cream until it becomes soft peaks. Scoop out a small amount of whipped cream into a small bowl and set aside. Finish beating the cream to firm peaks.

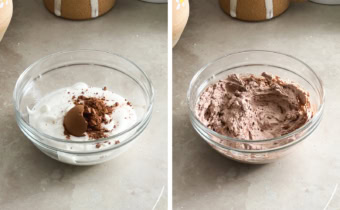
Chocolate whipped cream - To the portion of cream you scooped out, add the cocoa powder and mix until the cream is tinted brown. Transfer this cream to a small piping bag and snip off the tip. Set aside.

Fill piping bags - Transfer both the whipped cream and the chocolate whipped cream to separate piping bags and cut the tips off.
Assemble and decorate the cake
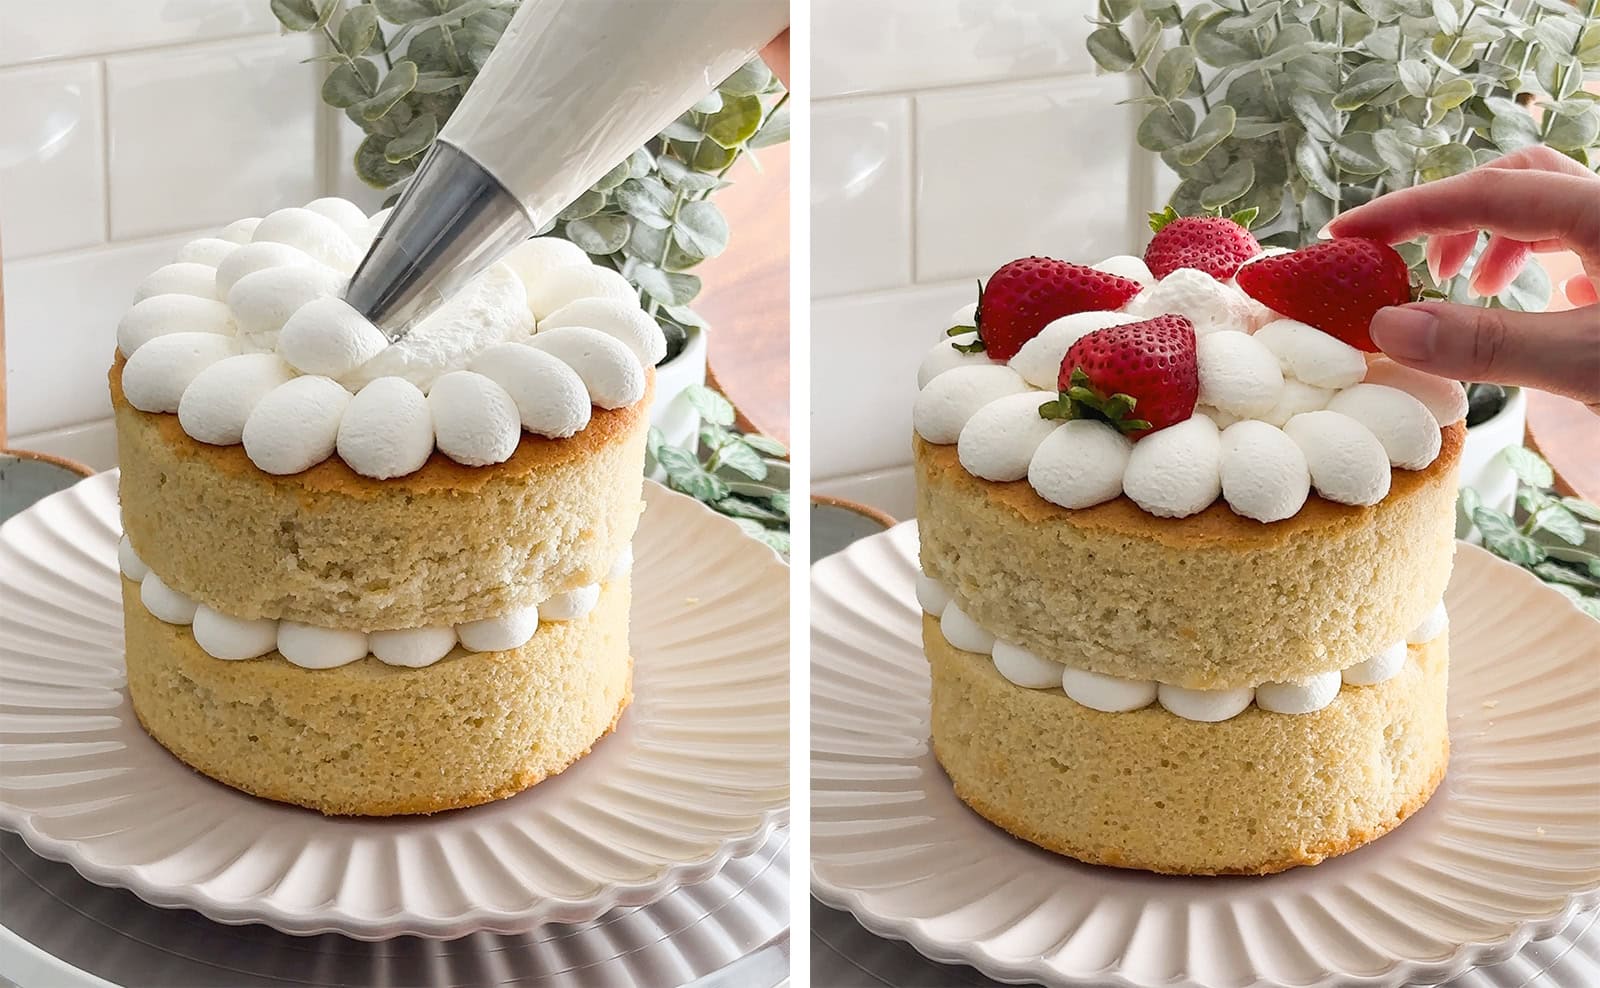
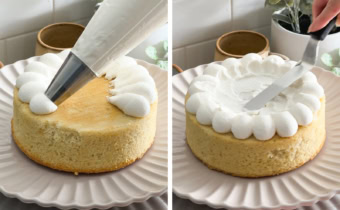
Pipe cream - On a large serving plate or cake board, place down the first cake layer. Pipe dollops of whipped cream along the edge of the cake, ending towards the middle of the cake. Use a spatula to smear the tail ends of the dollops towards the middle of the cake.

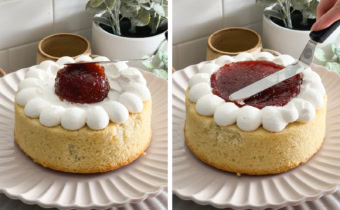
Add strawberry jam - To the middle of the cake, add the strawberry jam. Smooth it into an even layer with an offset spatula without disturbing the whipped cream.

Decorate the top - Place the second cake layer on top. Pipe more dollops of whipped cream on top of the cake. Arrange halved strawberries on top of the cream. Insert a candle in the middle.
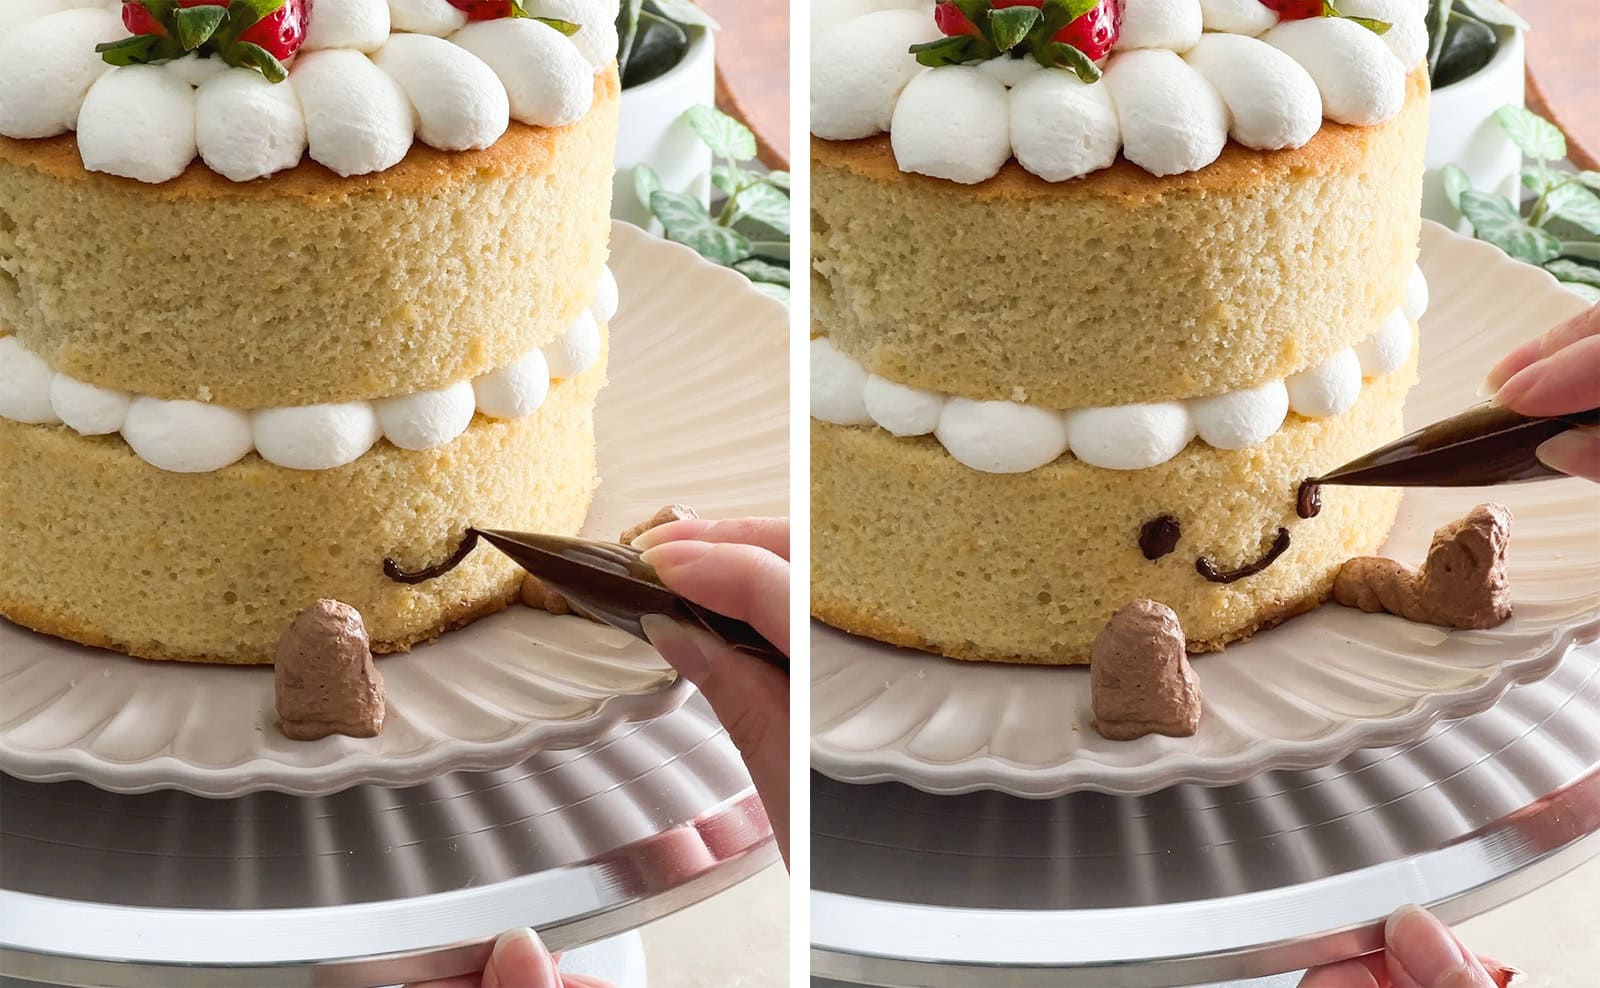
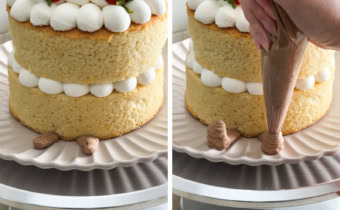
Pipe legs - With the brown whipped cream, pipe little legs on top of the plate, extending out from the bottom cake layer.

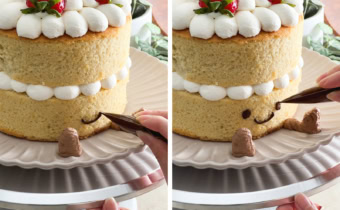
Draw the face - Melt the chopped dark chocolate in the microwave or on the stovetop, transfer the melted chocolate to a small piping bag, and snip the tip off. Pipe eyes and a smile on the bottom cake layer in between the legs.
Storage
This jellycat birthday cake can be stored in an airtight container in the fridge for up to 3 days. Bring it back to room temperature before serving.
Freezing
Leftovers can be placed in an airtight container or wrapped well in plastic wrap and frozen for up to 1 month.
Thaw in the fridge overnight or at room temperature for a few hours.
Frequently asked questions
To make this an 8" cake, double the recipe. The exact conversion is 1.78x but I would recommend just multiplying the ingredients by 2 to avoid weird decimals.
Baking by weight is much more accurate than volume. When using US standard cups, ingredients like flour and sugar can easily be overpacked into the cup causing you to add too much of certain ingredients. Recipes with weight measurements are also easier to scale to smaller or bigger batches without dealing with weird fractions. To measure by weight, you simply need a kitchen scale which you can usually pick up for less than $20.
Small measurements are given in tablespoons and teaspoons because most kitchen scales are not accurate under about 10g. Tiny amounts like a ¼ teaspoon may not register accurately unless you have a drug scale. Mixing these measurements is a common practice among other recipe sites and commercial kitchens.
More cake recipes to try
- Raspberry Pistachio Cake
- Strawberry Chocolate Cake
- Soot Sprite Cake
- Harry Potter's Birthday Cake
- Peaches and Cream Cake
Recipe

Jellycat Birthday Cake
Equipment
Ingredients
Cake Layers
- 225 g all-purpose flour
- 1 ½ teaspoons baking powder
- ½ teaspoon salt
- 3 large eggs, room temperature
- 225 g granulated sugar
- 85 g unsalted butter
- 190 g milk, dairy or non-dairy
- 2 tablespoons oil
- 1 ½ teaspoons vanilla extract
Filling
- 300 g whipping cream or heavy cream, cold
- 30 g powdered sugar
- 1 teaspoon vanilla extract
- 1-2 teaspoons cocoa powder
- 4 tablespoons strawberry jam, store-bought or homemade
Decoration
- 2-3 fresh strawberries, halved
- 1 birthday candle, with white and red stripes if possible
- 20 g dark chocolate, roughly chopped
Instructions
Cake Layers
- Prep: Preheat oven to 350°F. Line two 6" round cake pans with a round of parchment paper on the bottom of each pan. Set aside.
- Dry mixture: In a small bowl, stir together flour, baking powder, and salt. Set aside.

- Hot milk mixture: In a small pot or microwave-safe bowl, add the butter, milk, oil, and vanilla extract. Heat it on the stovetop or in the microwave until the butter has melted. Don't let it boil. Remove it from the heat and cover to keep it warm while you start making the batter.
- Beat eggs and sugar: In a large mixing bowl, add the eggs and sugar. Use an electric hand mixer fitted with a whisk attachment to beat the mixture for a full 6 minutes at medium speed or until the mixture has tripled in size and becomes very pale (almost white) in colour.
- Combine dry and wet mixtures: Add half of the flour mixture and mix on low speed until just barely combined. Add the rest of the flour and mix until mostly combined. Some flour patches are fine because you'll continue mixing some more in the next step and we don't want to overmix.
- Add hot milk mixture: With the mixer on low speed, slowly stream in the hot milk mixture until you have a smooth and fluid batter.
- Fill pans: Divide the batter into your lined cake pans until about halfway full.
- Bake: Bake cakes for about 35-40 minutes or until a toothpick inserted in the middle comes out mostly clean with a few crumbs.
- Let cool: Let the cakes cool in the pans for about 15 minutes before running an offset spatula around the edges of the pan. Release the cakes onto a wire rack to cool completely.


Filling
- Whip cream: In a large mixing bowl, add the whipping cream, powdered sugar, and vanilla extract. Use an electric hand mixer fitted with a whisk attachment to beat the cream until it becomes soft peaks. Scoop out a small amount of whipped cream into a small bowl and set aside. Finish beating the cream to firm peaks.
- Chocolate whipped cream: To the portion of cream you scooped out, add the cocoa powder and mix until the cream is tinted brown. Transfer this cream to a small piping bag and snip off the tip. Set aside.
- Fill piping bags: Transfer both the whipped cream and the chocolate whipped cream to separate piping bags and cut the tips off.
Assemble and decorate the cake
- Pipe cream: On a large serving plate or cake board, place down the first cake layer. Pipe dollops of whipped cream along the edge of the cake, ending towards the middle of the cake. Use a spatula to smear the tail ends of the dollops towards the middle of the cake.
- Add strawberry jam: To the middle of the cake, add the strawberry jam. Smooth it into an even layer with an offset spatula without disturbing the whipped cream.
- Decorate the top: Place the second cake layer on top. Pipe more dollops of whipped cream on top of the cake. Arrange halved strawberries on top of the cream. Insert a candle in the middle.
- Pipe legs: With the brown whipped cream, pipe little legs on top of the plate, extending out from the bottom cake layer.
- Draw the face: Melt the chopped dark chocolate in the microwave or on the stovetop, transfer the melted chocolate to a small piping bag, and snip the tip off. Pipe eyes and a smile on the bottom cake layer in between the legs.


Claire says
I really love the recipe and I really liked how the cake was so accurate to the real plushie !
Danni Cooper-Evans says
Followed the recipe exactly and it came out beautifully. As others have mentioned I did have to gently shave the sides to achieve the look as they were pretty golden. But otherwise it came out just like the picture, super proud of it and my mum was so happy with her birthday cake!
Maya says
This cake was a huge success in my daughter's birthday party yesterday.
I recommend reading the comments here as they were very helpful, especially the one about adding the milk mix to the batter while it's very hot.
I needed the cake to feed more than 20 ppl so I used two 9" pans and doubled the recipe amount. The cake was very thin, in hindsight I should have tripled the amount for 9" pans but it was still great.
I replaced the cream with Ermina icing (https://www.recipetineats.com/fluffy-vanilla-frosting/#recipe) as we were celebrating outside on a warm day and cream would have been much too soft for us. I needed two batches of that icing.
For the legs, we used chocolate twisties, it still looked super cute.
And everyone raved how yummy the cake was.
Linda says
Hi I am hoping to make Jelly cat cake for my grandaughter. I only have 7 inch cake tins. What amount of mixture would I use please
Linda
Anonymous says
So cute!
Deborah L Roche says
Hi what size piping tip did you use? Thank you!
Disappointed says
Very disappointing. Prepared mixture according to recipe, 30 minutes is absolutely not long enough to bake this cake! Even after 40 minutes the cake was completely raw in the middle! Bakers beware that this cake will need at least 50-60 minutes in the oven
May says
My cake definitely didn’t come out like the picture lol. The sides were too dark, maybe I baked it for too long? I baked it for 40 minutes so I’m not sure what the problem was. Also, I used the same size cake pans as you and filled them halfway, but my cakes were not as thick as yours. Making the legs was really hard for me, it wouldn’t stay upright. At the end, it was really yummy but the decoration turned out really bad because my cake was too dark and too short.
Claire says
I love this cake! I made this for my daughter (using buttercream rather than whipped cream). It looked great and tasted delicious. I had to ‘shave’ the sides using a small serrated knife in order to get it to look like the photo.
Sharon Leese says
Made this cake twice this week, second time the sponge was much better. It's a delicious cake! Could the recipe be used for cupcakes?
Simone says
I just made this cake. It was yum and recipe accurate. I re-read every step and the comments. Here are a few things that might help: add eggs then spoonfuls of sugar (not all in at one go). Also room temp eggs are 20 degrees which is good to know. Bake the cake one day then decorate it the next day. The rest of the cake is straight forward. Please note that one thing I would change is putting baking paper on the sides if the cake pan - it might help get that creamer colour than mine which was golden and the therefore didn't look the same as the jellycat. Also the hardest bits were the face and legs. Getting them to look right is important but tricky. Good luck everyone!
Leanne says
This recipe was so easy and fun to make! It tasted really good and turned out soo cute!!
Jacqueline O'Connor says
If I were to have four four-inch pans, how long would the cooking time be?
Strawberry says
I saw this on Pinterest and have been searching for the recipe since I am going to use it for my birthday party and can I double it and put it in an 8” pan ? Because 8 slices is not gonna last with nearly 26/25 people pls respond
Gail Ng says
Yes, you can!
Beth says
I tried this, but the cake didn't rise for me 🙁 tasted delicious but very flat - any ideas why?
Taylor says
If I bake the cake in 3" deep cake pans, will it turn out okay?
Sigma Sigma says
Gorgalistic! Gorgwonderful! Gorgtastic! Three sigmas made this and it was absolutely splendid. Very cute. Gained infinite aura.
Emily says
The cake is delicious! I used GF flour and found that I had to over-mix the batter and do a double batch for the cake layers to be tall as I wanted. I used a 6" pan with about a 3" wall for reference.
Emily Corrigan says
This is beautiful! I have a quick question which I’d be so grateful if you could answer.
How do you shave the sides to get the naked look without ruining the perfect circular shape?
I got my first (and only) Jellycat when I was about 8, once I had children I passed on my love to them. My twins are turning 13 this summer and would love this cake. I’m going to try my best to recreate it with your helpful guide
Gail Ng says
Hi! I didn't shave the sides of the cake - they just came out of the pan like that. I hope the recipe turns out well for you!
Emily Mitchell says
How do you keep the weight of the top layer from squishing the whipped cream in the middle?
Ada says
I think the whipped cream dollops will be kinda squeezed out from the sides when the top layer is placed on top. And hopefully it just looks okay anyway. I’m going to try this so wish me luck!
Michelle says
Can you freeze cakes before decorating?
Gail Ng says
Yes you can. Just wrap them well in plastic wrap/foil to prevent them from drying out.
BecomingTia.com says
This is so cute! Your recipes and website branding is adorable. I love it.
Kiki says
I'm making this for my daughter's 1st birthday! Just wondering if the cakes are something I can bake in advance, freeze, then thaw the night before? Or would this mess up the texture/taste at all?
Thank you in advance!
heather says
Hi there! I'm planning to make this cake soon but was wondering if I could bake the cake layers ahead of time and freeze it overnight (just cake no cream on it yet) before assembling everything together the next day? Would that change the taste or texture at all? Thank you in advance!
Amelia says
The recipe is great, however I added more than 3g of powdered sugar to the Whipped cream frosting as I thought It needed more sweetness, other than that it tasted great!!
Cherry says
Hello, May I know the ingredients of cake layer (225g all purpose flour) can make one 6” round pan cake or two 6” round pan cake? Thank you
Noor says
It’s so cute
Carina Teed says
What type of oil do you use for this recipe please?
Florie says
so lovely, the cake was very soft and sweetly delicious!
Susi M says
Hi Gail, I will be making this for my daughter’s birthday next week and need to know how long the 8” round will take to cook? Your helpful tool doubles the quantities but doesn’t change the cooking time.
Elle says
Can you substitute cake flour for a more tender/lighter crumb? If so, would you add a bit more than 225g because of the different flour densities?
Patricia says
What depth are your 6” pans for the jellycat cake - normal or deep?
Gail Ng says
My pans are 2" tall - normal height!
Anonymous says
To all those making this - make sure the butter mixture is hot when you add it. Fully whip the cream mix.
You will need to shave off the cake crumb so get the naked cake look - I didn't do it as out of time!
It's tall, but fab! Thanks!
Julia says
I would like to try this recipe for my birthday but I was wondering if you could switch whipped cream for buttercream?
Gail Ng says
Yes of course you can!
Charlotte Eland says
this is so cute and will definitely try the recipe it is so organised and well done.
Sarah says
Perfect recipe! Cake rose well and was soft and sweet and spongy and icing was perfectly sweet and not overpowering! Love this recipe would 100% recommend!
Hayley says
What a nightmare my sponge didn’t rise as above and I followed the step’s, what might have gone wrong?
Hebe says
Me too and I am not sure why?!
Anonymous says
Me neither! Any ideas?!
Anonymous says
this video was much more helpful - seems that the milk has to be HOT and folded in with a spatula https://www.youtube.com/watch?v=OUBQih01SHc
Rebecca says
My whipped cream was so soft and just oozed out the sides when I put the top of the cake on. Any idea what happened? I ended up having to just cover the entire thing in cream 🙁
Gail Ng says
Sounds like you just needed to whip the cream more! It stiffens up the more you whip it - just stop before it becomes grainy.
Anonymous says
I was so excited about this cake for my daughter’s 11th birthday! I would’ve loved to learn how to shave the sides of the cake, as mine was darker and I tried using a serrated knife but it was crumbling everywhere. The ‘dallop’ of strawberry jam needs to be small, and the whipped cream needs to be cold and beat until just before it gets grainy and even then, you better be fast because it is soft obviously. I would make this again with butter cream instead. The melted chocolate for the face was a drippy mess so I had to make a face on waxed paper and put it in the freezer and stick in onto the cake with a little frosting for glue. Right after I took a photo the top fell off of my cake! I put it back on and used skewers to hold it all together and put it in the fridge. The back is ruined but hopefully it tastes good and thank the Lord the front is not ruined. Tips: use buttercream for all frosting including the face.
Jodie says
Please can I ask what size nozzle you used for piping? Thank you
Gail Ng says
I used a Wilton 6B 🙂
Anonymous says
Are you sure that the nozzle is 6B it looks different than the one you used for the cake
Amy says
I assume you need to trim the outer edge to get the naked cake look. How do you do that? I thought my cake was over baked but then realized I wasn’t going to get the look I wanted without trimming. The cake tasted great!
Jackie says
Hi, my daughter wants me to make this lovely cake tomorrow for her birthday party, but is it 2” or 3” deep pans? Thanks
Gail Ng says
Hi! My pans are 2" deep.
Sophia says
This is so cute and delicious!
Zoeya says
About how tall would this cake be? I'm looking to put it in a cake box and was wondering the correct size to buy.
Liz says
Did you find this out? I'm wondering the same
Nicola Keys says
Would this be okay made the night before needed and should I store in the fridge please? Thank you
Gail Ng says
Yes, it would be fine stored in the fridge! Make sure to cover it with a cake container or overturned mixing bowl - it doesn't have frosting on the outside so the cake can dry out if it's not covered in the fridge.
Anonymous says
Hi Gail, thanks for sharing this recipe! Would you know approximately how many grams of batter you put in each cake pan?
Anonymous says
Hi! Is there a way you can convert the recipe to cups?